This guide shows how to automate keeping thousands of email accounts alive.
All the software/tools/extensions/addons I use in this guide are free.
═
══════ 

 ══════
═
Part 1: What the problem is
We all have many email accounts connected to our IG, FB, TW, LI accounts.
We need these emails to stay alive, in case we need to verify the account.
The problem is that if you don’t use an email (login to it, receive emails, send emails), after some time (usually 6-12 months, depending on if it’s gmail, yahoo, etc.) the email account gets shut down and you won’t even know about it until you try to use it. But then it’s too late.
If you only have 1-2 emails, that’s no problem. You just use those emails once every couple of months (login to each account and send an email), and you’re safe.
But if you have hundreds, or thousands, of emails, you need to automate this.
═
══════ 

 ══════
═
Part 2: What’s wrong with the old solution?
More than 2 years ago I wrote this guide, that suggested using Jarvee to keep email accounts alive.
That guide is obsolete, so don’t use it anymore, for 2 reasons:
-
It’s not good enough in keeping the email accounts alive. The current guide shows a system that works much better.
-
It’s pricey to use it on a large number of accounts, because for each email account you need to add a Jarvee account, and it gets pricey (Jarvee licenses plus VPSs). The current guide shows a system that works totally free, even for thousands of email accounts.
═
══════ 

 ══════
═
Part 3: Thunderbird
Thunderbird is an email client, with some usefull addons, and (as far as I know) has no limit on the number of email accounts you can add to it.
Download Thuderbird (it’s free):
I highly suggest that you get the PORTABLE version of Thuderbird (it’s free):
https://portableapps.com/apps/internet/thunderbird_portable
This way, by using the PORTABLE version, you will be able to move it from your pc/laptop to a vps, by just copying a folder,
without the need to install/configure everything again.
═
══════ 

 ══════
═
Part 4: Add email accounts
Now lets add an email account.
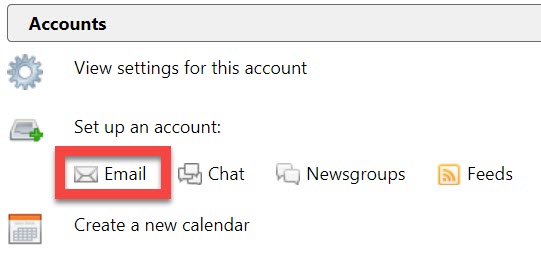
Click email on this screen:
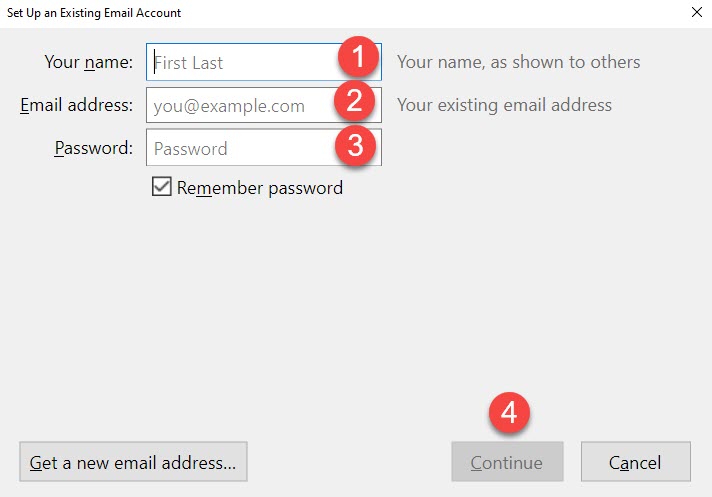
And now fill 1, 2, 3 and click on 4:
-
This is the name people will see, so if the email is example@gmail.com I usually put example here.
-
you email, i.e. example@gmail.com
-
your password
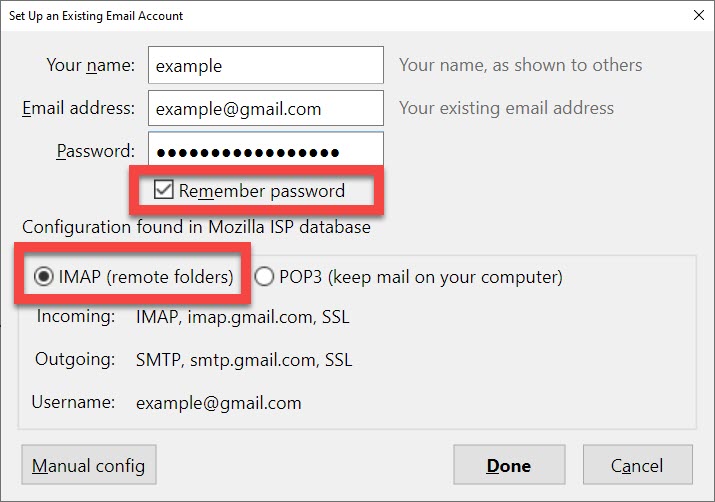
Now make sure that remember password is ticked
And make sure IMAP is ticked, and not POP3
This means (I’m simplifying here) that all the emails will stay on the server (i.e. on gmail’s servers) and will NOT be downloaded to your computer/vps. This will make sure that the Thunderbird folder remains small, and doesn’t grow to tens/hundreds of GB even if you have thousands of email accounts.
And now you can click done.
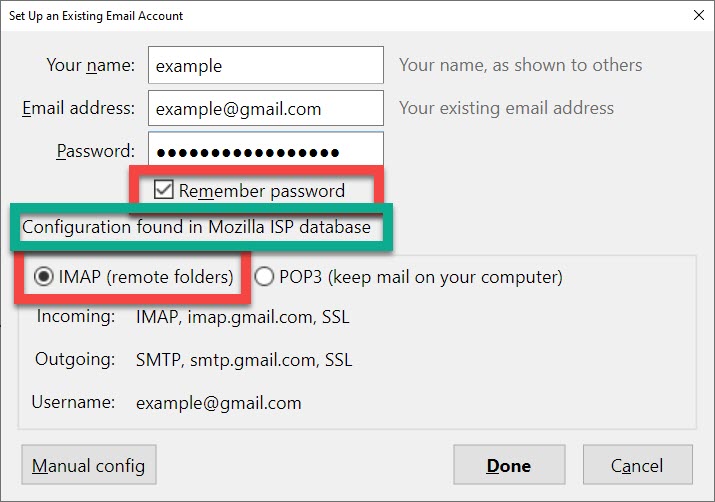
For most emails (gmail, yahoo, etc.) this will take a few seconds, because Thunderbird does the setup for us (see the green rectangle here):
If for some reason you have an email account that Thunderbird does not know how to setup automatically (this will be very rare), just google it and you’ll find how to do it, and then you can use the manual config option.
So we added 1 email account.
Now do this (part 4) again for each email account you have.
═
══════ 

 ══════
═
Part 5: Don’t let them know your IP/location
Now we want to make sure that when I open an email (with text and/or attachments and/or pictures), the sender will NOT get a notification that I opened the email (and will not get the location and/or IP the email was opened from).
The reason for this: If I have 1,000 IG accounts connected to 1,000 gmail accounts, I don’t want IG to see that I opened the emails from them, because it will show them that all these 1,000 accounts are on the same IP and/or same location (either my home IP or my VPS IP).
Thuderbird does some of this as default:
Email messages can contain remote content such as images or stylesheets. To protect your privacy, Thunderbird does not load remote content automatically, but instead shows a notification bar to indicate that it blocked remote content.
https://support.mozilla.org/en-US/kb/remote-content-in-messages
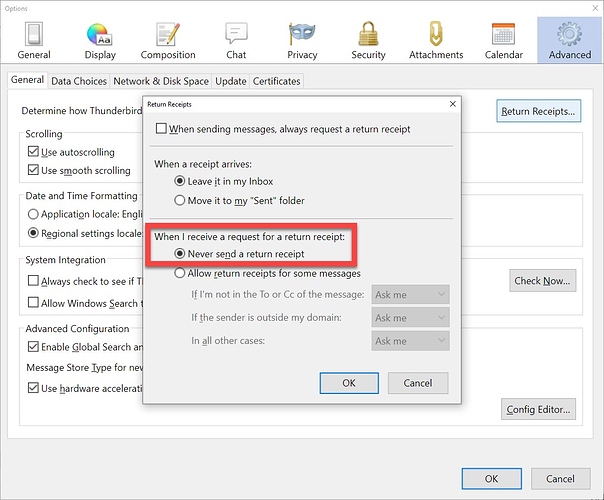
And to be safe, we will also add this option to turn off return receipts.
Go to Tools —> Options —> Advanced —> General --> Return Receipts
and choose Never Send a return receipt.
═
══════ 

 ══════
═
Part 6: Addons
Make sure you have these addonds installed.
If you don’t see some of them, just install them (get add-ons). They’re all free.
═
══════ 

 ══════
═
Part 7: No junk filtering
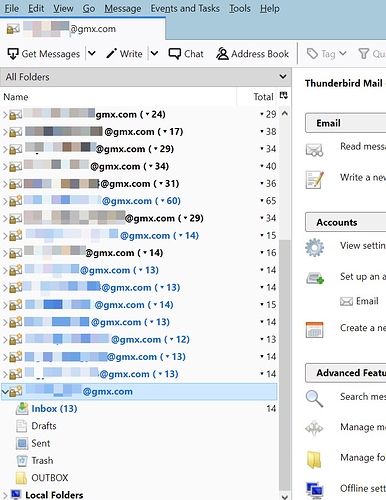
At this stage, your left pane should be full of email accounts.
And for each email account, you can click on it (on the > arrow) and see its sub-folders (inbox, drafts, etc.)
Now we want to make sure that ALL emails go to our inbox, and none go to the junk/spam folder.
This will help us find emails quickly.
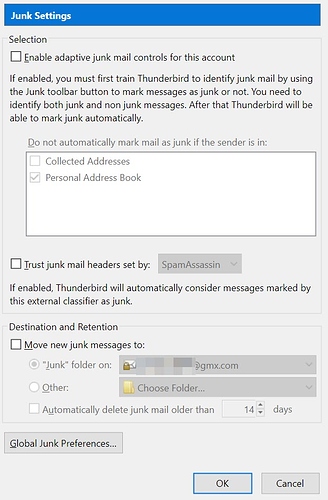
Right click on the account name, choose settings, and choose junk settings.
Disable the option “enable adaptive junk mail controls for this account”, and click ok.
═
══════ 

 ══════
═
Part 8: Schedule emails
I highly suggest that you first add all your email accounts to Thunderbird,
and then do this part,
as it will be much quicker (just a few seconds) to do this for many accounts one after the other,
as it will mostly be copy-paste,
and the scheduler will let us repeat our last schedule with one click.
Do this for each one of your email accounts:
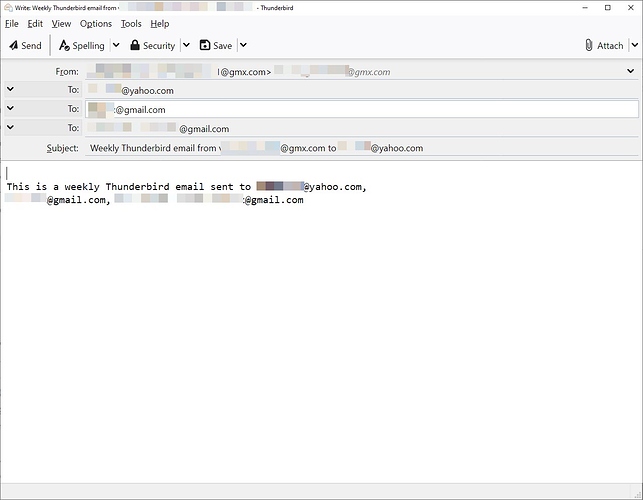
Open a new email,
in the “to” field, enter one of your emails (i.e. your real gmail).
In the screenshot you will see that I added 3 different emails,
because I want to make sure that over the next years even if the first email address stops working,
the other 2 will still work and will receive this email.
In the subject field and in the email itself you can write anything.
In the screenshot you will see that I write some info that will help me remember who sent this email and for what purpose.
Now instead of clicking send, choose file —> send later
this will open the scheduler window.
Choose a day of the week and hour.
I suggest that all your emails will use the same day/time, as it’s easier for you to keep an eye on them.
DON’T think that since your email will stay active for 6-12 months, you only need to schedule an email once every 6 months.
No!!!
Something will go wrong (Murphy’s law), and it’s much safer to make sure the email is sent once a week.
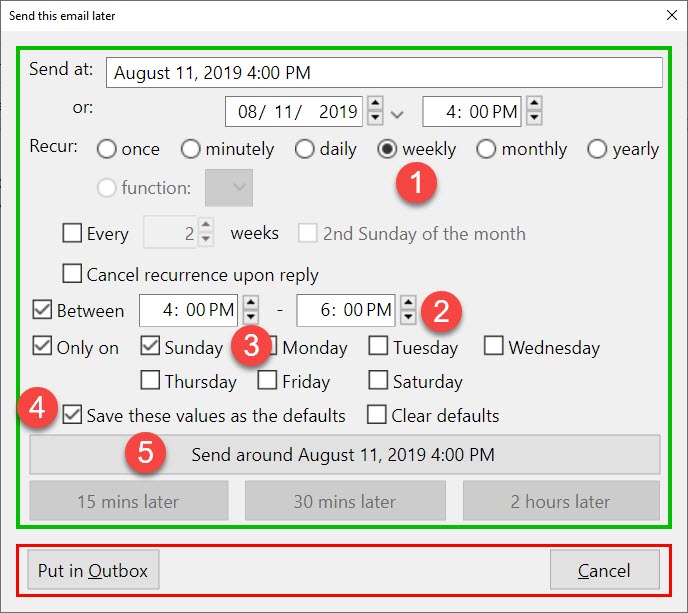
Do the 5 steps in this screenshot (DON’T pay attention to the red rectangle and green rectangle in this specific screenshot):
-
Once a week
-
Hour
-
Day of week
-
Save this as default (so if you have 1,000 emails to set, this will only take seconds for each one)
-
Click this when you’re done
═
══════ 

 ══════
═
Part 9: Now what?
We finished setting everything up.
Now click on the minimize button and Thuderbird will be minimized to the system tray (if it doesn’t, go back to part 6).
Thunderbird will be running in the background, so make sure that when you boot up your pc/laptop/vps - you get it running.
It takes almost no cpu and no ram to keep it running.
If you try to exit it, it will warn you that the scheduled emails will not work unless it’s running.
That’s it.
Now, once a week (in my example: every Sunday at 4pm) I will get all these emails to my main gmail account.
I keep an eye on these to make sure they arrive.
If they don’t arrive - something is wrong with your settings.
If they do arrive - make sure none are missing (i.e. if you have 157 email accounts, just count that you got 157 emails on Sunday at 4pm)…
If an account goes bad, either Thunderbird will give you a login message for that account, or you will not receive your weekly email for it, and you should check what happened.
═
══════ 

 ══════
═
Part 10: Same IP?
If you have many email accounts, you might be worried that it’s not safe to run all of them on the same IP.
For example, if you have 300 Instagram accounts connected to 300 gmail accounts, and they’re all connected on Thunderbird running on you laptop/pc/vps, then Instagram won’t know that they’re all on the same IP (we took care of hiding that in part 5), but gmail will know that they’re all on the same IP and might not like that (a regular user might have 1, 2, maybe 5 gmail accounts for his family on the same IP, but 300 looks fishy).
What can you do?
I have 2 suggestions:
-
Set up Thuderbird with all the instructions in this guide, to save yourself some work, and then copy the Thuderbird folder (since it’s a portable program) and move it to a couple of VPSs that you have, so you can divide the email accounts across different IP addresses that the different VPSs have.
After you copy the folder, all the settings are ready, so all you need to do is just add the email accounts you want to run on that vps (using the vps’s IP). -
You can set up a proxy on Thuderbird.
The problem is that you can’t set a different proxy for each email account, but rather set a global proxy.
So you need to have multiple instances of Thuderbird, each one of them with a different proxy, and each one of the instances will have some of your email accounts on it (obviously not 1 account, since it would be crazy to run hundreds of instances of Thuderbird).
Make sure you are using the portable Thuderbird, as the regular (installed) version of Thuderbird can’t run in multiple instances.
So which one should you use, 1 or 2?
I say use both.
That way, on each vps you will have several instances of Thuderbird running, each one of them with a different IP.
Here is an example, assuming that you feel same running 20 email accounts on the same IP (or change that number to whatever number feels safe to you):
VPS #1, Thunderbird portable #1, proxy #1: email accounts #01 to #20
VPS #1, Thunderbird portable #2, proxy #2: email accounts #21 to #40
VPS #1, Thunderbird portable #3, proxy #3: email accounts #41 to #60
VPS #1, Thunderbird portable #4, proxy #4: email accounts #61 to #80
VPS #1, Thunderbird portable #5, proxy #5: email accounts #81 to #100
VPS #2, Thunderbird portable #1, proxy #6: email accounts #101 to #120
VPS #2, Thunderbird portable #2, proxy #7: email accounts #121 to #140
VPS #2, Thunderbird portable #3, proxy #8: email accounts #141 to #160
VPS #2, Thunderbird portable #4, proxy #9: email accounts #161 to #180
VPS #2, Thunderbird portable #5, proxy #10: email accounts #181 to #200
VPS #3, Thunderbird portable #1, proxy #11: email accounts #201 to #220
VPS #3, Thunderbird portable #2, proxy #12: email accounts #221 to #240
VPS #3, Thunderbird portable #3, proxy #13: email accounts #241 to #260
VPS #3, Thunderbird portable #4, proxy #14: email accounts #261 to #280
VPS #3, Thunderbird portable #5, proxy #15: email accounts #281 to #300
That’s it.



 will try, thx!