I hope you guys are doing good. I just wanted to share this with you.
I’ve been here for almost 4 years now, and it is time for me to give back to this amazing community.
My story short
I’m not a big player. But, before Instagram (almost) killed automation back in 2019, I’ve been making $5K a month.
Like most of us here do, I started my own Instagram growth service and started going after clients.
I mainly used cold emails to find clients (Apart from the ones I found on Upwork).
I started sending cold emails with the help of Elastic Email’s SMTP servers and Atomic Email Sender.
For a few days, it worked well, and all of a sudden Elastic Email suspended my subscription. That’s (I think) because of lots of spams + Unsubscriptions
I know such cold emails still work. But, for me, it didn’t!
So, I started using Yet Another Mail Merge (YAMM) with Gmail. (This was back in 2018 as I remember)
Scraping Emails and other info
I used my favorite automation software to scrape Instagram usernames, Followers, Following, and, most importantly, their emails.
And I configured YAMM to work with Gmail.
You can try different other ways to find emails. You could use a VA to find them for you as well. But, I see it is always economical to scrape emails and some other information.
A sample message
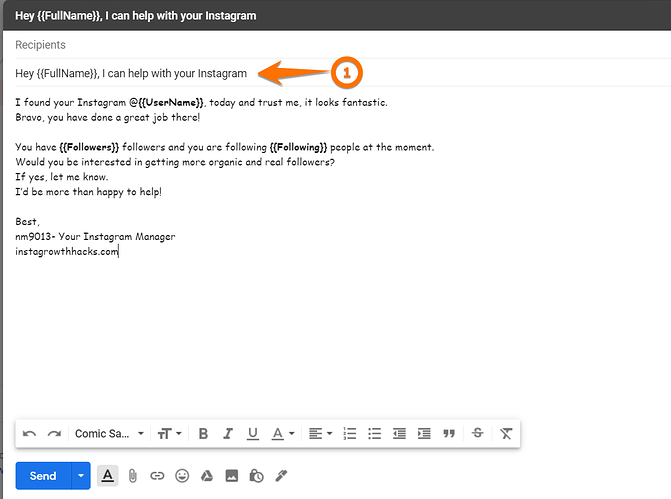
I was sending a message similar to this. (And I have modified this workflow a bit. So read on) and it worked for me.
Subject
Hey {{FullName}}, I can help with your Instagram
Message Body
I found your Instagram @{{UserName}}, today and trust me, it looks fantastic.
Bravo, you have done a great job there!
You have {{Followers}} followers and you are following {{Following}} people at the moment.
Would you be interested in getting more organic and real followers?
If yes, let me know.
I’d be more than happy to help!
I know it is a simple message, and that really worked for me.
Let’s configure YAMM
If you are not familiar with YAMM and what are those curly brackets are, let me help you with configuring an email to work with YAMM.
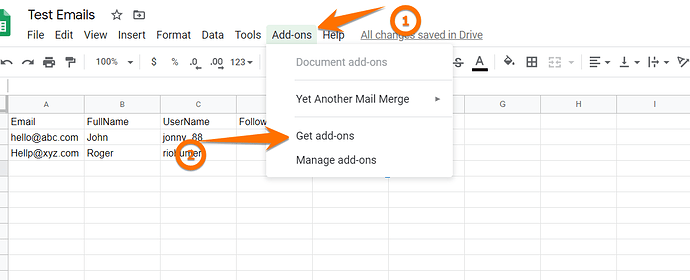
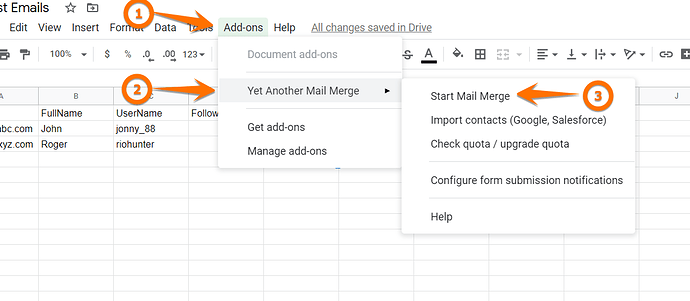
First, you need to sign in to your Gmail (Which you are going to use) and Go to ‘Drive.’ Once you are in your Google Drive, open a new Google Spreadsheet. Then go to Add-ons> Get Add-ons.
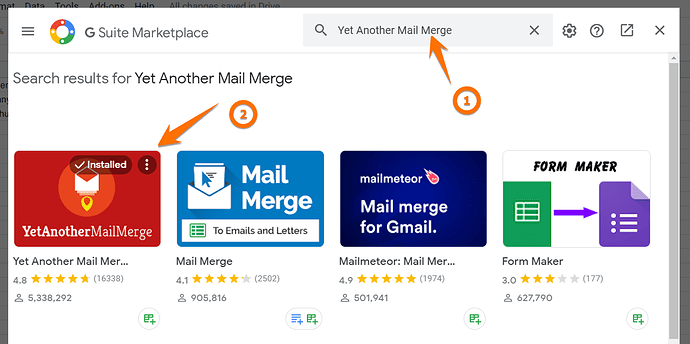
In the pop-up window, search for Yet Another Mail Merge. And Install YAMM
YAMM sends emails to email addresses we already placed in a Google spreadsheet. That is why we have to work with Google Spreadsheets.
Once YAMM Installed, I highly recommend you buy a license. That will cost you just $20/year. Trust me, it worth the money!
Let’s draft an email first
The first thing you should do is draft an email. Once prepared, keep it as it is. NEVER DELETE it. Because this draft will send out as many as the time we run YAMM.
As you can see, when drafting the email, you have to make sure the fields you want to customize/Personalised should be in curly brackets.
Because YAMM is going to replace these curly brackets with respective fields from the Google spreadsheet we use.
Let’s configure the spreadsheet
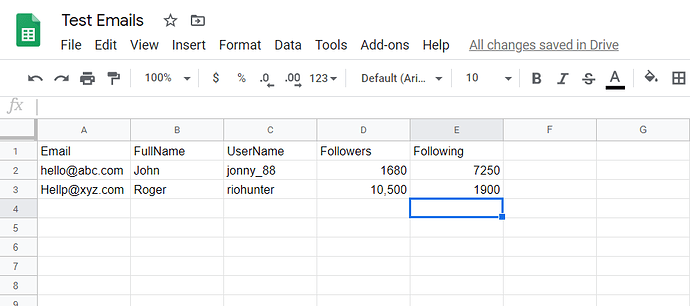
Check the heading and how I named each column.
All these columns represent the information that I need to add to my email. Compare them with the curly brackets in the draft.
The sky is never the limit. You can add as much as headings and information to make your email more appealing and give it a more personalized approach.
NOTE: When naming headings, never use spaces.
That’s it. You can start sending emails using YAMM now.
This is what you have to do.
And YAMM allows you to customize the sender’s name, Track emails, ad Unsubscribe links, etc
You can configure everything.
Make sure to select the correct draft to use with every email campaign from the dropdown. If you choose the wrong draft, the wrong message will be sent out. If you have a couple of drafts, this is not a big deal.
But, when you have several drafts, you better keep an eye on which draft you select.
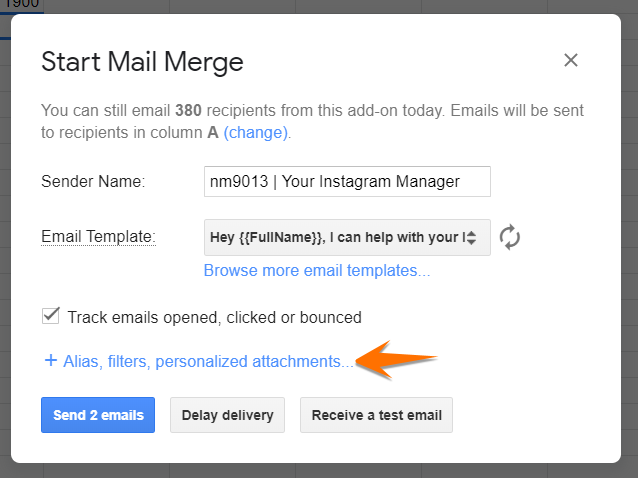
Adding the Unsubscribe link is essential and easy. And even you can change ‘reply to’ address. I usually change the reply-to address to a custom domain/mailbox. So, if someone responded, my response will be sent from my business domain.
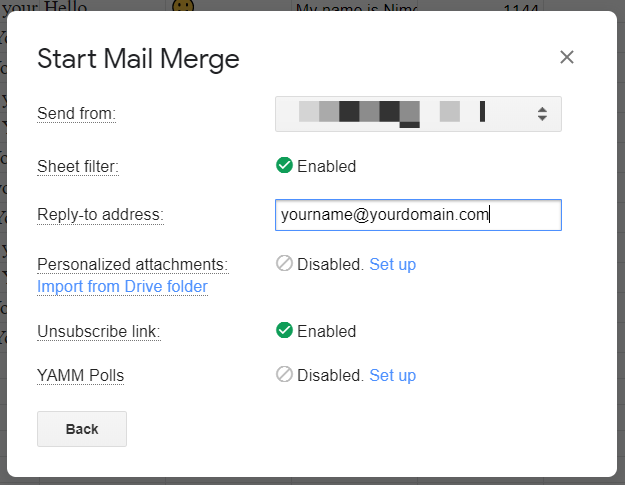
Once everything is okay, you can start sending the emails.
NOTE: If you need to be certain on the structure of the email, you can always click on ‘Receive a Test Email’ first. I always do this to make sure email is configured to my preferences.
As I told you, I have made some changes to this workflow. But, I should remind you that the exact method and a similar email helped me find clients.
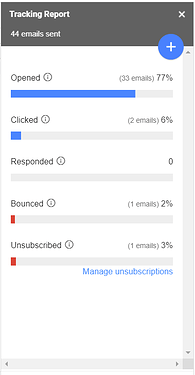
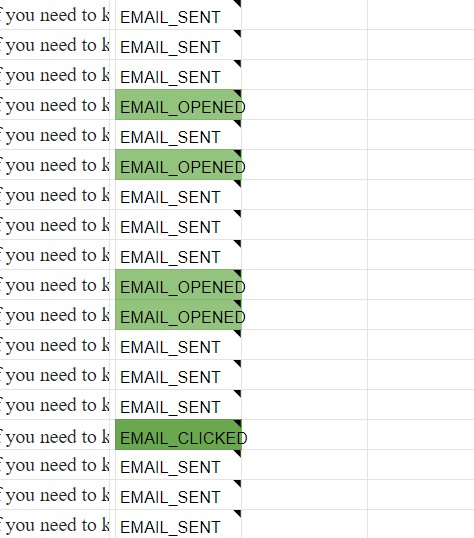
Importantly, the open rate was higher as well. I don’t have previous info. This is what I got from a campaign I sent yesterday
I know it is less than 50 emails sent. I’m just warming up my Gmail. And the open rate was almost 80%.
Modified workflow
I always wanted to make sure I’m sending unique emails as much as possible. So I needed to add variations to the message I send. To do so, Spintax was in my mind.
For those who don’t know what is Spintax is and how to write one, I highly recommend you read this article by @benny . Thank You for writing this extremely helpful article. It helped me a lot.
I found that we can implement Spintax on Google Spreadsheets. I found this information from this article. It wasn’t really about using Spintax on YAMM. I put my imagination to it and come up with the idea 

Implementing Spintax on Google Spreadsheet
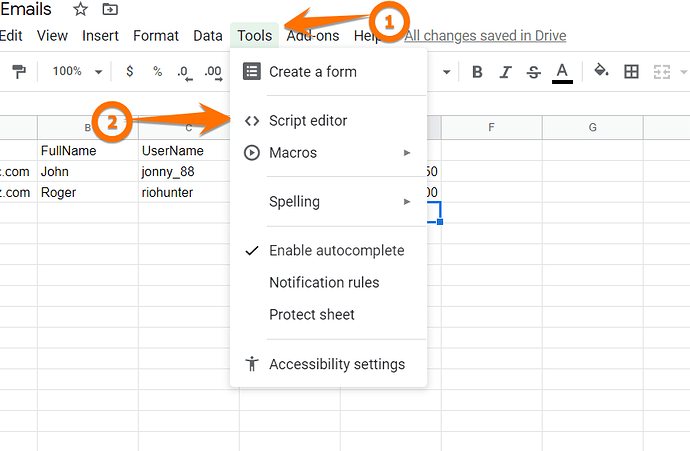
Implementing Spintax on Google Spreadsheet is easy. All you have to do is copy the following Js and paste it in ‘Script Editor’. (Thanks to the person who wrote the guide in the first place.)
Here the Js
// @param   -- spintax. Required. String. A string of text marked up with spintax.
// @example -- run_spintax("{What is|what's} the deal with {airline food|the food they give you on airplanes}?")
function run_spintax(spintax) {

  // Define a variable to store a REGEX that will match all spintax instances
  var regex = new RegExp(/{([^{}]+?)}/);

  // Loop through all spintax instances
  while((to_spin = regex.exec(spintax)) !== null) {
    // Break the current spintax match from a string into an array split on the pipe character
    opts = to_spin[1].split("|");

    // Get a random option from the spintax options
    random = Math.floor(Math.random() * opts.length);

    // Replace the full spintax string with the chosen option
    spintax = spintax.replace(to_spin[0], opts[random]);
  }

  return spintax;
}
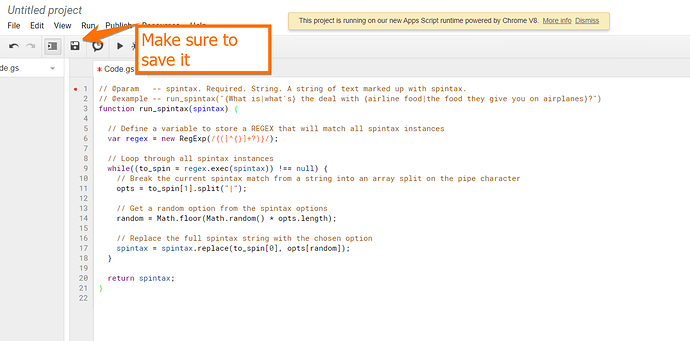
And this is how you paste it in Script Editor
Once the script is placed, make sure to save it before exiting from the script editor.
Okay then, you just implemented Spintax on Google Spreadsheet.
Now time to try Spintaxing your message.
Time to write a Spintax
Let’s use the same message.
Subject
{Hi|Hello|Hola|Hey there|Hello there|Hey} {{FullName}}, I can help with your {Insta|Instagram} { |:ok_hand:|:wave:|:raised_hand_with_fingers_splayed:|:blush:|:smile:|:innocent:|:slightly_smiling_face:}
Message Body
I found your Instagram @{{UserName}}, today and trust me, it looks {Fantastic|Amazing|Awesome|awesome|Cool  |cool:sunglasses:|Cool|fantastic}.
Bravo, you have done a {GREAT|great|Good|good} job there!
You have {{Followers}} followers and you are following {{Following}} people at the moment.
Would you be interested in getting more organic and real followers?
If yes, let me know.
I’d be more than happy to help!
I made a few changes to the above message and I used simple Spintax. I’m not sure whether nested Spintax works on Google Spreadsheet or not. You can try them out.
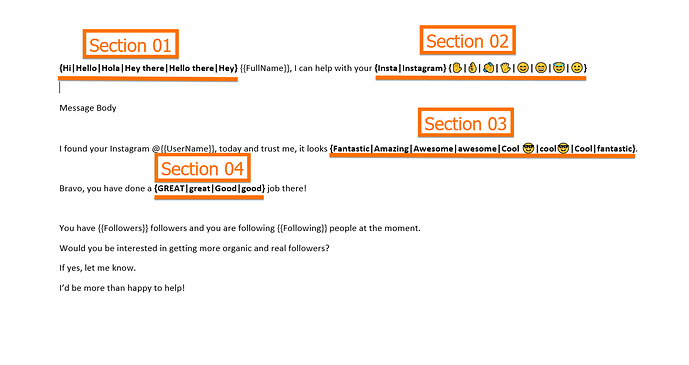
For your convenience, please take a look at the image below.
As you can see, I’ve divided the message into 4 sections. Each section has its own Spintax. A simple one.
I’m going to name each section. You’ll see why. Read on!
Section 01= {{Hey}}
Section 02= {{Instagram}}
Section 03= {{Appreciate}}
Section 04={{great}}
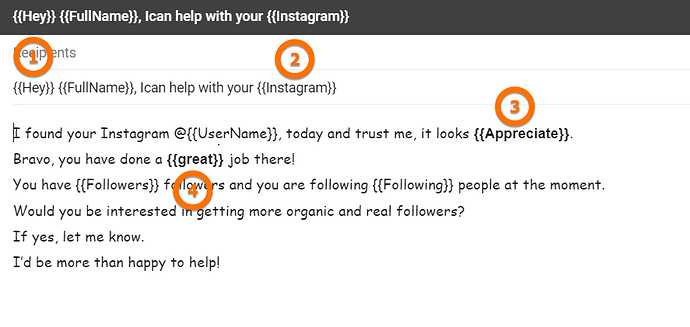
Write another draft
Let’s write another draft, and it will explain to you why I named those sections.
As you can see, I have replaced all 4 sections with their assigned names ({{Hey}},{{Instagram}},{{Appreciate}} and {{great}})
Let’s configure Google Spreadsheet again
As now we have 4 different sections, we should add these to the Google Spreadsheet.
Each section represents a new column in the Google Spreadsheet, and each column should be named accordingly.
See below
I think it is self-explanatory. Right?
Let’s Spintax
Now we know that newly added sections can be spun.
So, let’s do it.
To do so, you should use the following code
=run_spintax("{Your Spintax Goes here}")
Let me show you.
Let’s try Section 01.
Section 01 is
{Hi|Hello|Hola|Hey there|Hello there|Hey}
So, it should be like this
=run_spintax("{Hi|Hello|Hola|Hey there|Hello there|Hey}")
Section 02
=run_spintax("{Insta|Instagram} {✋|👌|👋|🖐️|😊|😄|😇|🙂}")
Section 03
=run_spintax("{Fantastic|Amazing|Awesome|awesome|Cool 😎|cool😎|Cool|fantastic}")
Section 04
=run_spintax("{GREAT|great|Good|good}")
Now copy and paste all those to appropriate cells
Once you pasted everything, all you have to do is this
If you have 100 emails listed on the spreadsheet, drag it down till the end of 100 emails, and you are ready!
Final Thoughts
-
If you are thinking of sending tens of thousands of emails per day, this might not be the perfect strategy.
-
But of course, you can purchase several YAMM licenses and send emails from multiple Gmail accounts.
-
YAMM is free to use, and free users can send up to 50 emails per day. So I highly recommend you purchase a license. (I’m not affiliated with YAMM in anyways)
-
When you purchase, you can send 400 emails per day.
-
But, I would not send 400 per day. I usually stick with 200 per day.
-
If you don’t have an aged Gmail, create a new Gmail. Subscribe to several newsletters using the newly created Gmail. Let new emails flow in. It is kind of warming up I do if I have to start with a brand new Gmail.
-
Then start sending 20 emails per day for a week at least and start sending 200 per day. This is what I do. But of course, you can test yourself.
Okay, then, that’s all.
I hope this helps and I sincerely hope you will find new clients and make more money from this.
I know there are pro users who might have to know other strategies or have new ideas to make this more meaningful and productive. Comment below and share the knowledge!
