I have been using this method to grow and legitimize slave accounts in the niches I needed.
In order to schedule thousands of posts for as many accounts as you need, you would need three things:
-
Content
-
Captions
-
Hashtags
We will cover each of these separately.
But, before we start, we will need to create a campaign where these posts will be piled. To do this, first create a Destination List where you will add all the accounts that you want to feed with content. After you have created your destination list, go to the Campaigns tool and click Add Campaign. You will create a Standard Campaign as we want different images to post on all of the accounts. Now that the campaign is created we can go over each of the things we’ve mentioned above and when we have all of them done, we will come back to the campaign to set it up and start it.
So, let’s dive into this!
I Content
For this first part, we will use the Repost tool in Jv. However, we will not repost the posts directly on the account, but rather use one account to scrape content and send it to the campaign(s) that publish on all of the slave accounts.
First of all, you would need to do some research and find at least 20 (optimal is 50) accounts in your niche. For simplicity reasons we will say that you have accounts in the Travel niche.
So, you will need to look for travel influencers and/or travel repost pages. If you use Influencers with original content (which I highly suggest), make sure they only post travel content and do not have personal content on their profile.
After you’ve found 20-50 accounts whose content you can use, add them in the Sources tab of the Repost tool, under the Repost Posts of Specific Users option.
Next, go back to the settings tab and set the following settings:
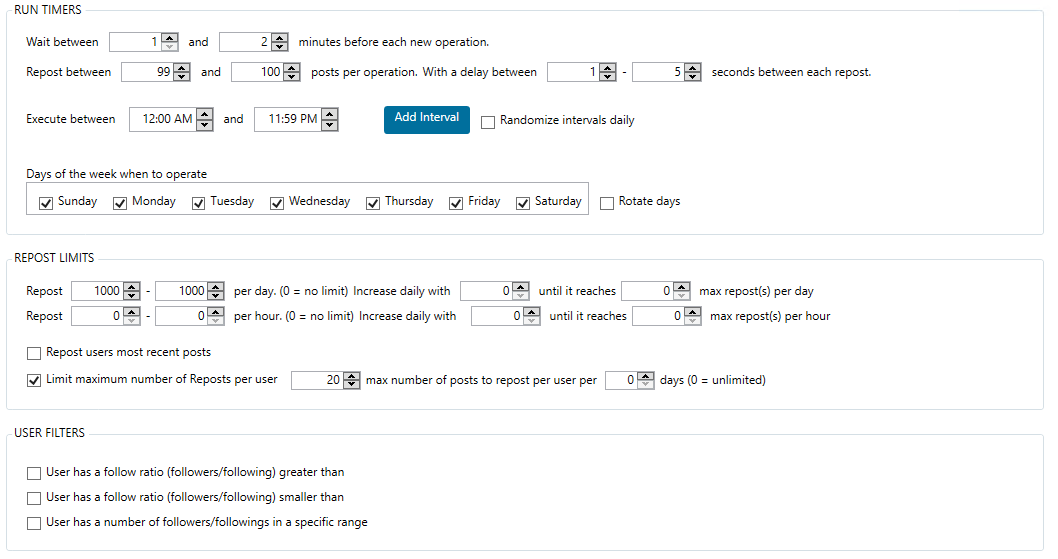
With these settings, you will need to have 50 accounts added as sources, as you will take 20 images from each accounts, totaling 1000 posts in total.
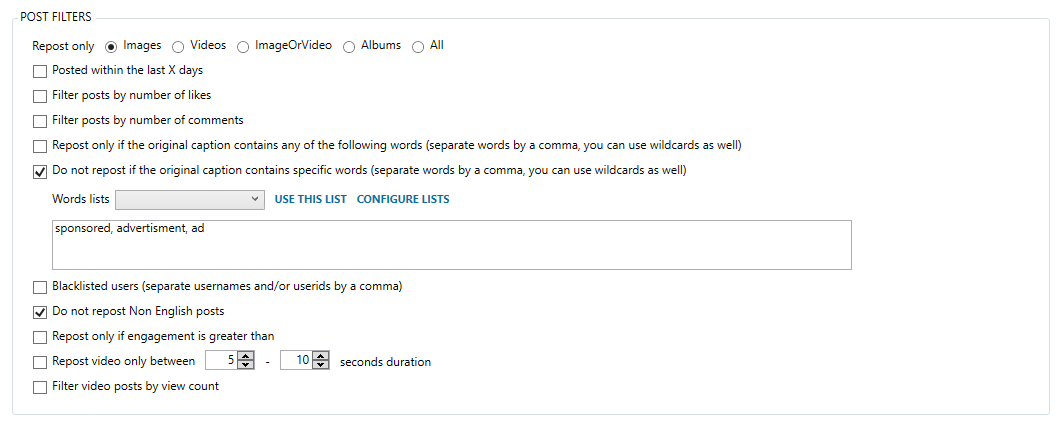
Next, scroll down and check the Post Filters that you think fit best for your needs. I personally, only repost Images and do not repost Non English Posts. Also, check the Do not repost if the original caption contains specific words option and write words that would suggest the post is an ad, such as: ad, advertisement, sponsored . You can also filter the content by the number of likes, and put something like 10,000+ likes which will result in scraping only viral images. If you do this, make sure the accounts you add as sources have posts with 10,000+ likes.
Now, comes the most important part - the Repost Settings. The one and only most important thing you need to do here is to check the Send posts to campaign instead of posting on the wall option. From the dropdown menu select the campaign that you previously created. After that, change the Unique Image Alteration Level to Medium and you are done with the Repost Settings, as well as the part with the content.
II Captions
For this part, we will use the ultimate evergreen cringe weapon - quotes! Here’s how to do it.
Go to google and search Top 100 Travel [write your niche here] Quotes . You will most likely get many links with lists and lists of quotes within any niche that you look for. Open a couple of these links and look the ones that look most decent. Now, open a google (or word) document and start copying them one by one. I usually use between 100-200, but the more the better. After you have them all in your document it is time to put them into a spintax.
Use each of the quotes as a single possible combination of a big spintax. So, for example, if you have 200 quotes, the output of that spintax should be 1 quote. If you don’t know how this works, search for some guides on spintax on this forum.
Now, in order to spice up things a little, we will introduce some modifications that will give us tons of combinations. We will do this by tweaking all of the quotes individually with slight changes by adding/removing some words in the sentence and/or use synonyms where possible. You will, of course, use micro spintax for this.
Basically, we now have a MAJOR SPINTAX comprised of 200 quotes and MICRO SPINTAX each comprised of the different quotes within the major spintax, each with certain modifications.
Let’s illustrate this. Out of the 200 quotes in the MAJOR SPINTAX, one of them is:
A journey is best measured in friends, rather than miles.
Now, here is an example of a micro spintax done on this particular quote:
{Each|A} {adventure|ourney} is best measured in {acquaintances|friends|friendships}, rather than {kilometers|miles|road travelled}.
When you do this on each of the quotes, you will have billions of different combinations. It will take you some time to do to finish them, but you will get faster with practice. It now takes me 30 seconds for each sentence, so you will need around 2 - 2.5 hours to do 200 of them, taking into account breaks and struggles.
Optionally, you can add spintaxed emoticons at the end of the quotes for an additional level of complexity.
Lastly, after you have all of these done, we need to add content disclaimer and credits at the end of the caption by using the @[USERNAME] variable in Jv. which will take the username of the original account from where you’ve taken the image. Something like the following sentence can be fine:
This awesome image was taken by @[username]
This works if you only post from original creators. If you post from repost pages as well, you can use something like the following sentence:
Image via @[username]
With this, we are done with the creation of the captions. Before you add this HUGE spintax in the caption field of the repost tool, make sure you check it’s validity with some of the online spintax checkers. You can find dozens of them just by googling.
After you verify it and test a couple of different outputs, copy this monstrosity and paste it inside the Post Caption Text field at the bottom of the Repost Tool. You can check the spintax once again for the last time here by clicking Check Spin Syntax.
III Hashtags
The first step here is to use this amazing guide: [METHOD] Simple away find good hashtags and organize them! Spoonfed 🔥 to find 200-300 generic hashtags within your niche.
Make sure all of the hashtags are pretty general and can fit as many versatile types of posts in your niche as possible. What I mean by this is the following: in the Travel niche you would have hashtags that suit a certain type of landscapes and content, such as #mountains, #sunsets, #oceanside etc. which all can be found and used in travel content quite efficiently, however, are highly situational and it is hard to automate them.
What you are looking for are hashtags such as #wanderlust, #getlost, #worldplaces, #theglobalwanderer etc. that can fit any travel content that you will publish.
After you have at least 200 such hashtags, you will sort them by a number of posts in the sheet. Then, split the list in two groups by the number of posts:
-
Top 20%; and
-
Bottom 80%
Place a line or just somehow make this border visible so you know where they start/end.
Now, comes the interesting part. Go back to the Repost Tool in Jv. and scroll way at the bottom, where just below the Post Caption Text you will find the Enable Dynamic Hashtags option which you need to check. Two boxes will appear and you will do the following.
First, in the Max Hashtags Per Post option, write the total number of hashtags that you want to use in each post. I go with 20-28 hashtags per post which worked good for me.
Next, above the first box enter Pick 20% of the hashtags from this list.
Above the second box enter Pick 80% of the hashtags from this list.
Now, copy the TOP 20% of the posts that you found and paste them in the first box and copy the BOTTOM 80% and paste them in the second box. Make sure, they are separated by commas, which you can do with this tool HERE.
What this will do is the following: If the post has 20 hashtags, Jv. will select 16 hashtags (80%) of the smaller hashtags and 4 hastags (20%) of the bigger hashtags and place them at the bottom of the post. This will help have bigger chance to rank in some of the smaller hashtags which, then could boost you to rank in some of the higher end hashtags which can bring you more reach and followers on your accounts.
With this, we will conclude the 3 step setup of the repost machinery. You can now go ahead and activate this tool which will start sending posts to your campaign. I would suggest to turn it off after you have enough posts, as it doesn’t need to spend resources and send API requests to Instagram. I usually run it one day to gather 1000 posts, which are more then enough for me for some longer time.
Finishing up the campaign
You can now head to the campaign and see the posts pouring in.
Before we can push that Start Publishing button we will need to setup some settings in the campaign.
First thing first, go to the Where to Publish tab and select the destination you have created at the beginning of the process.
Next, go to the When to Publish tab and select either 2 or 3 posts per day, as this is what is working best. You can try going 4-5 posts per day, but this could irritate your audience, as it looks a little bit spammy. Down, select the Specify posting interval for each timer option and write intervals of 1-1.5 hours in the times when the audience is most active. Most importantly, select Publish a Post List items on all selected destinations !
Finally, go back to the Overview tab to finish up the campaign settings. Go to Advanced Settings and in the General tab. Check these three settings:
When Publishing send one post for each destination !
Choose a random post from the post list (instead of the top one)
Insert posts at random locations in the Post List (instead of at the end)
Now, press the Start Publishing button and voila, you have thousands of posts scheduled for your niched child accounts!
I hope this helps some of you guys! Cheers, and keep grinding!

