Hey guys! The last few months I’ve come across quite a few threads where new/existing members were asking how to do the mother/child Instagram method or the best Jarvee settings for the mother/child method.
This guide will hopefully provide you with a clear understanding of how to use this method with clear images of our settings, explanations & data driven tips to guide you in the correct direction.
I will also outline the costs involved in each step from purchasing equipment to expected monthly running costs.
We have managed over 50,000 child accounts successfully over 3 years now. Everything stated on this guide has been tested numerous times with thousands of accounts in order to gain the perfect settings / environment for Instagram automation.

Pre-account Creation:
There are many guides/methods in how to create mass Instagram accounts. The procedure to create Instagram accounts changes along with updates made by IG. If the correct steps are taken when creating each individual child account, it will prevent action blocks and verifications.
Managing 50,000 accounts, we do see the odd phone verification or temporary locked account however we constantly have a surplus of accounts that are resting to be used as replacements. It is faster and more efficient to simply replace an account then trying to overcome the blocks.
The Limitations of Purchasing IG Accounts:
Aside from the obvious risk that you are unaware of the methods and procedures used to create these accounts, from past experiences we have realised that these accounts often caused issues within 4 months. A few further examples of these risks are as follows:
-
Account security e.g. the seller may still have access to the secondary (recovery) email and on a previous occasion a seller gained access to the purchased accounts and they were able to reset password and gain control.
-
We have seen a trend in accounts being sold which have been initially phone verified. These accounts normally have the phone number removed after the creation of the account so that customers can re-input their own phone number. From our previous testing of purchasing these accounts in bulk, we saw over a period of time a higher percentage of phone verification compared to manually created accounts (using a permanent phone number). In this instance, when Instagram is requesting a phone verification, they will see that a permanent phone number is always being used, creating a higher trust level.
-
One example of a test carried out was to see the validity of purchased Instagram accounts. These accounts were purchased and had been rested for 2 weeks without any login attempts/connection to Jarvee or any actions being performed. We purchased and had left them alone. On some occasions we were surprised to see these purchased accounts were removed by IG even after being listed as being high quality accounts. The cost of testing these accounts for the Mother/Child method out-ways the time and effort needed to manually create accounts.
-
Another main issue is the cost. We are yet to see a seller providing mass handmade Instagram accounts, that is fully profiled (Profile picture, Bio, Following, commenting and posts) based on the customer’s requirements at a reasonable price for the mother/child method.
Physical Simcards Vs Virtual Phone Numbers:
When creating a new Instagram account, you will be requested to enter a phone number or an email address. We strongly recommend using the phone number option when registering compared to an email address. Email addresses can come with additional complications during registration and in later use of the accounts.
When using email addresses, we have seen several issues such as not receiving verification codes (not appearing in the inbox), login security issues when purchasing bulk email addresses and PVA issues with email accounts requesting phone verification codes which defeats the purpose of using the email option in the first place.
You now have 2 options when it comes to phone verifying your accounts; physical sim cards and using a virtual phone number service. In order to activate your Instagram account, you will need to receive and enter a SMS code. We will outline the pros and cons of both options and conclude with why we use physical sim cards for the creation of our accounts and not virtual numbers.
There is an abundance of virtual number services online. We have used many over the years and it is definitely a great cheap option for creating accounts, however we do not believe it is worthwhile to use virtual number services for mass account creation for a long-term mother/child campaign.
The issue is not with the virtual number service but rather the continuous use of different virtual numbers each time Instagram requests a phone verification. The continuous changing of phone number does not mimic a real IG user. It is not typical for a person to change their phone number often; this can be seen as a red flag. There are providers that allow renting a virtual number on a monthly basis however it is not cost effective compared to purchasing a physical sim card.
If you are using the mother/child method for a churn and burn campaign, a virtual number service would be the preferred mode. Jarvee has even implemented the use of virtual numbers for auto verifying accounts if it requires a phone verification.
For those that are using this method for the long term, we highly recommend purchasing physical sim cards. In the event that Instagram requests for phone verification, the same number will be used thus gaining higher trust levels. The majority of real-life users will not be changing their phone number on a regular basis hence stick to a more permanent solution.
Having physical sim cards also allows you to create accounts on other platforms without the need of purchasing multiple virtual numbers.
There are multiple platforms in which you can purchase physical sim cards in bulk for example ebay. Bulk sim cards can be purchased from marketplaces in phone forums as cheap as £0.05 ($0.07). We recommend you to find a seller that is based in your country.
Phones:
There any many guides that try to replicate the account creation process using PC based phone emulators however based on our testing we have come to the conclusion that the best method to replicate a phone is to have a physical phone.
Unlike other guides, our tested method uses a human approach in every step of creating an account. When using an automated tool to create accounts we have seen that it had a higher percentage of deletion without Instagram allowing any attempts to restore the account.
PC Phone emulation software have multiple limitations such as not having a touchscreen, network connectivity and unrealistic app performance (which can be detected by Instagram algorithms). We are not discrediting the use of PC based phone emulation software as part of the account creation process however we feel that using a physical phone increases the chances of your child account lasting longer and it reduces the time needing to recover an account e.g. recovering from multiple verification blocks as the initial account creation has been implemented correctly from the start.
When we are creating mass Instagram accounts, we use 2 types of phones.
Phone: A – Samsung A20e
Phone: B – Cheap burner phone

For those that are using our method we highly recommend having 2 phones, having the correct phones will ensure that you save time during the account creation process.
As stated above we use multiple Samsung A20e (Phone: A) during the signup and account creation process. This phone has the system requirements to run the Instagram app without lags or delays, long lasting battery life, adequate storage space and most importantly is 4G enabled. If you were to use a 3G enabled only phone for the signup process it will result in slower transmitting of data and a slower response rate compared to a 4G phone. Using anything less than a 4G enabled phone will result in an increase of time during the account creation/post signup stages. Phone: A contains the sim with a 4G data plan and this sim is never removed from the phone.
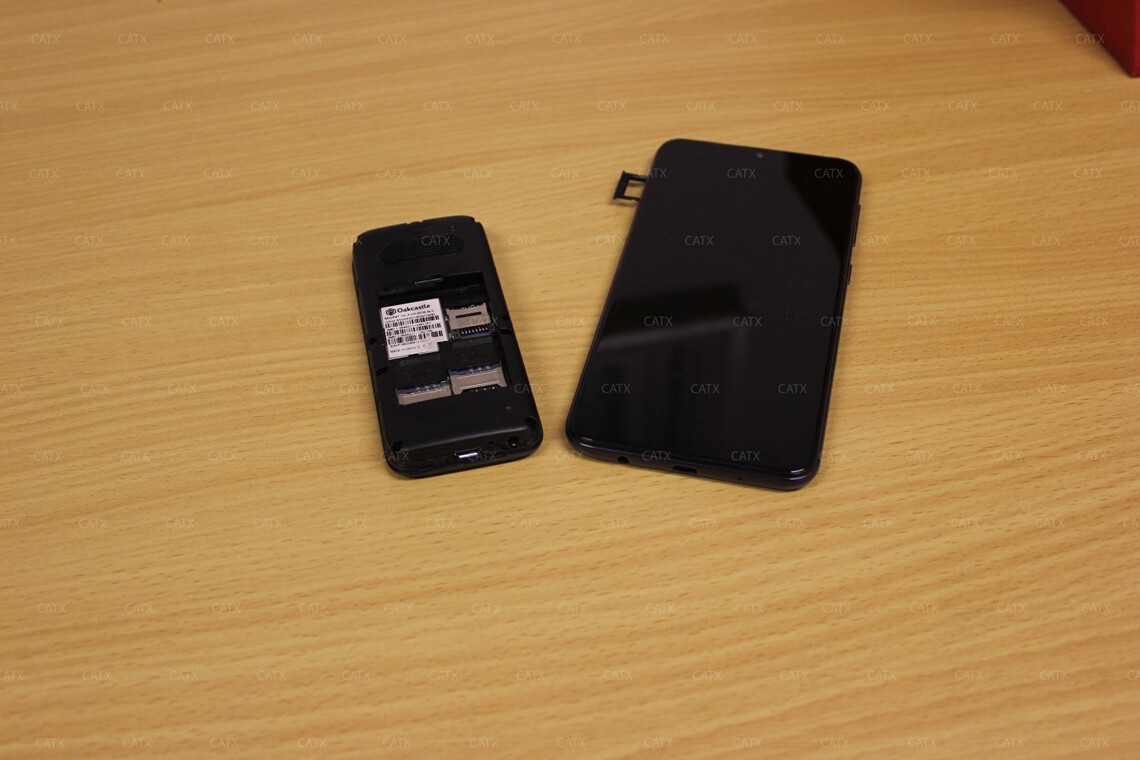
Burner phone (Phone: B) is purely used during the signup process. When creating an Instagram account, the first screen you come across is to verify using a phone number or an email address, our method requires you to use real phone number which means having a physical sim card. The phone number is entered on the Instagram app (installed on Phone: A) however the code is received on Phone: B. We recommend that when purchasing a burner phone to ensure that it has a long-lasting battery life, no bloatware, able to access the sims easily and has dual sim slots.
Having multiple burner phones with a dual sim slot, allows you receive 2 Instagram verification codes as there is 2 sims attached to the phone, this saves a lot of time as you are not having to constantly change sims amongst phones. Phone: A is to create the accounts and Phone: B is used to receive the verification code for each physical sim number.
If you intend to use our mother/child method we recommend that you make the investment and purchase these types of phones in bulk. Having multiple phones will decrease the time needed to make accounts in mass.
Being organised
Bio Excel Sheet:
Being organised is highly important when creating mass accounts and we recommend creating an excel sheet for account management. This excel sheet would contain all information needed to create an Instagram account and this sheet would be your point of call to retrieve information when an account goes into email or phone verification. Please have a look at the excel sheet in the image below.
The fields that we use are as follows:
Sim Number
Phone Number
Full Name
Password
Username
First Name (Hide field after merging with Surname to make full name)
Surname (Hide field after merging with Firstname to make full name)
Bio
Bio Count (maximum 150 characters and hide cell once finished)
Email
Comment filter text
Make sure that the fields are in this order as this is the order in which Instagram asks for the information when creating an account.
Sim Organisation:
We physically attach a numbered sticker (purchased on ebay/amazon) to each sim packet so that it is easier for us to locate which sim is assigned to an account.
Example:
Sim number: 001 is allocated to Username: David_steve
In the event of an account phone verification it will be easier to locate the sim packet as this information is stored in the excel sheet.
Prior to creating the child accounts, we strongly advise that you prefill the account information on an excel sheet. In the long term, this will save you time as it will be easier to locate and manage your accounts.
Expense Sheet:
We recommend everyone to have a digital expense sheet (outlining all cost incurred). An expense sheet helps you identify your monthly running costs (data plans, equipment, IT cost, Jarvee and etc) and assists you to identify if the mother/child method is financially viable.
An expense sheet also allows you to prioritise your expenses/cost over a specific time frame. Depending on your campaign, you may be required to increase your child account settings e.g. increase followers or have accounts running for a longer period of time. An example of this is when you want to do a season push on a product e.g. Christmas decorations. This will require additional resources such as more scrappers, IPs for the scrappers and additional child accounts during this period which will result in an increase in expense.
In addition to monitoring the increase of running cost, it also helps you to identify were you can save costs. Majority of our savings came from when we continue to purchase equipment in bulk. We were able to conduct cost comparisons with other suppliers and eventually was able to reduce our equipment costs. This is an ongoing process and will require you to evaluate your expense sheet continuously.
If you are an individual or an agency it is crucial to be aware of the cost involved when employing the mother/child method to potential clients. An expense sheet helps you to monitor and evaluate the setup costs and monthly expenditures for each potential client based on their goal. In order to provide a quote and understand how much profit will be gained, you must know these outgoings.
With the nature of the mother/child method, the initial month is spent creating/warming up the accounts. A typical client would need to be retained for a minimum of 2 months in order for them to see the benefit. As a provider, you would yield a return on the second month as the initial fee charged to the client is used to cover the setup cost. The industry standard for mother/child service providers typically charge between £2.60 - £3.72 ($3.5 - $5) per child account depending on which plan the client selects.
Lastly, an expense sheet also helps you to identify unauthorised charges. On occasions we had seen duplicate charges when doing our bank reconciliation and the expense sheet helped us to recover the funds as we were able to recognise our monthly expense.
Download a simple expense sheet example:
https://docs.google.com/spreadsheets/d/1LBO5-aMtzXyERjeJr9TLI1Iun1MxgQrOto5TivkTbw8/
Photo Hash:
Each child account will require its own set of photos to be posted to make the account seem more genuine. We recommend a minimum of 9 photos per child account as we have seen a higher ratio of conversion/follow backs compared to those accounts that had less images uploaded.
It would be difficult to obtain unique images for 1,000 child accounts. We have not seen any issues to using the same images over various accounts as long as the image has been altered. We recommend altering these images in bulk using the following methods:
- Bulk photoshop editing script
- Hash Manager
There are a number of photoshop scripts available that can be used to make minor alteration in bulk such as inserting watermarks, changing colour, size, transparency or adding filters. A recommended tutorial to view is: How to Watermark Multiple Photos in Photoshop CC - YouTube
The Instagram algorithm has the ability to interpret and detect images by analysing the MD5 hash. Hash Manager allows you to bulk change the MD5 code for each image.
We use both automated methods when prepping to use our set of images. It can take an hour to have the same set of images modified to be posted onto 1,000 accounts. As each image has now become unique it is impossible for Instagram to detect duplicate images.
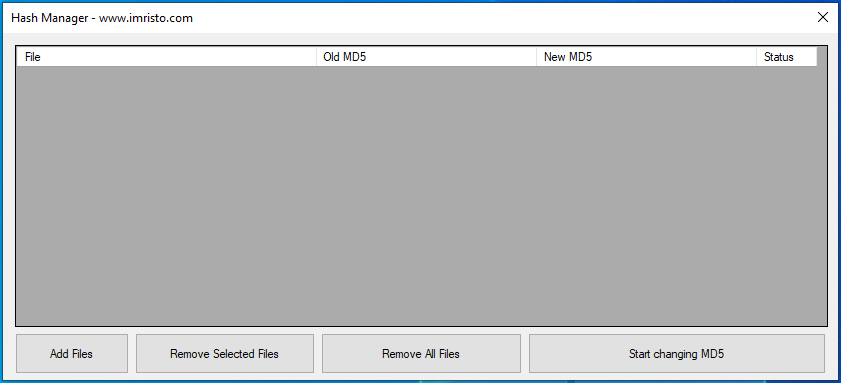
Image Renaming:
We take an addition step in making each image unique for the mother/child method by also renaming each individual photo. We recommend using the following free software: Bulk rename utility.The software allows you to bulk name change files / images. This allows us to be more organised and also allows us to track where each photo is being allocated to a child account.
Bio:
Instagram’s visible profile area allows each account to have 150 characters in text and emojis. In the mother/child method a bio can be a conversion factor, a well written and constructed bio can increase your conversion rate by 30%.
If you intend for your accounts to have longevity, we recommend that each child account has a unique bio. We have seen companies fail trying to implement the mother/child method as a result of using the exact same bio for all their child accounts. This creates a huge footprint for Instagram and creates an unnecessary risk to your child accounts.
Unique bios also deter competitors from easily locating your child accounts and understanding your marketing strategy. It will take a simple Google search by a competitor to find the majority of your child accounts if the same bio text is used.
A tried and tested method to creating unique bios in bulk is to extract and alter existing bios of profiles in your niche and then using spintax to increase the number of combinations of that extracted bio. For a better understanding of spintax follow the link below: What is Spintax? - YouTube
When spintax is used effectively it can save you a lot of time and eliminates duplication of bio text. A useful website that we use to output spintax variations is http://sp1n.me/
Pro tips: To increase the spintax variation we recommend you to use emojis as part of your bio. Not only does this increase the variation score but it also adds a more dynamic attraction. Your bio character limit is 150 so ensure that it fits within this parameter. An easy way to check your bio character count is to check on excel using the following formula:
=LEN(A1)
*A1 = Column containing your bio
Bio Method:
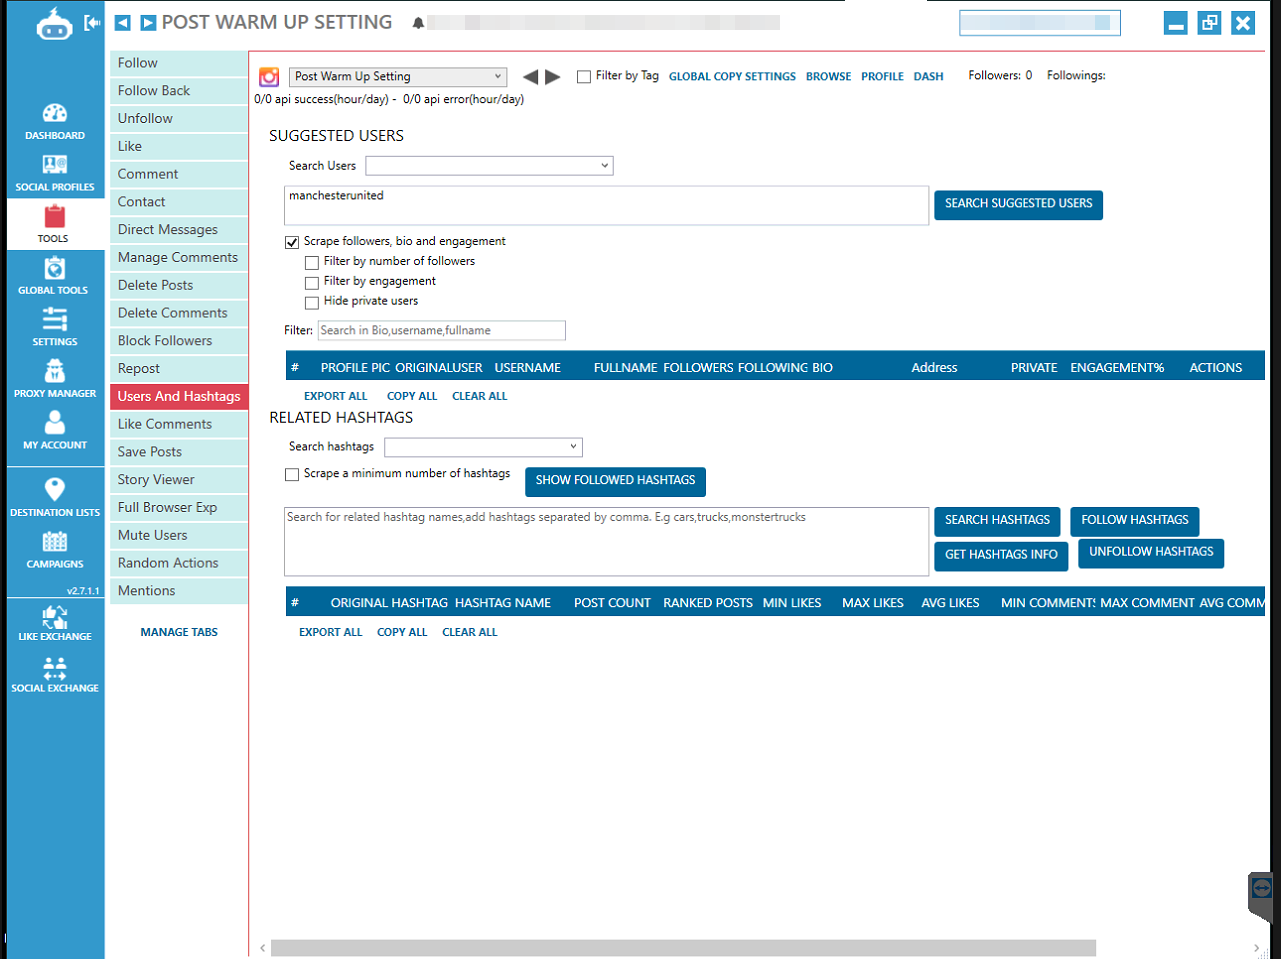
Jarvee allows the ability to scrape existing IG user’s bio data via 2 methods; “Scrape Tools” and “Users and Hashtags” tool.
The Scrape Tools method uses scraper accounts to scrape data from a given source. We recommend scraping the follower’s data of a large source related to your niche. In the example below, we have scrapped the follower’s data of a football team @manchesterunited. It is more likely for these followers to have bios related to football which you will then mix and match to create your own unique set of bios for the child accounts.
The “Users and Hashtag” tool is usually used for researching and finding users / hashtags. Jarvee has also provided the option to “Scrape followers, bio and engagement”. This will provide the same data as the “Scrape Tools” method.
Whether your campaign goal is to direct followers to a mother account, website visitors, lead generation or enquiries we refrain from posting a URL onto the child account bios. Placing a URL in the bio creates a footprint on Instagram and directly connects your mass child accounts to your mother account. Further in this guide we will illustrate how you can track and monitor conversions made by each child account.
Account creation:
There have been many guides displaying how to create accounts in mass over the years, with each IG update the process becomes more difficult and majority of guides have become obsolete. This guide was written to illustrate what is possible to achieve when the mother/child method has been implemented correctly. We will disclose all Jarvee settings however the software that we use to avoid Instagram detecting the mass child account creation is custom made for our requirements and will not be disclosed.
Important: The steps below need to be carried out in the exact order. Any deviation in our mother/child account creation process may result in an increase level of Instagram challenges.
- Sign up
- Profile Picture (post)
- Following
- Bio
- Comment Blocking
- Story tap
- Like and comment
- Picture posts
- Connect to Jarvee
Sign up:
There are a number of paid tools/private guides that you can use to create Instagram accounts. We have seen positive comments in regards to this thread on MP Social on how to create these accounts: Create bulk Instagram accounts - 2020 - Using phone - No root required
Disclaimer: We have not tested the above method. As we use our own custom-built app which performs additional processes and filters, we will not be disclosing this information to protect our method. The thread above seems to be working however caution must be taken with a public method (in terms of the mother/child and bulk account creation) as it can never be guaranteed to remain working in the long term without being detected by Instagram.
Profile Picture:
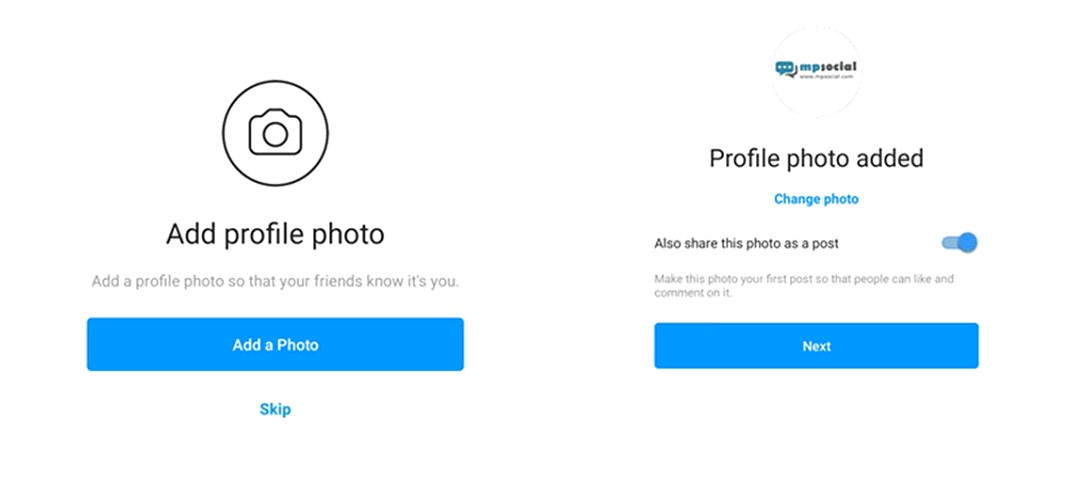
The profile picture that you use must be related to your niche. Prior to uploading, make sure that you have taken the addition steps written above if you are reusing a limited set of images. During the uploading of the profile picture make sure that you select the option “Also share this photo as a post” so that it displays on the grid. The initial post will not have any captions or tags.
This must be uploaded during the sign-up stage and not after.
Following:
After uploading the profile picture you are presented with the suggested celebrities to follow. Follow at least 10 – 15 of the verified blue tick users (famous people). If you notice that the follow suggestion page only has non-verified users I would recommend to scroll down and wait until you see verified users to follow.
Bio:
We recommend that you use the following CatX method which outlines how to write an effective bio. This has been tested and proven to be a high converting bio formula.
CatX method
1st line – Emoji | Spintax + CTA
2nd line – Emoji | Text related to your niche
3rd line – Emoji | Spintax + CTA + USP
Here is an example of the CatX Method:

The 1st line will contain a call to action to the mother account.
The 2nd line will contain text related to your niche.
The 3rd line will contain a call to action to the mother account followed by a unique selling point.
Comment Blocking:
It is very common for your child accounts to receive comments about the legitimacy of the account and even comments linking to the mother account. Having these negative comments may decrease your conversion rate as others will see these comments. It is also hard to manage and monitor negative comments on a mass scale, we recommend that you add a negative keywords list onto the “Manual comment filter” in the Instagram settings area for each child account. This step should follow after completing the bio. We have not experienced any issues when applying the same set of negative keywords on all child accounts.
Settings > privacy > comments > manual filter
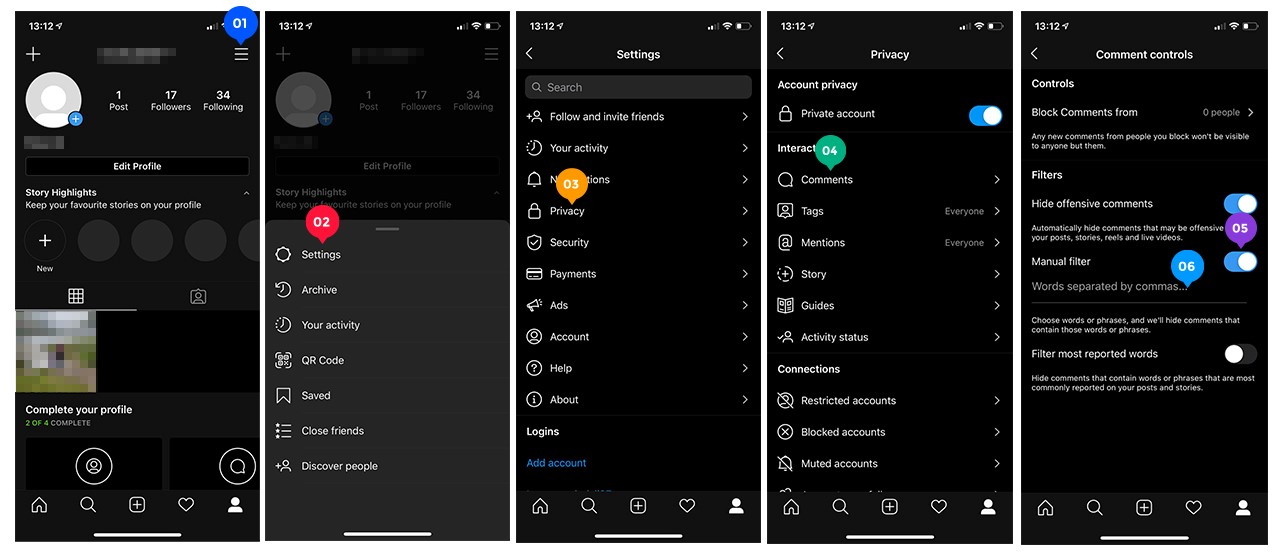
Some examples of words to block: reseller, fake, duplicate, stolen image, steal, copy, scam, scammer, @mother_account_name, report, permission.
If a comment is made using any of the negative keywords, only the commenter will be able to see their comment on the post however it will be invisible to all other users.
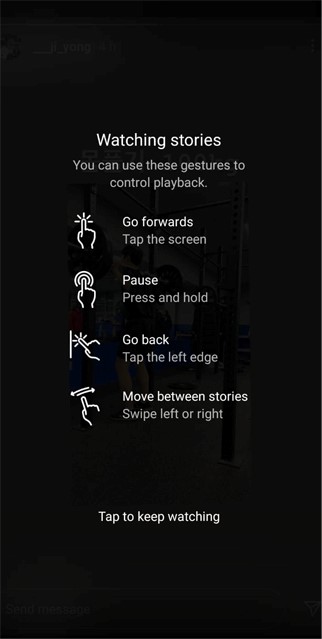
Story View Tap:
Once you have profiled your child account, we recommend to view the story posts of the verified members that you had followed on the follow suggest page. You may not have noticed this but on the 3rd story view of a brand-new account you will be presented with a story mode tap tutorial which you will need to tap to view the next story. This is another key indication to Instagram if you are a true user or a bot to the platform. This is an important step after the account has been created. If you are following our mother/child guide this step needs to be completed manually on the phone before it is connected to Jarvee. This step adds to the natural behaviour of a new Instagram user which you are replicating on mass.
Like & Comment:
After the account has been created, we recommend that you like 5-10 different posts of verified members (celebrities) we also follow this up by commenting on additional 2 posts of verified members. We have seen that by doing this it increases the performance of the account in the long-term. This is usually done as soon as the account has been fully profiled. We have not seen any issues when liking or commenting in the first 20 minutes, others guides suggest that you require a delay but we are yet to see any issues.
Picture Post:
Now that your account is fully profiled, we suggest that you start uploading the additional 8 images in 5-minute intervals. Based on our testing we have noticed that allowing 5-minute intervals when uploading images to a brand-new account had less verifications in the long term. In total there should be 9 images which is enough to cover the screen of most phones. We had not seen any increase of conversion when there was a higher number of images being posted. The posting procedure should take in total 45-minutes per child account.
Connect to Jarvee:
As soon as the 9th image has been posted you can log-out from your Instagram account and import your account into Jarvee. We have listed additional Jarvee settings below which is imperative to copy before connecting. There are many guides that suggest that there should be a 24hour delay between creating an account and connecting it to Jarvee however if you follow this guide this delay isn’t required. As long as the creation IP is located near the proxy public IP there is no need for a delay. The connection delay is not the same as the warm up delay.
In the case of renting a 4G mobile proxy in a different geographic location, allow a connection delay of 24 – 48 hours. This can still result in verification and action blocks. We do not recommend IP hopping.
Jarvee Settings
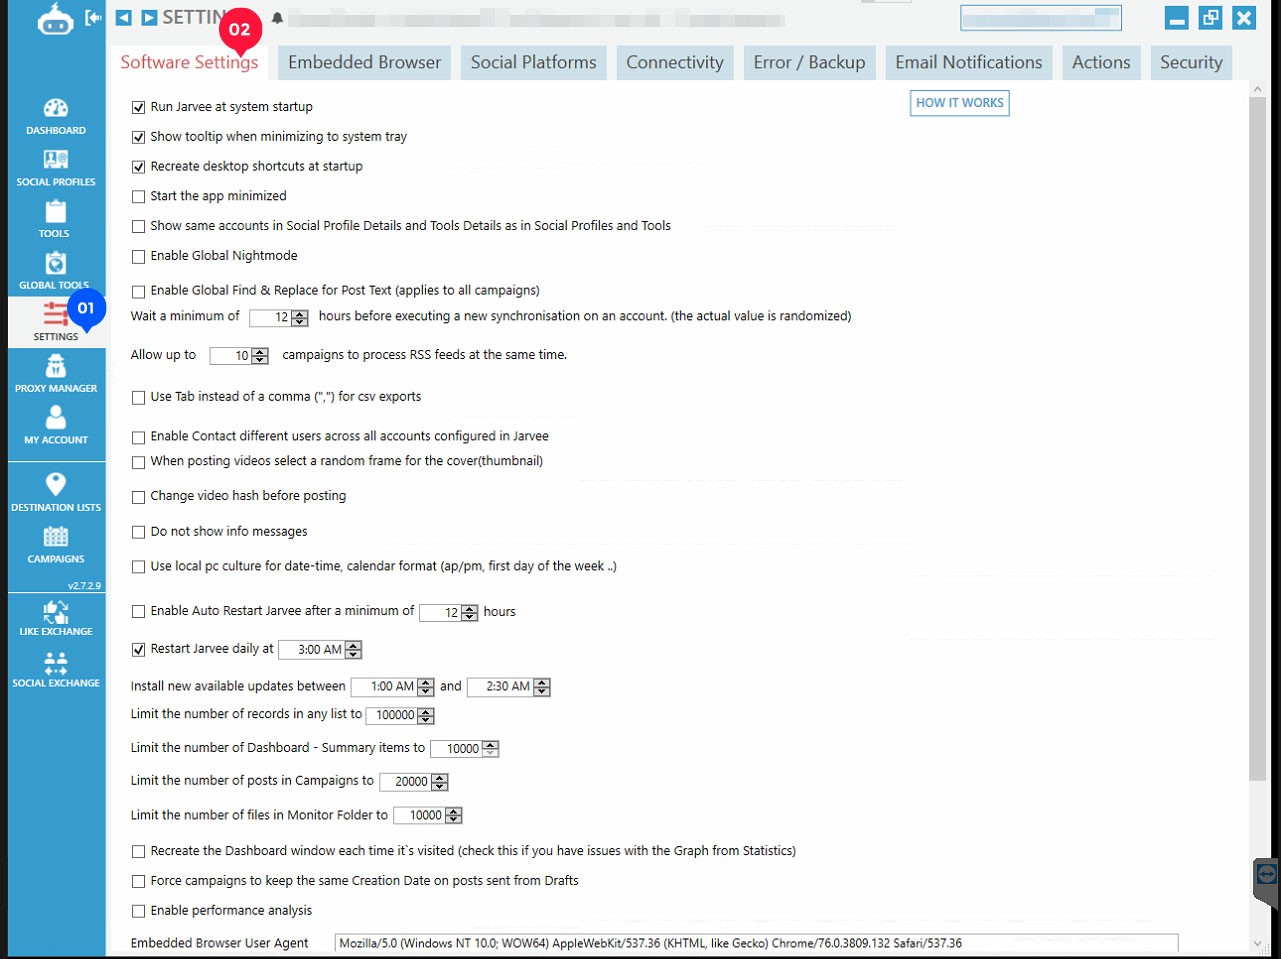
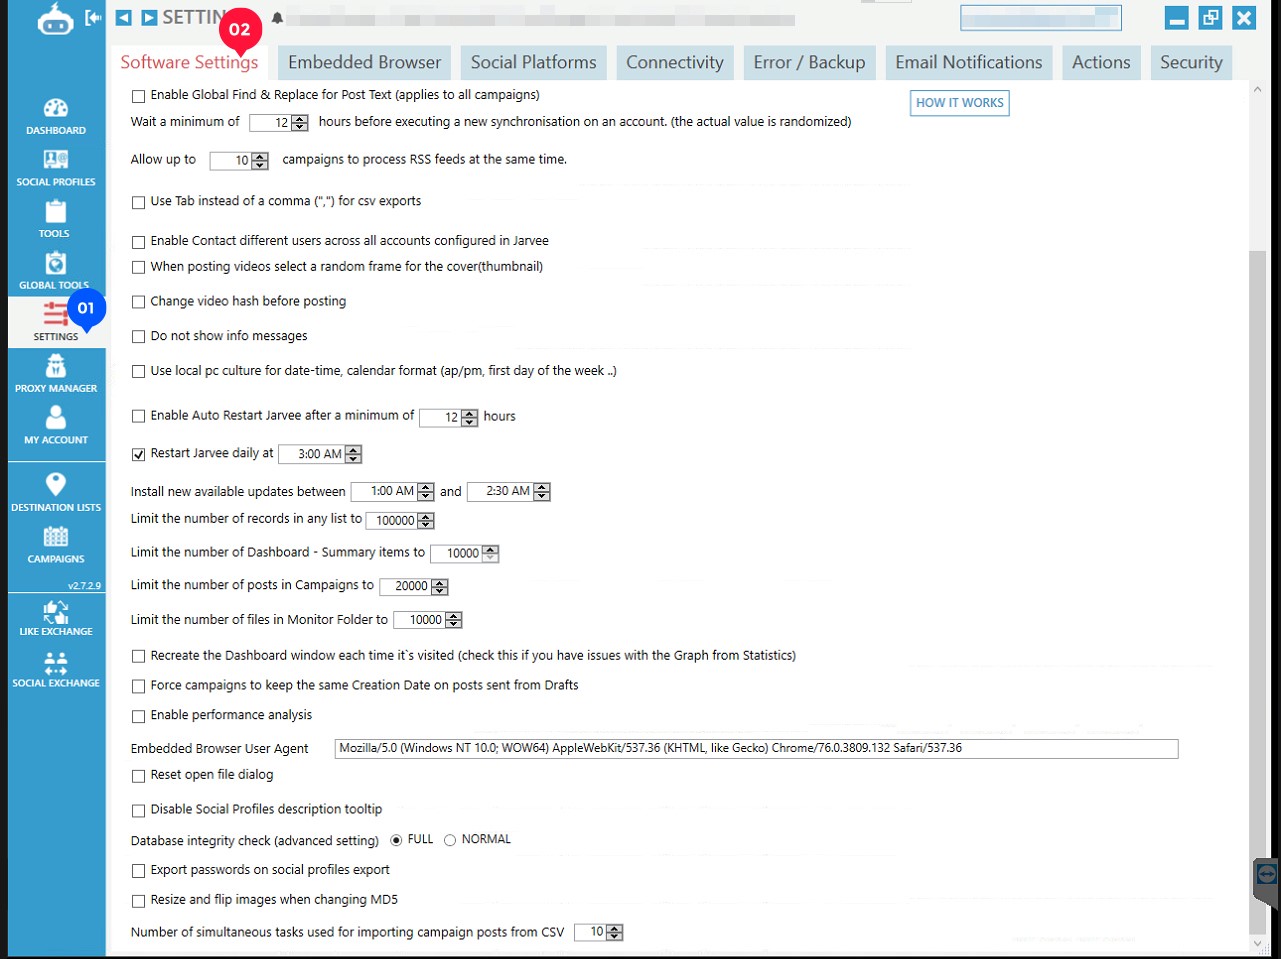
Software Settings:
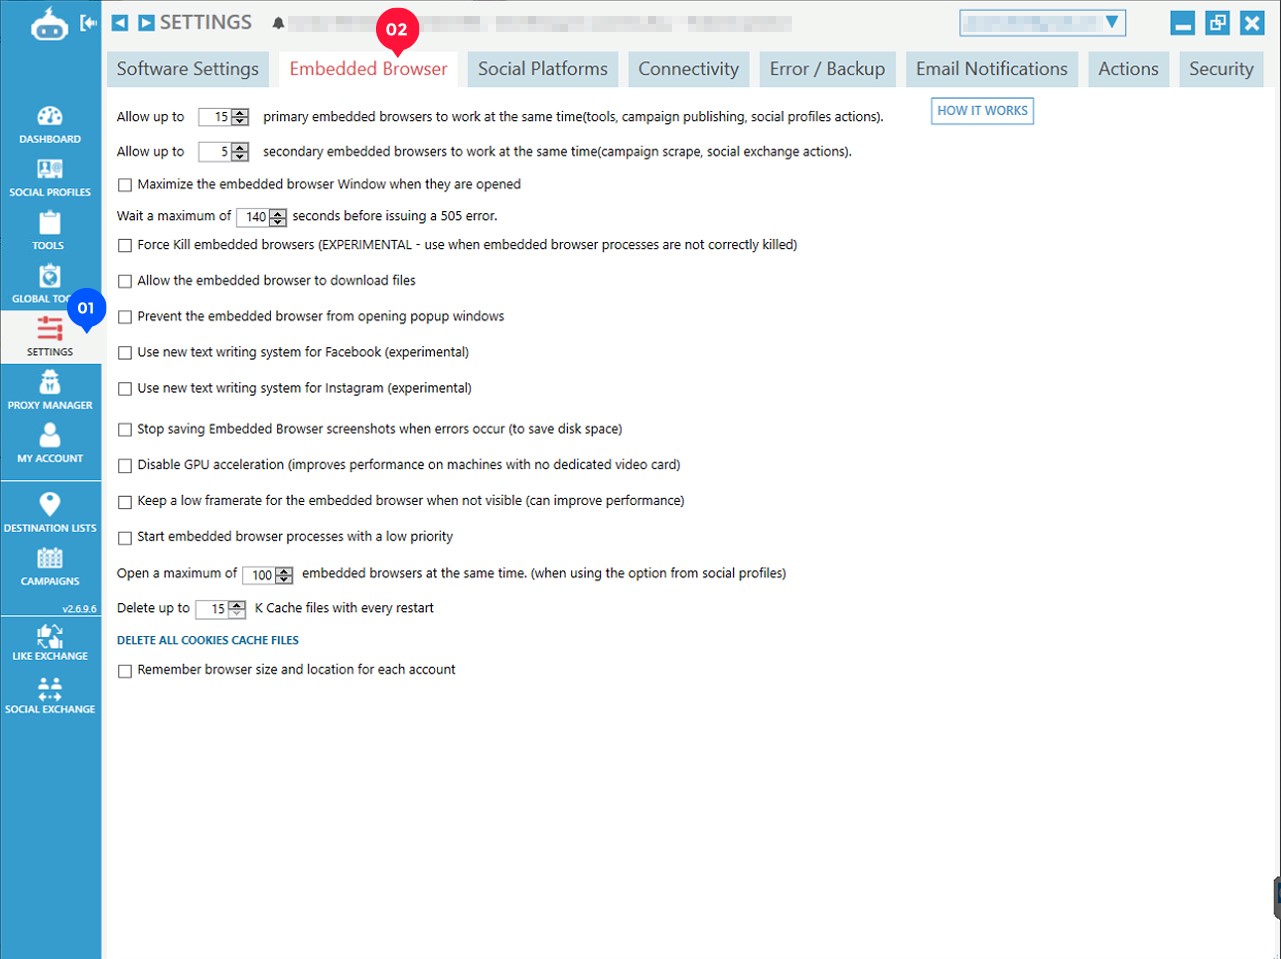
Embedded Browser:
Social Platforms
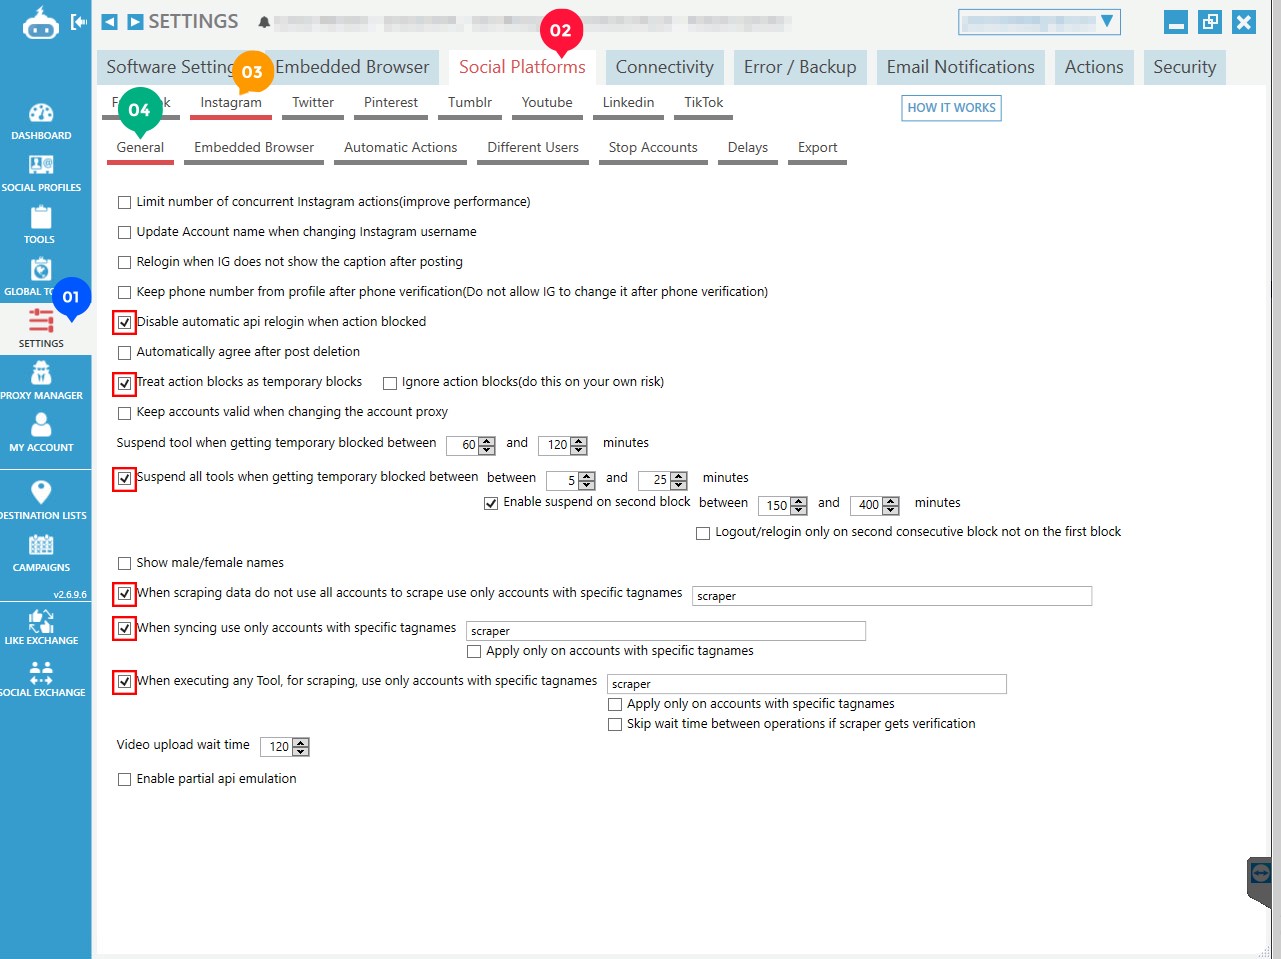
Social Platforms > Instagram > General
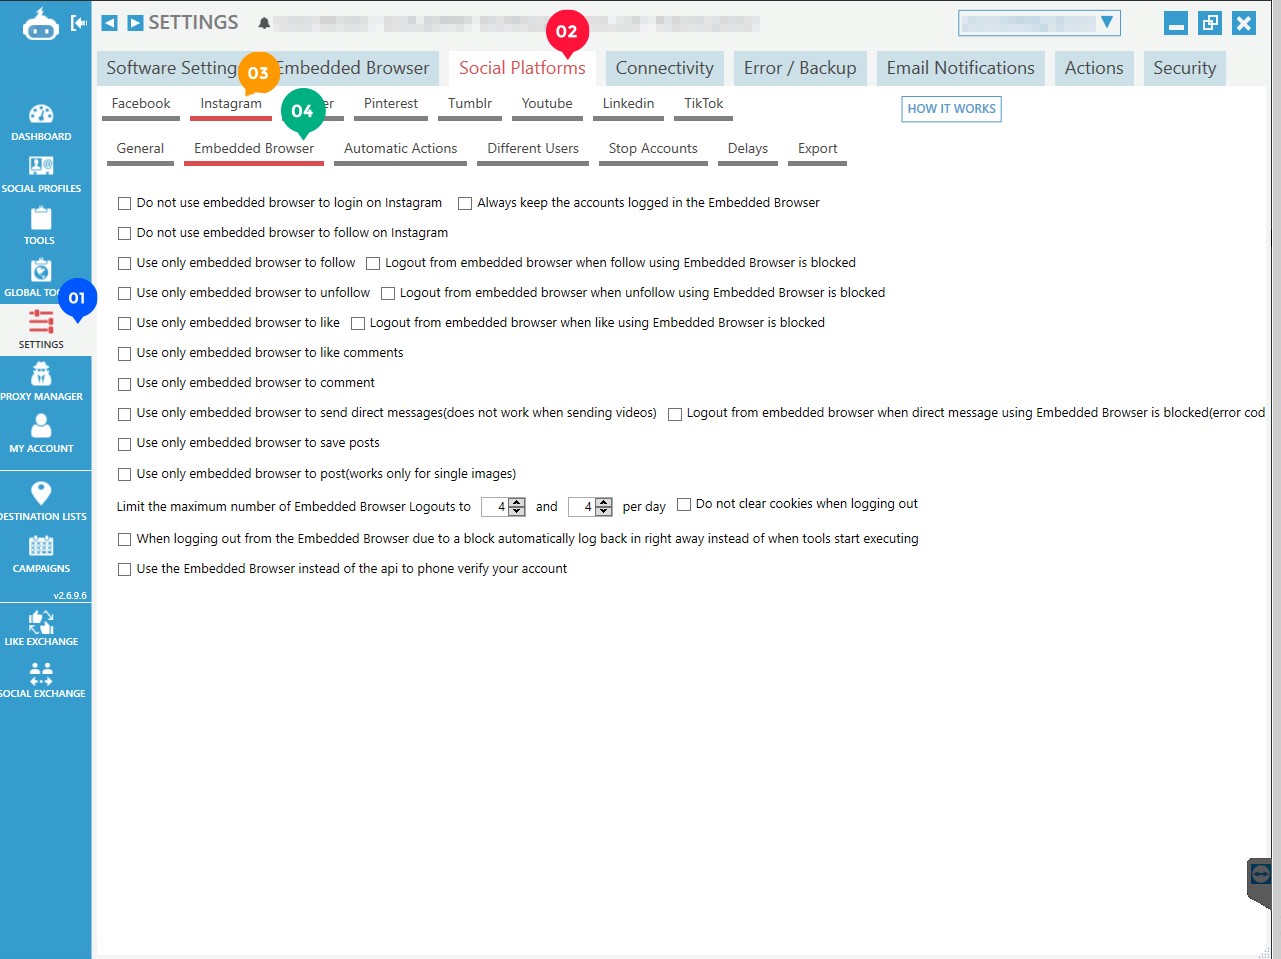
Social Platforms > Instagram > Embedded Browser
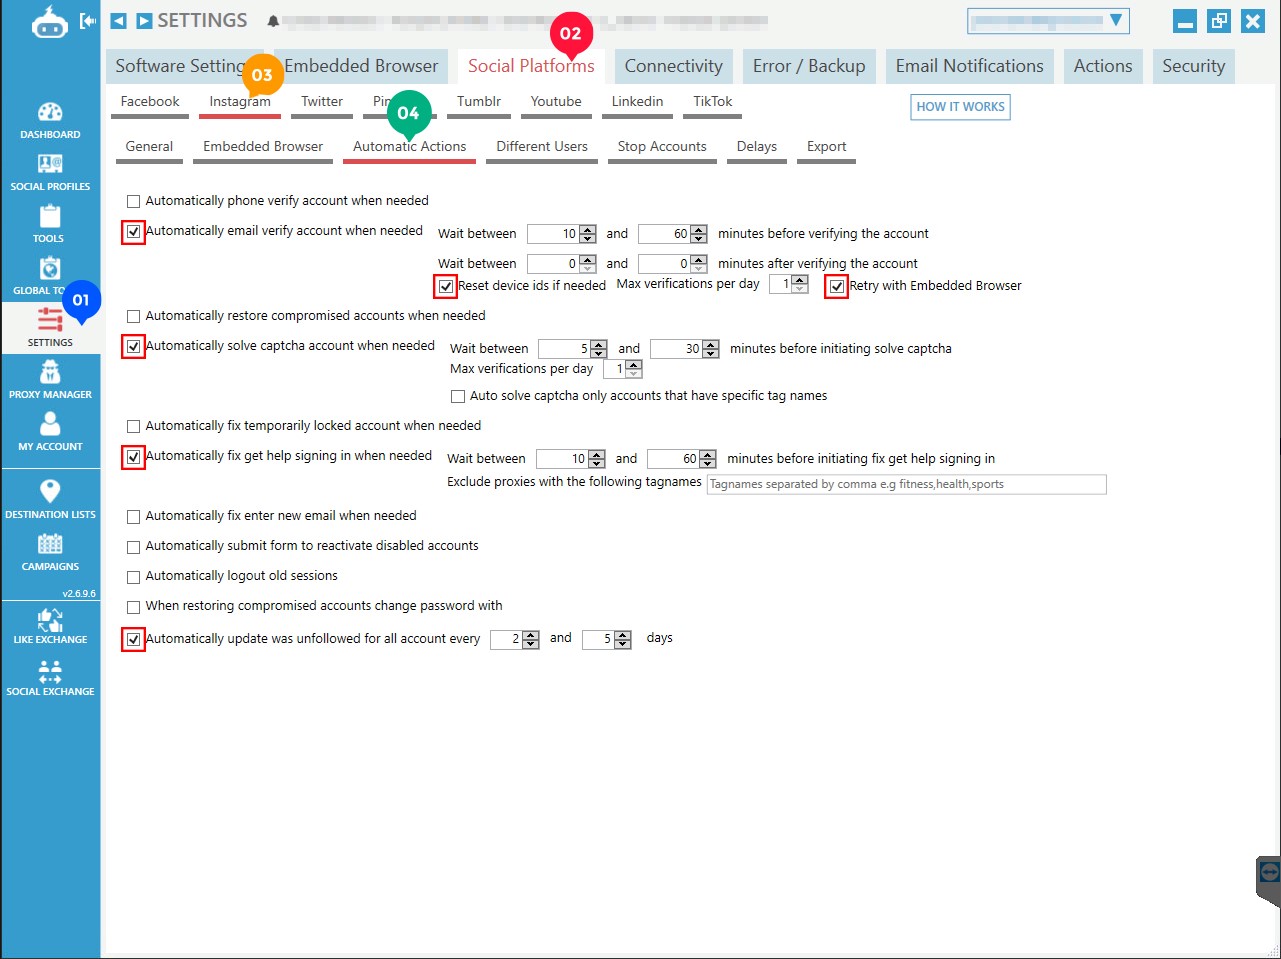
Social Platforms > Instagram > Automatic Actions
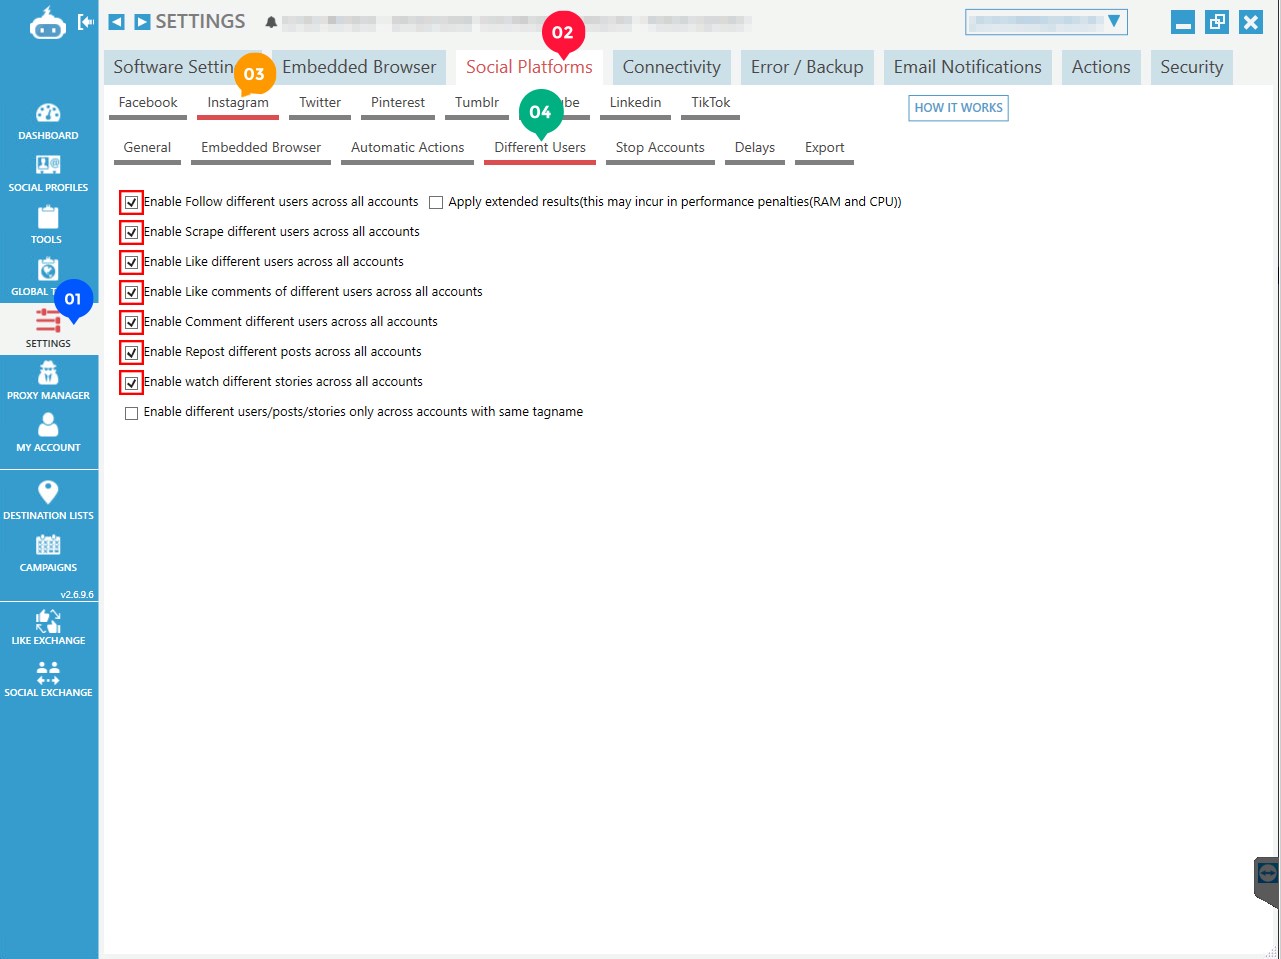
Social Platforms > Instagram > Different Users
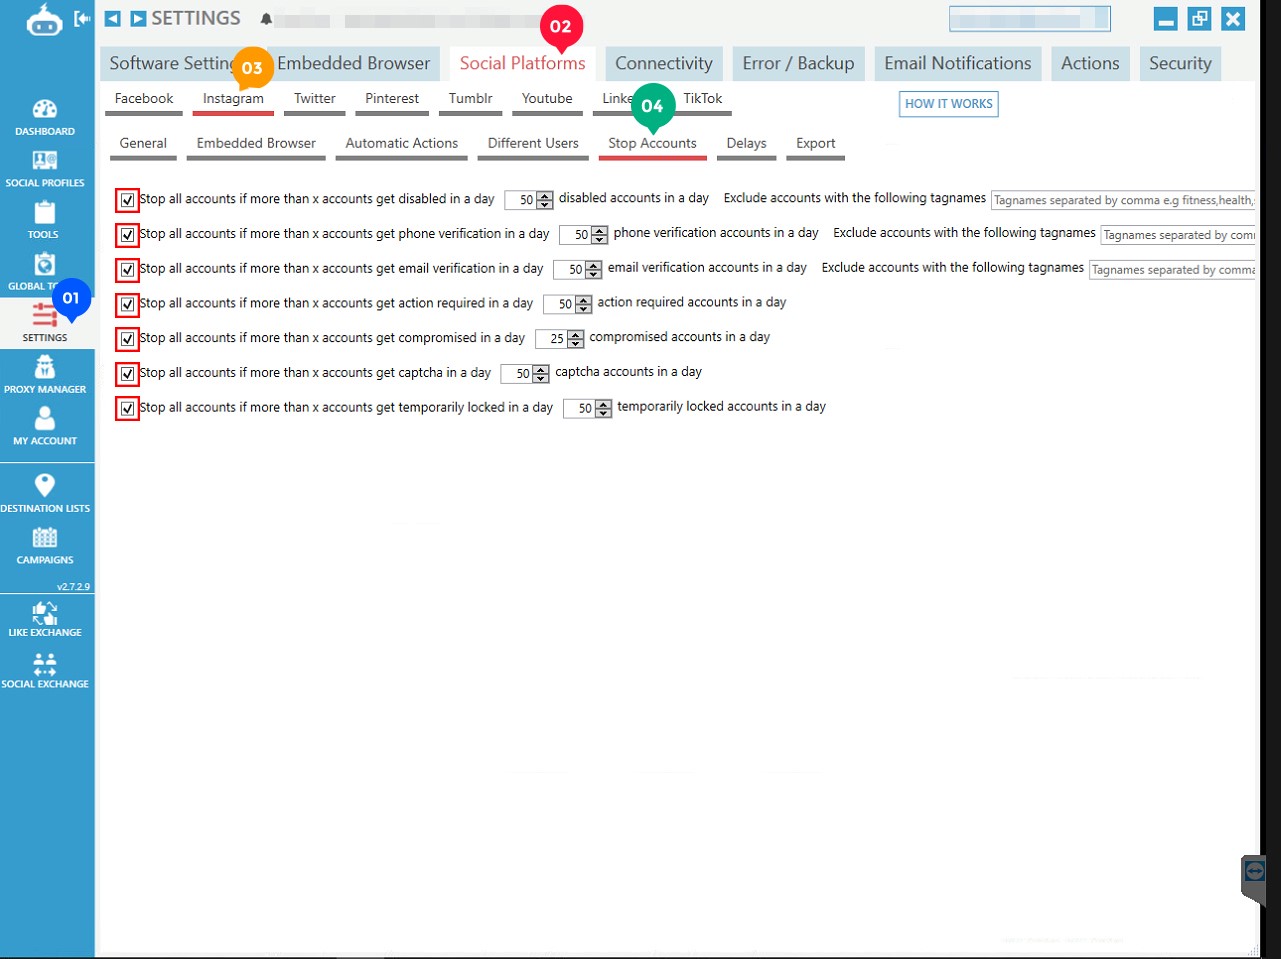
Social Platforms > Instagram > Stop Accounts
Social Platforms > Instagram > Delays

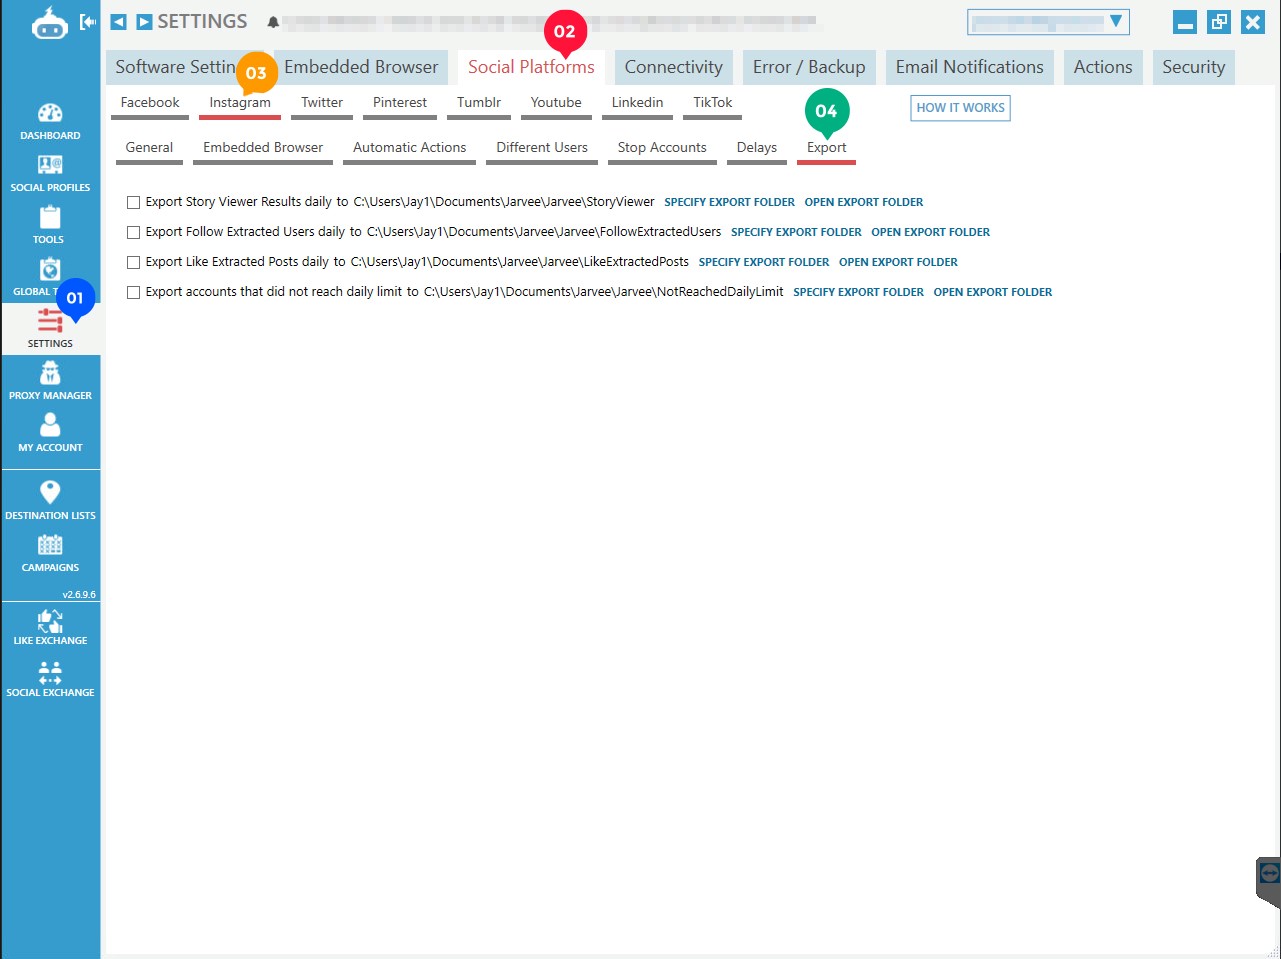
Social Platforms > Instagram > Exports
Warm Up Settings
How To Bulk Import Accounts:
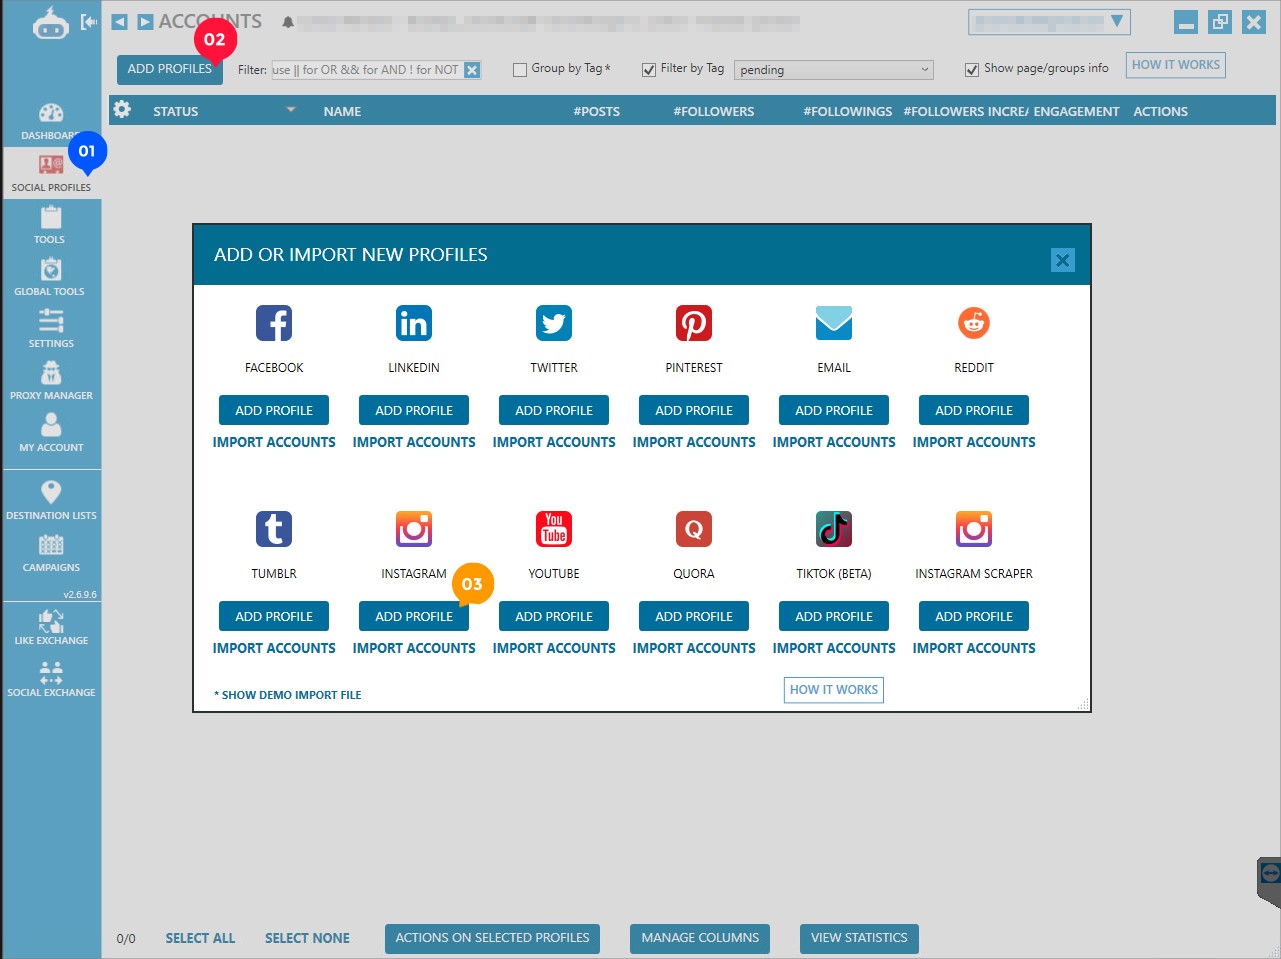
Jarvee provides an import template which is used to bulk import profiles.
Social Profiles > Add Profiles > Show Demo Import File
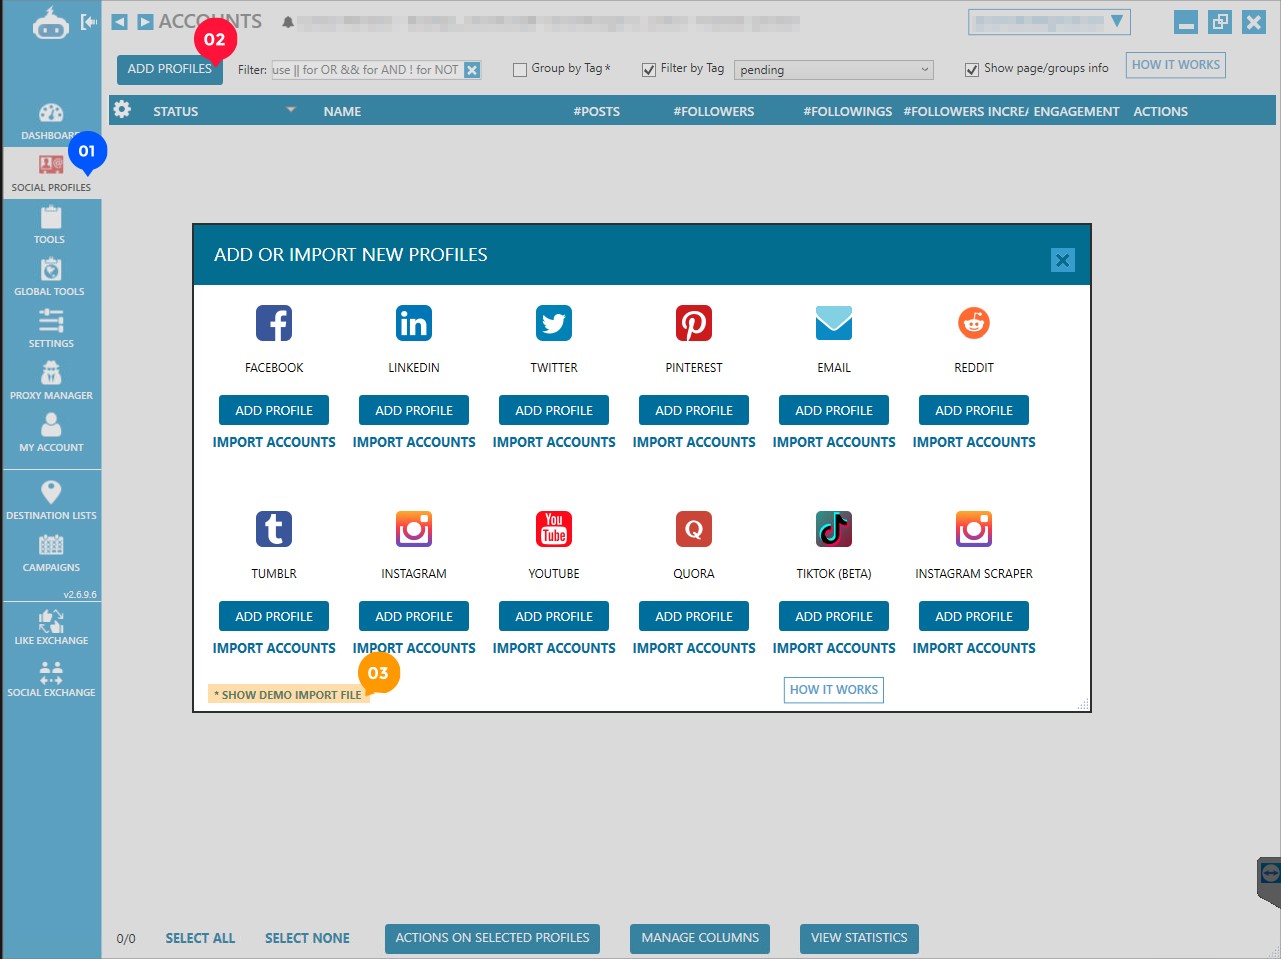
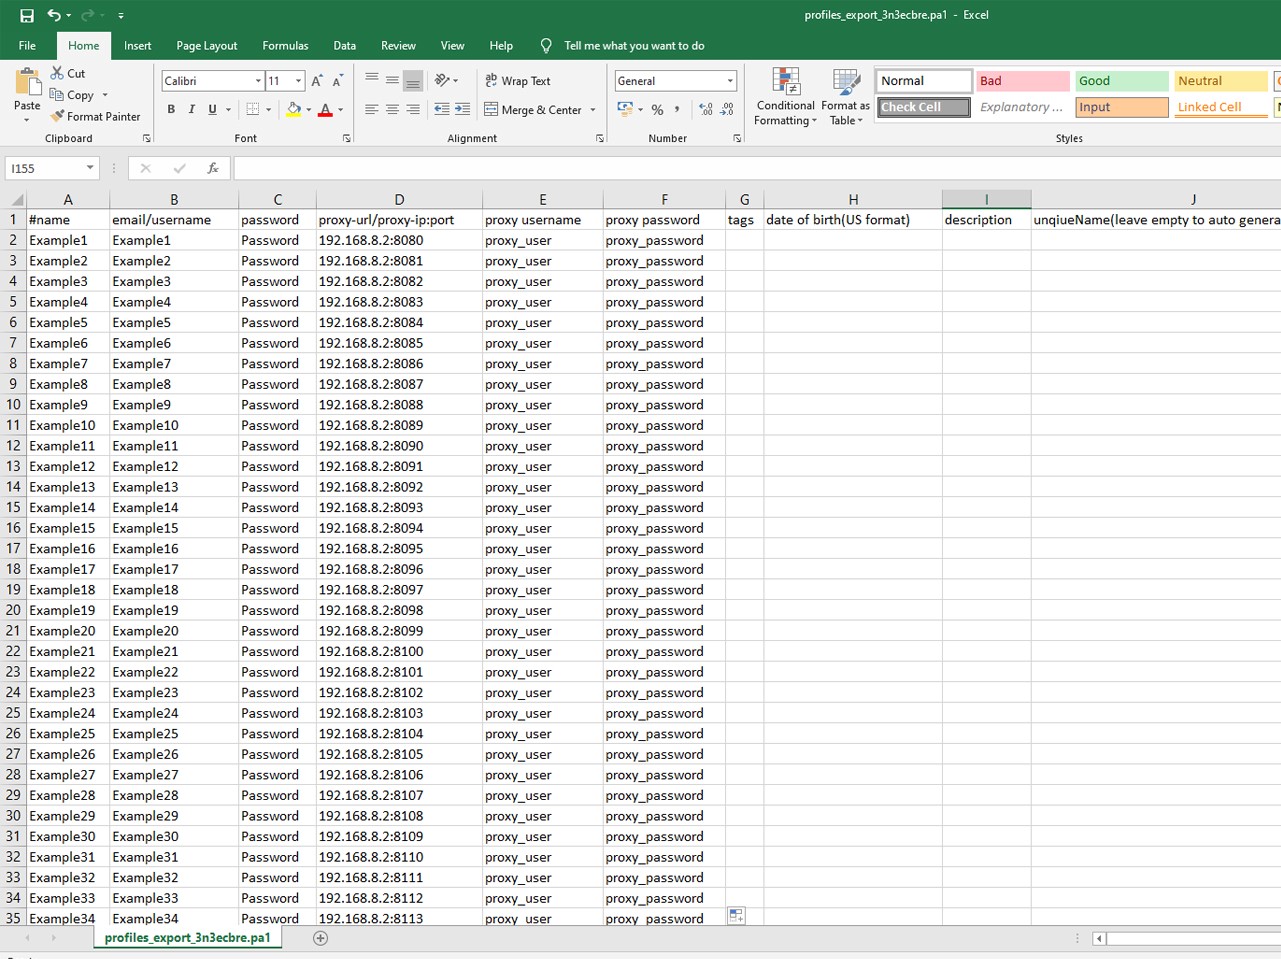
The exported Demo Import file can be opened in Excel. You will need to add your child account information including Username/Password/Proxy details. In the example below we are using our own private 4G proxies. Depending on how you have obtained your proxy either creating or renting, insert the information in the relevant fields. Save the document in same file format.
You will now upload your bulk profile information (the above excel document).
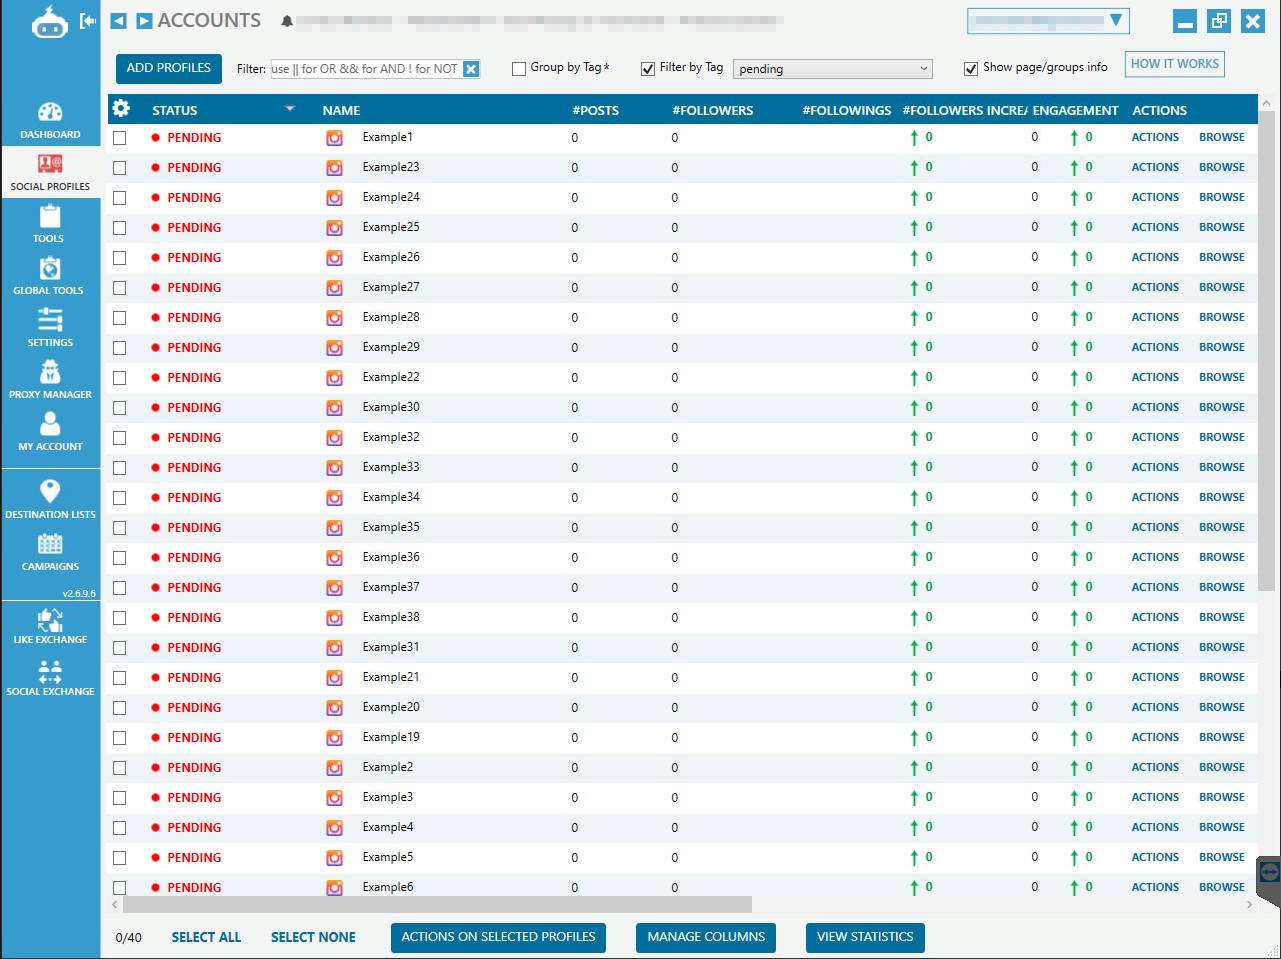
Social Profiles > Add Profiles > Import Accounts

It can take Jarvee a few seconds to import your child accounts. Once imported all accounts will be in a pending status. Do not verify any accounts yet.
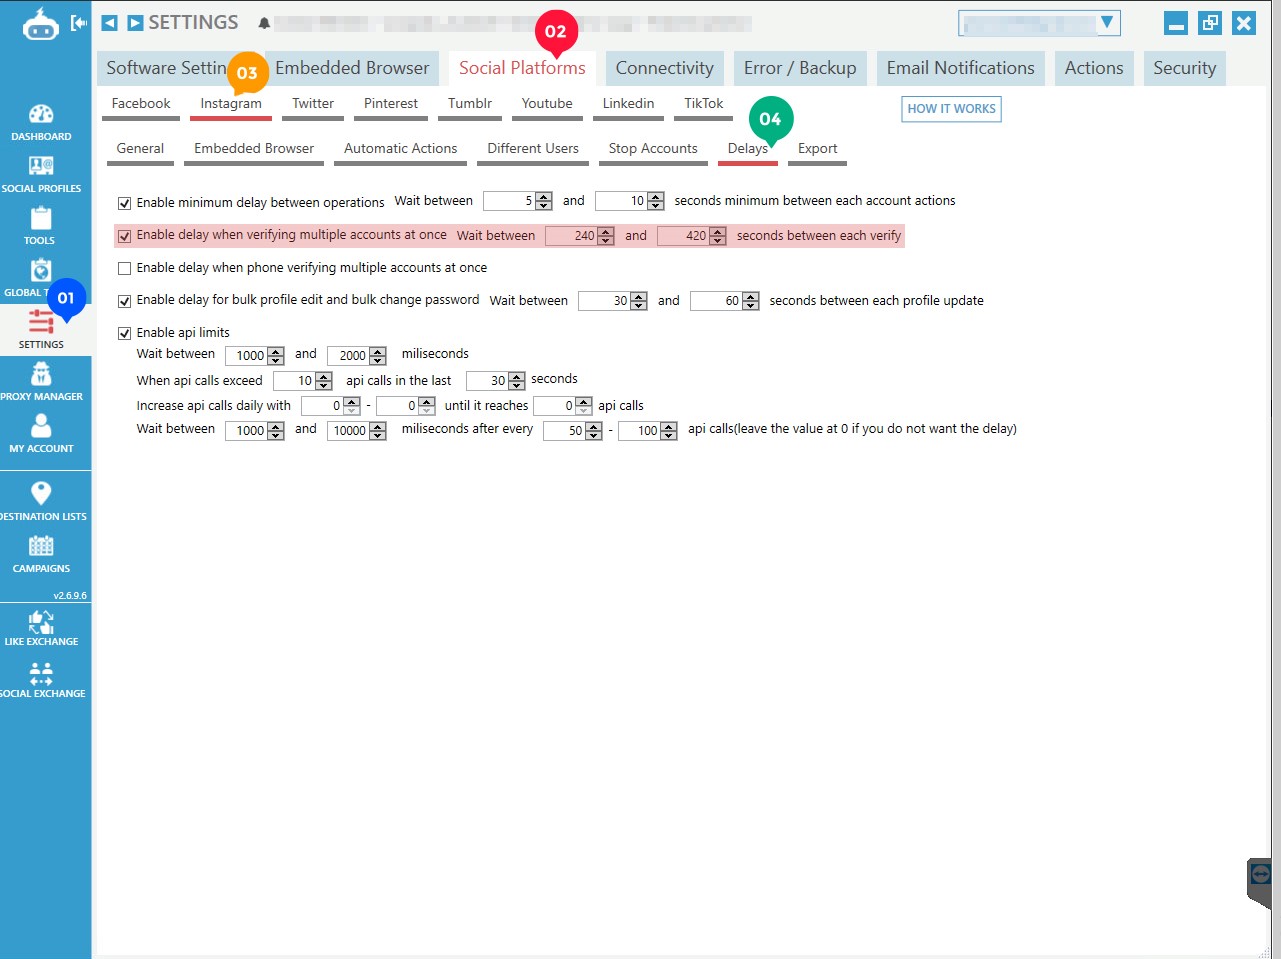
Before we can verify these profiles in bulk, we must make sure certain settings are applied particularly the “enabled delay when verifying multiple accounts at once”. Having a delay between Jarvee verifying accounts in bulk decreases the risk of Instagram verification.
Settings > Social Platforms > Instagram > Delays
We recommend a delay of 240 – 420 seconds. We have seen this to be the optimum delay range when verifying accounts in mass.
Do not verify any accounts yet.
Advanced Profile Settings
Rather than manually inputting the settings on each account we recommend that you create a demo account which contains the advance profile, follow, DM, like, story mode and comment settings which can be copied to all child accounts in 1 click. This account will remain in a pending status and will not require any proxy or a need to be verified, the sole purpose of this account is to simply have the settings pre-set and the ability to copy these settings in mass with a single click. Advanced profile settings will be provided below.
We have 2 demo accounts. After the 21-day warm up settings, we apply a post warm up setting which gradually increases the action tools daily.
Creating The Demo Warm Up Account Settings
Social Profiles > Add profiles > Add Profile
Name your account “Demo Warm Up Settings” and then click onto the “Show Advanced Profile Settings”
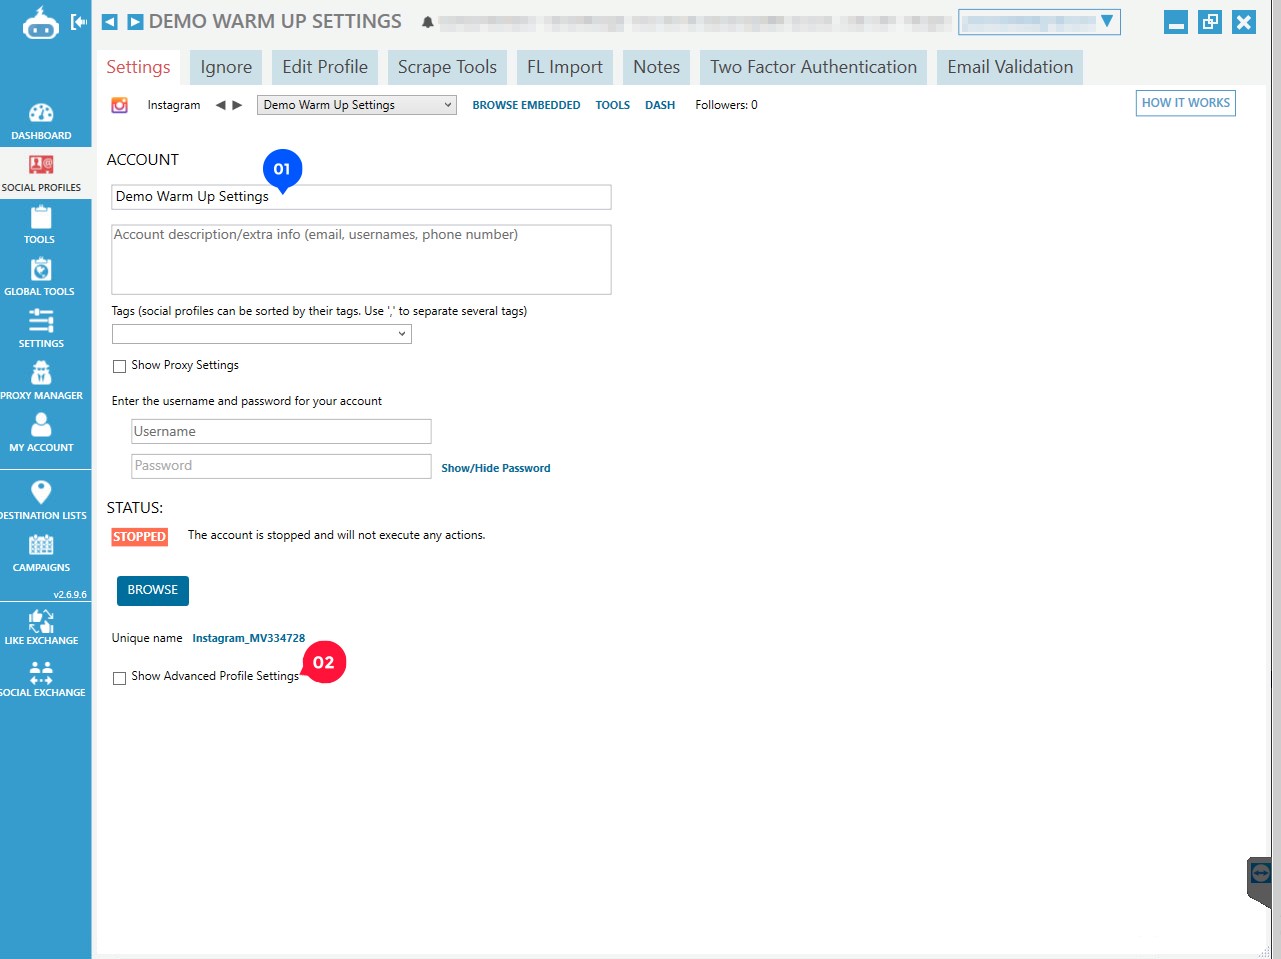
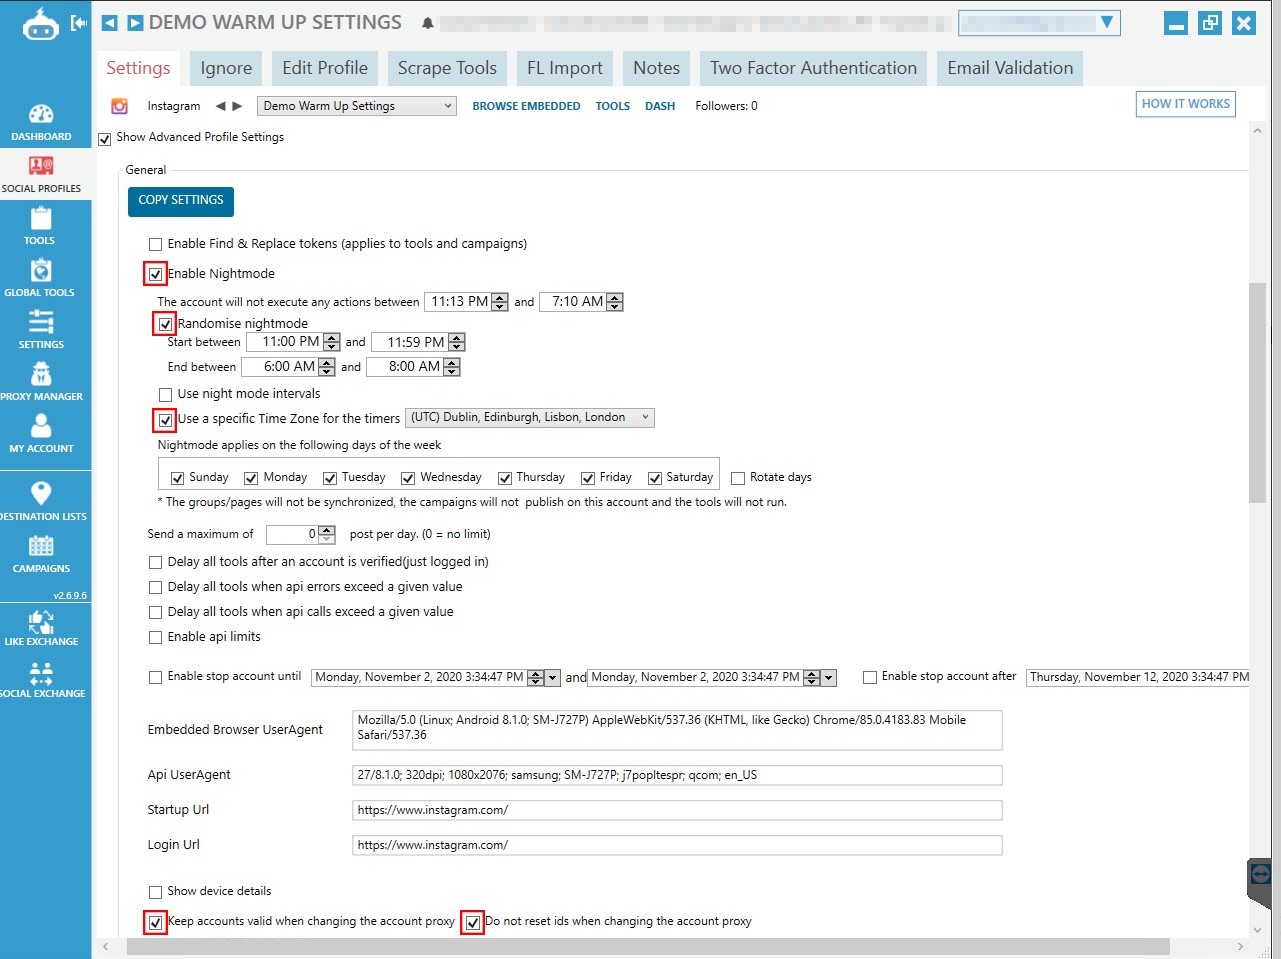
Use the exact settings provided below.
Enable Nightmode: All child accounts will stop executing actions between 11pm – 7am to mimic a realistic human behaviour (sleep pattern).
Randomise Nightmode: This ensures that all child accounts do not become inactive/active at the same time. It is harder for Instagram to detect a pattern when all child accounts have different operational start/end times.
Use A Specific Time Zone For The Timers: Select the time zone that you reside in.
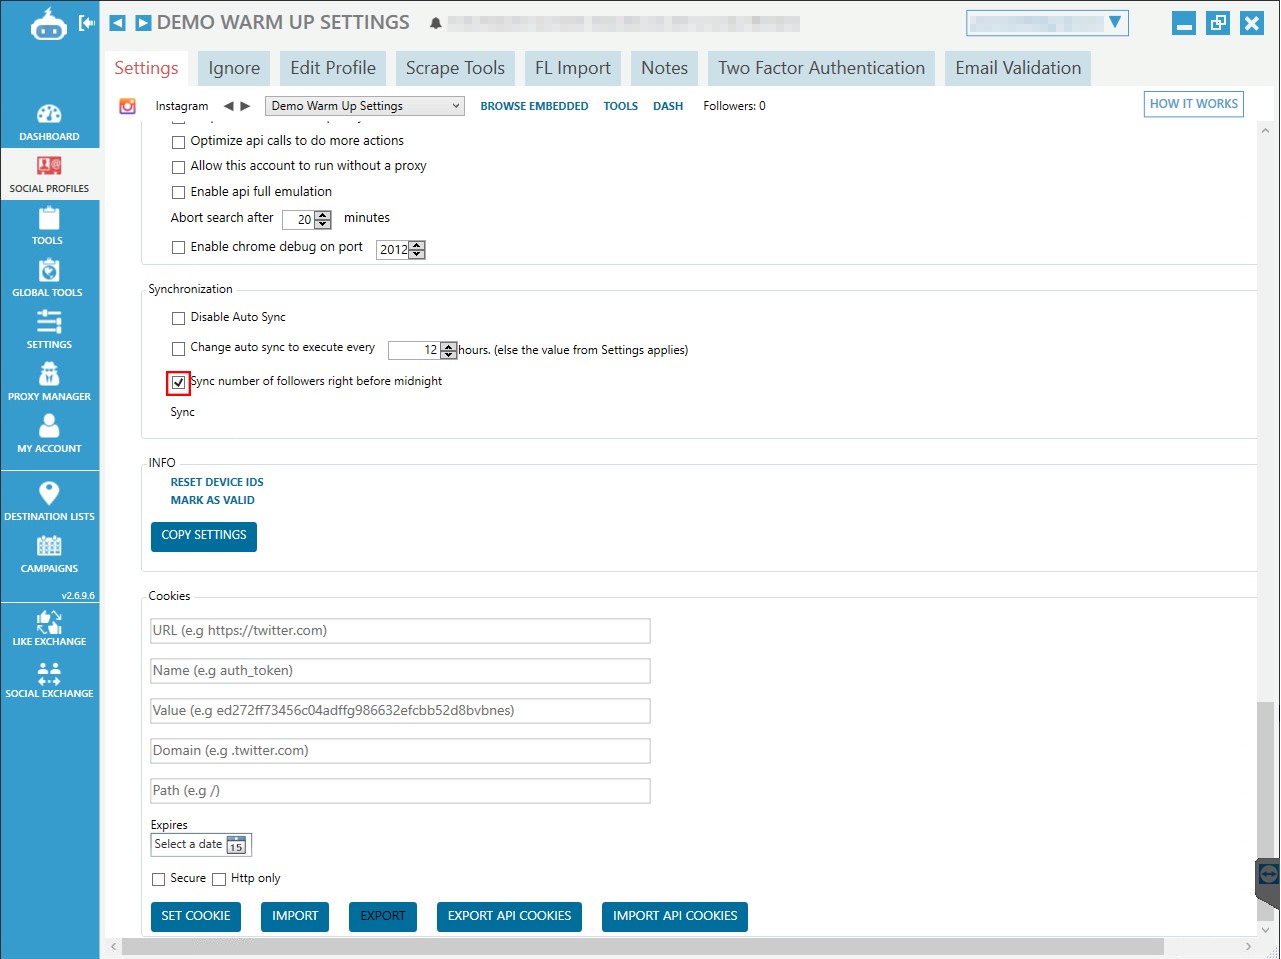
The advanced profile settings have now been configured for the demo account and now we have the ability to copy these settings to the pending child accounts (imported earlier).
Copy Settings > Pending > Select All > [important steps continued below]
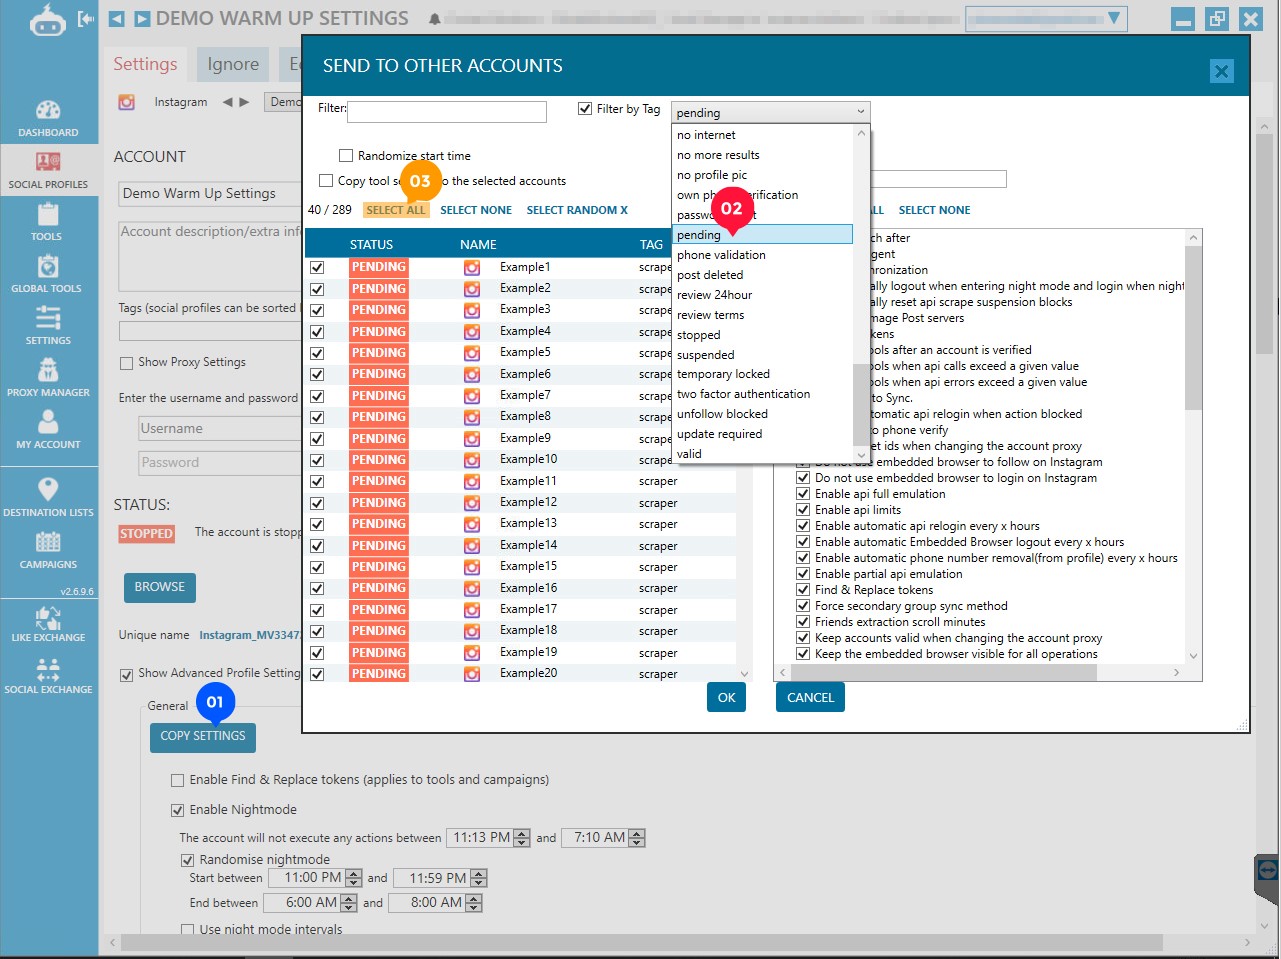
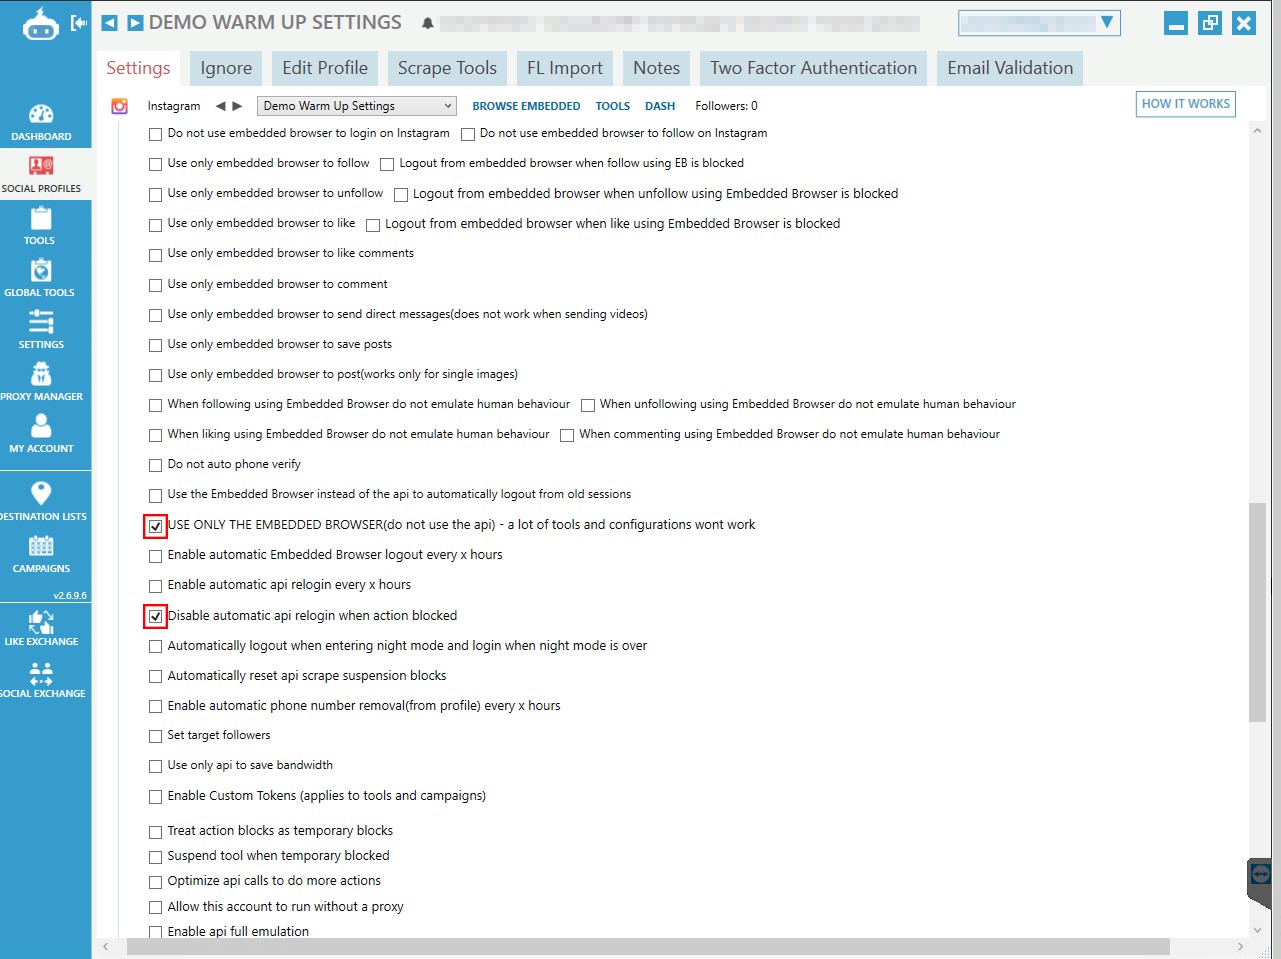
Before apply the settings, it is vital to uncheck options relating to “User Agent”. By unselecting these options, each child account will have its own unique user agent and this helps to avoid detection from Instagram.

After clicking OK the advanced profile settings is now copied to all the child accounts.
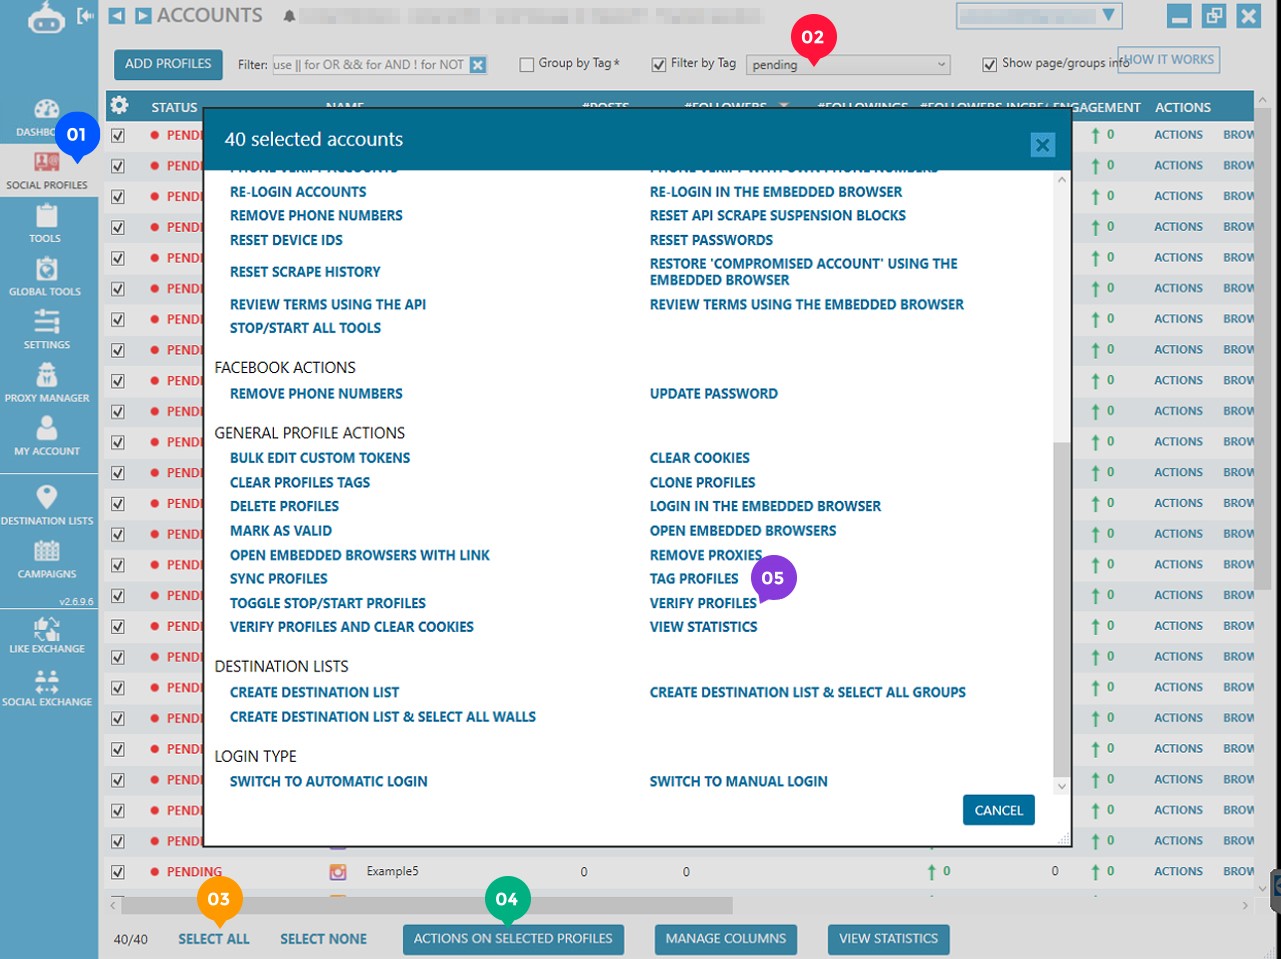
After the delay settings & advance profile settings have been applied, we are now able to verify the profiles in bulk.
Social Profiles > Pending > Select All > Actions On Selected Profiles > Verify Profiles.
This can take 24 hours or more to complete depending on the number of accounts you import. It is beneficial if this part of the process takes time as it decreases the chances of having an issue.
Warm Up Settings
Ensure that you have read and executed the additional steps during the account creation process section of this guide. The additional steps ensure that the new child account has been fully profiled and with a higher trust score. The new child account is now ready to proceed with the warm up settings without the need for a resting period.
Several guides have suggested a warm up period of 30+ days however our method ensures that child accounts are ready to perform an increased level of Jarvee actions after our 21 day warm up. Even after the recent Instagram algorithm updates, we have not faced any blocks or bans during our warm up process.
Warm Up Overview (will be explained further below)
Total warm-up period: 21 days
Day 1: Import accounts. No Tools enabled.
Day 2: Account resting on Jarvee. No Tools enabled.
Day 3: Enable Story view
Day 8: Enable Follow Tool and continue with Story view
Day 14: Enable Contact tool and continue with follow tool and story view
Day 21: Enable Post warm up settings
These warm-up settings will only work if your accounts are manually created and fully profiled with a profile picture, bio and with some interactions performed during the physical account creation e.g. liking and commenting.
Day 1: Import accounts. No Tools enabled
By this stage of the guide your child accounts have been imported and verified with the correct advanced profile settings. No tools on Jarvee will be enabled. The accounts will remain active on the 4G proxy.
Day 2: Account resting on Jarvee. No Tools enabled
All child accounts will remain verified and have an active status on Jarvee without any tools enabled. Our data test on 1,000 accounts displayed better performance on child accounts that have been rested for this addition 24 hours.
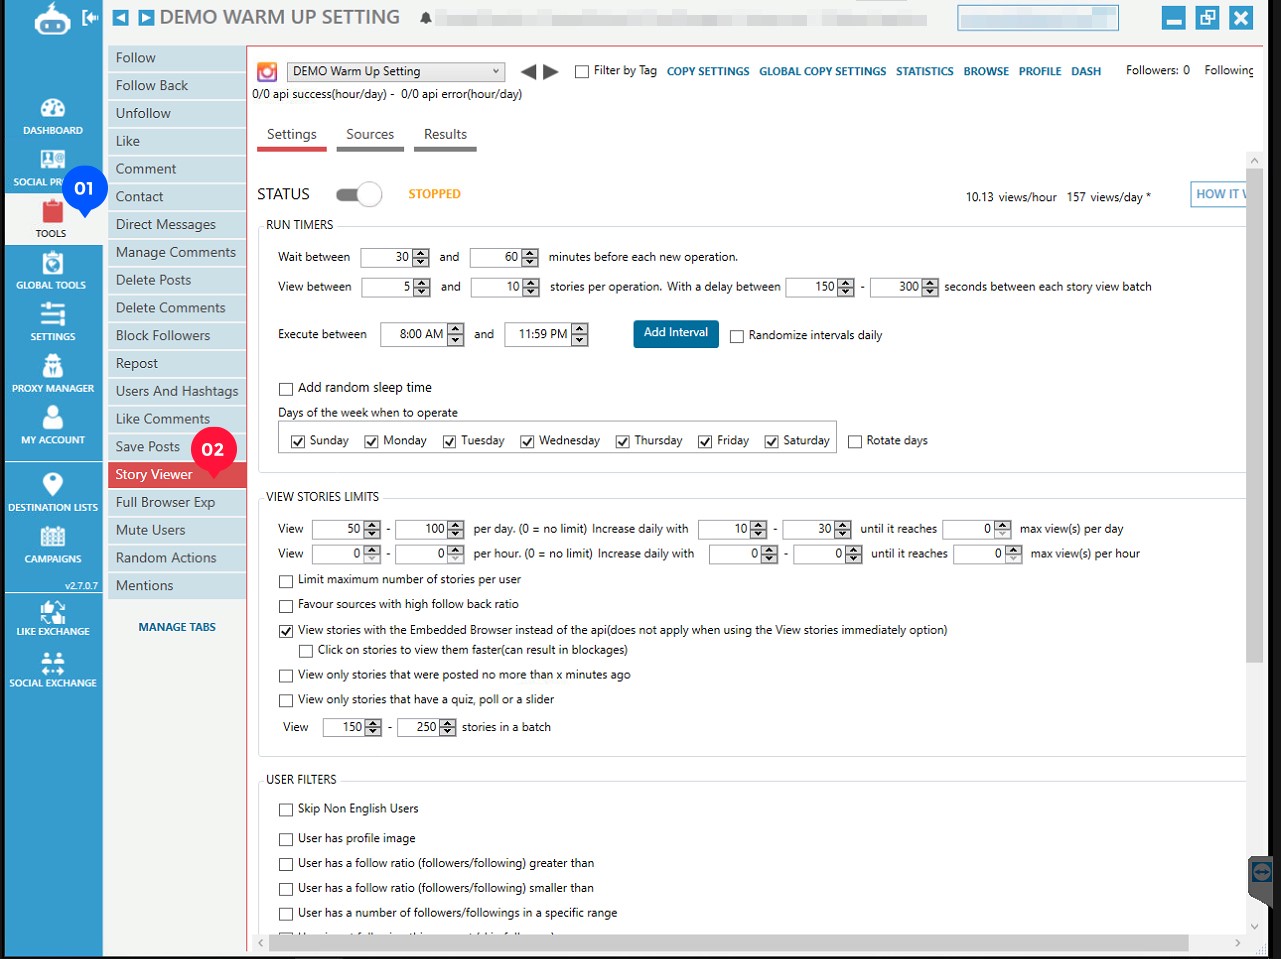
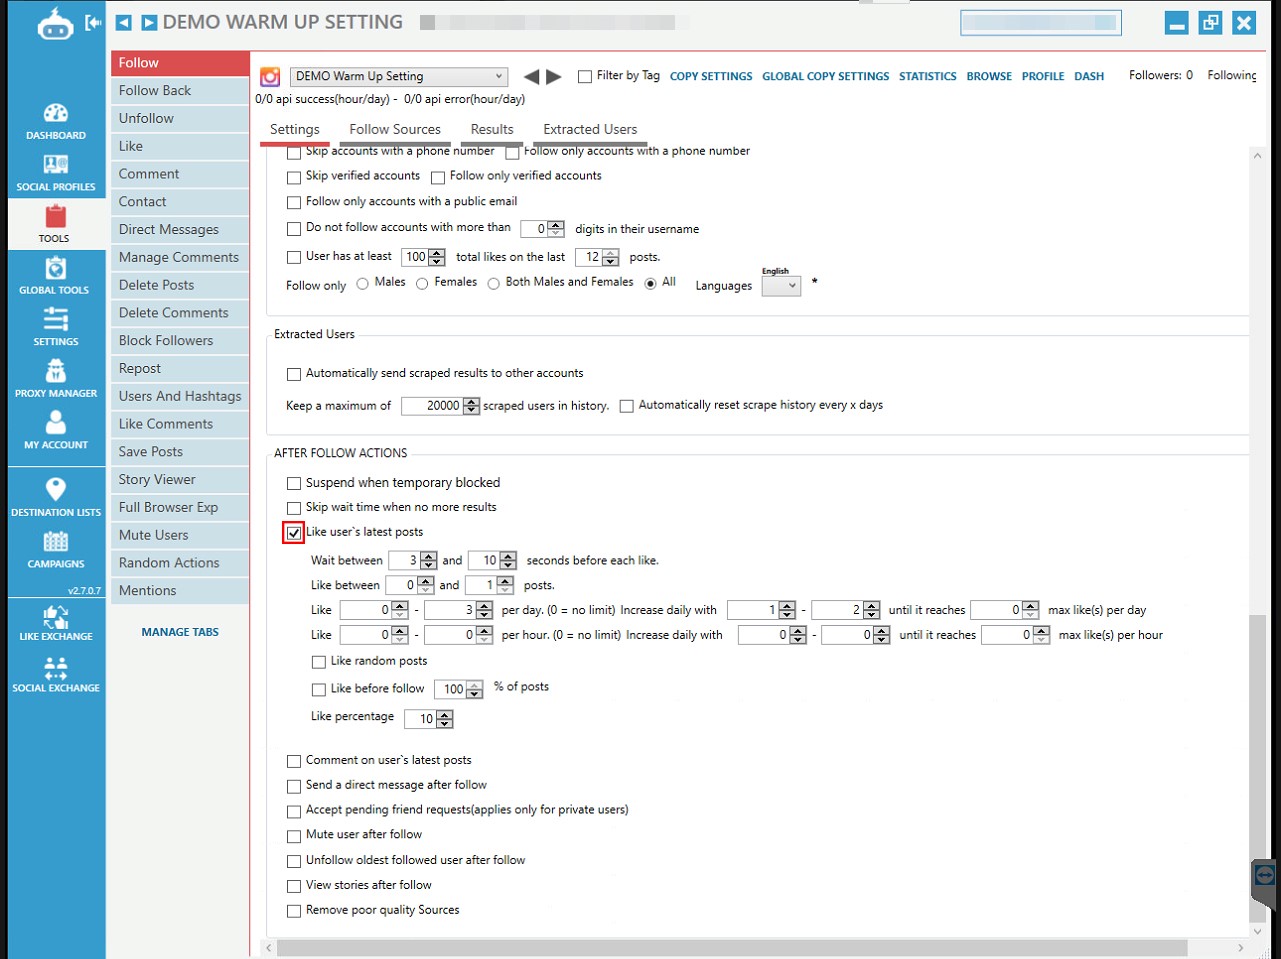
Day 3: Enable Story view
Please ensure that you are replicating the image below.
“USER FILTERS” & “AFTER VIEW ACTIONS” section is all left unchecked.
Story view Source
We use a collection of over 3,000 celebrity username as the source. We use “view stories of specific users” option as the majority of the source is guaranteed to have daily stories.
Please click on the link below to have access to our full warm up story view source list:

Day 8: Enable Follow Tool and continue with Story view


Select the “Follow specific users” option. Paste the celebrity list and then add usernames. This list is used during the warm up period only. Once accounts have been warmed up you will add your own specific user list (explained further above).

Day 14: Enable Contact tool and continue with follow tool and story view
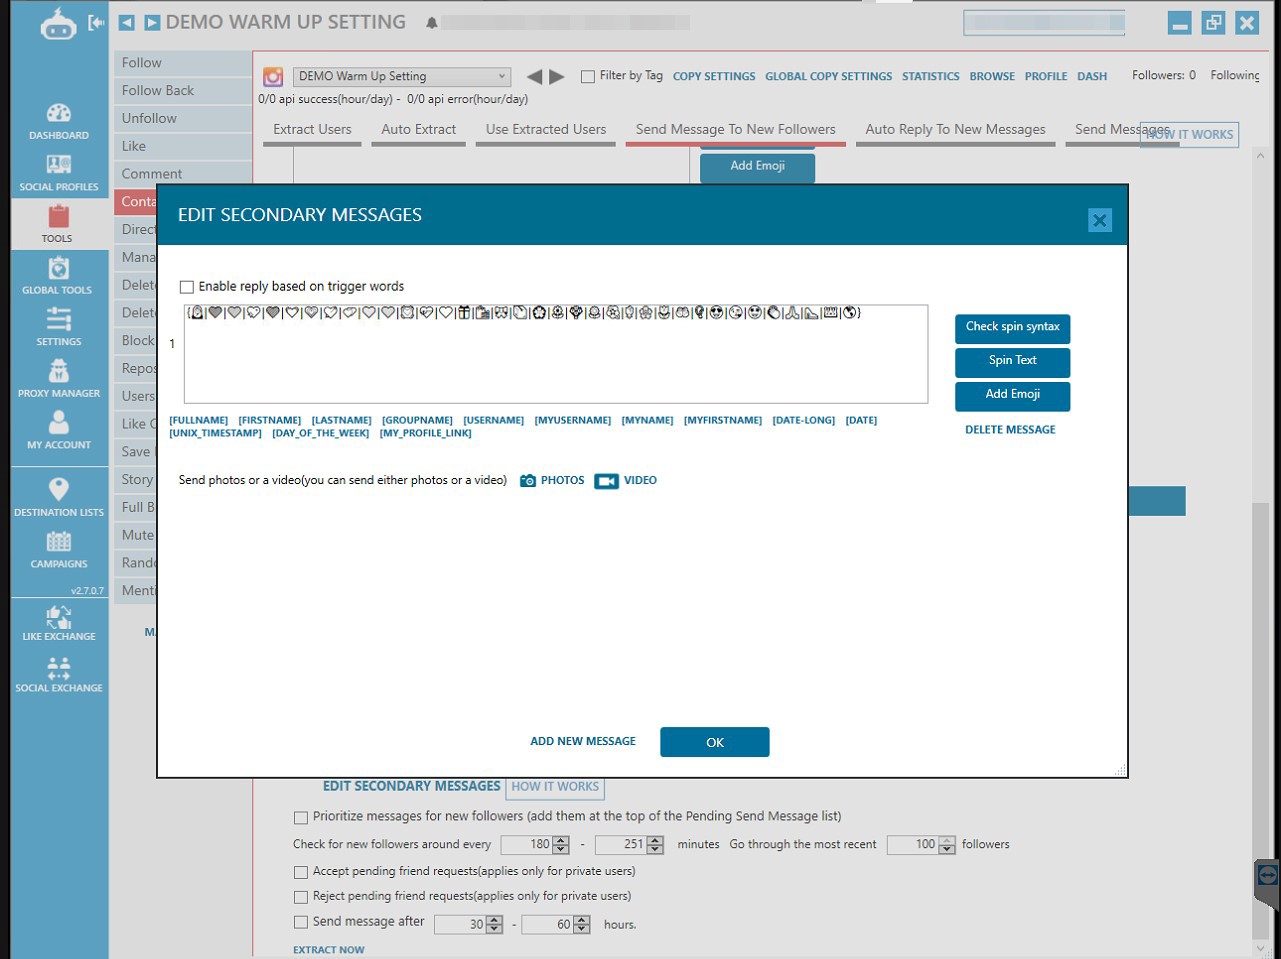
Contact Settings
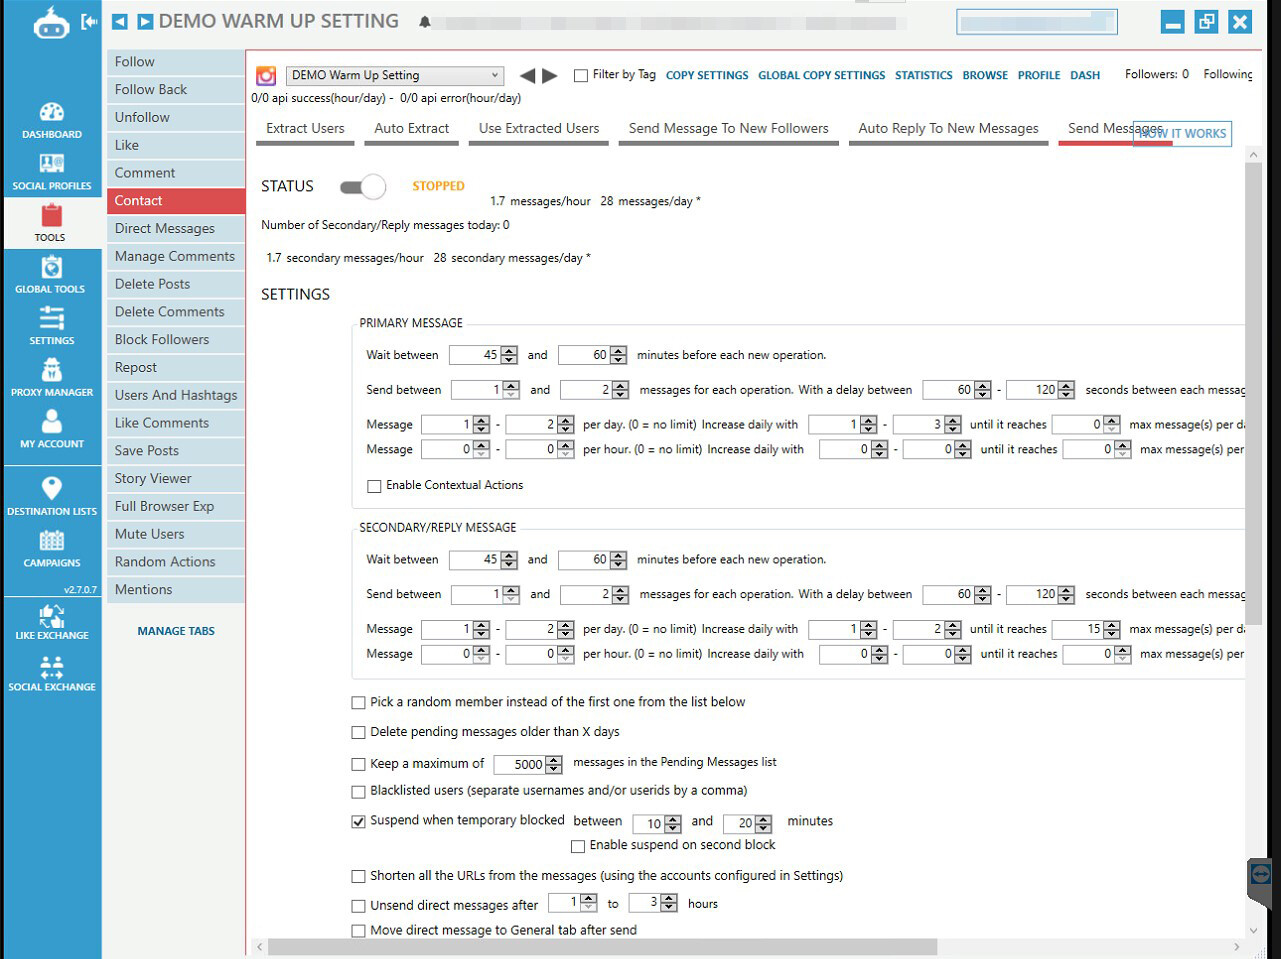
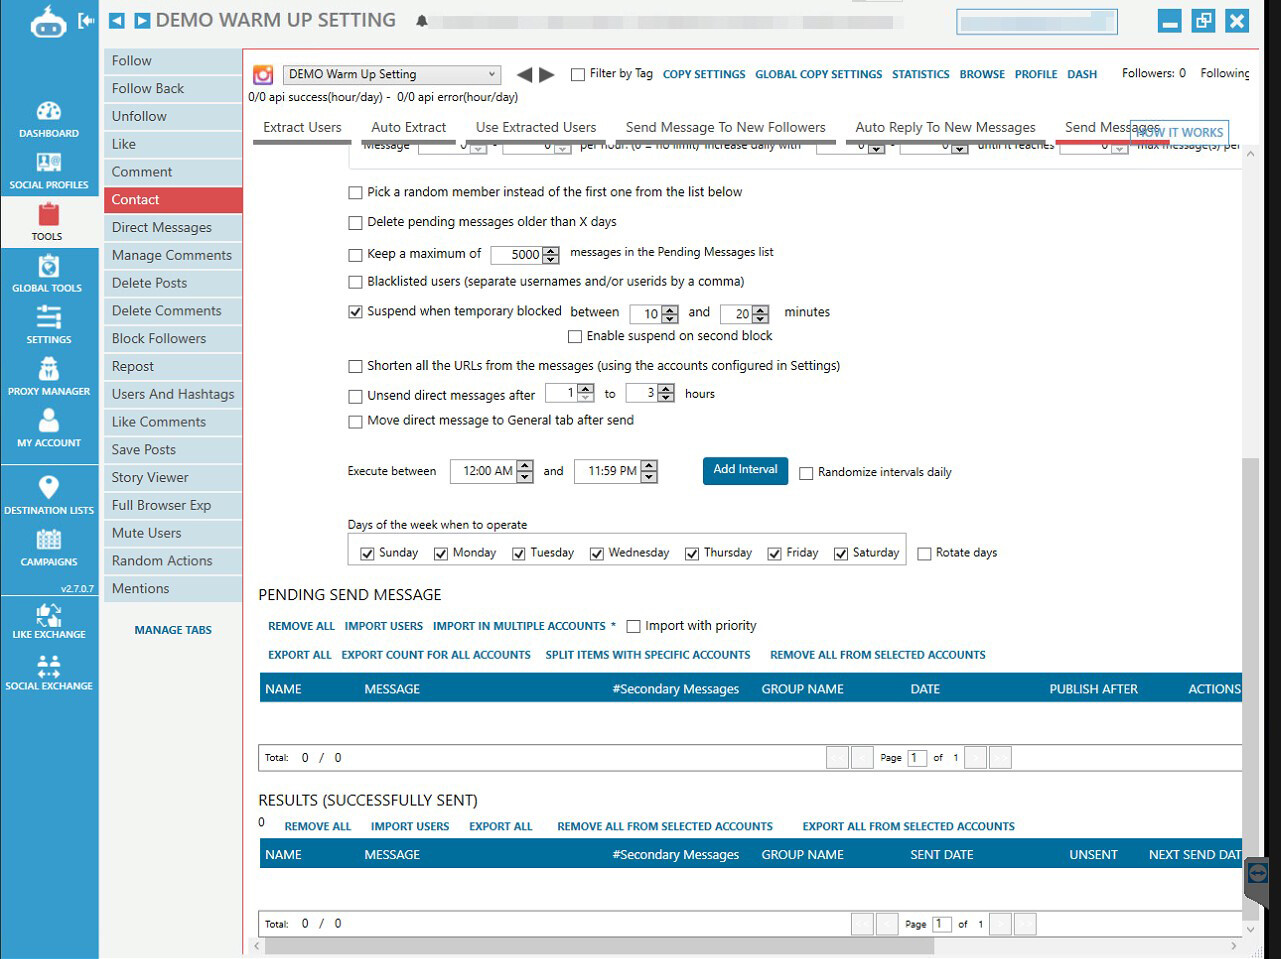
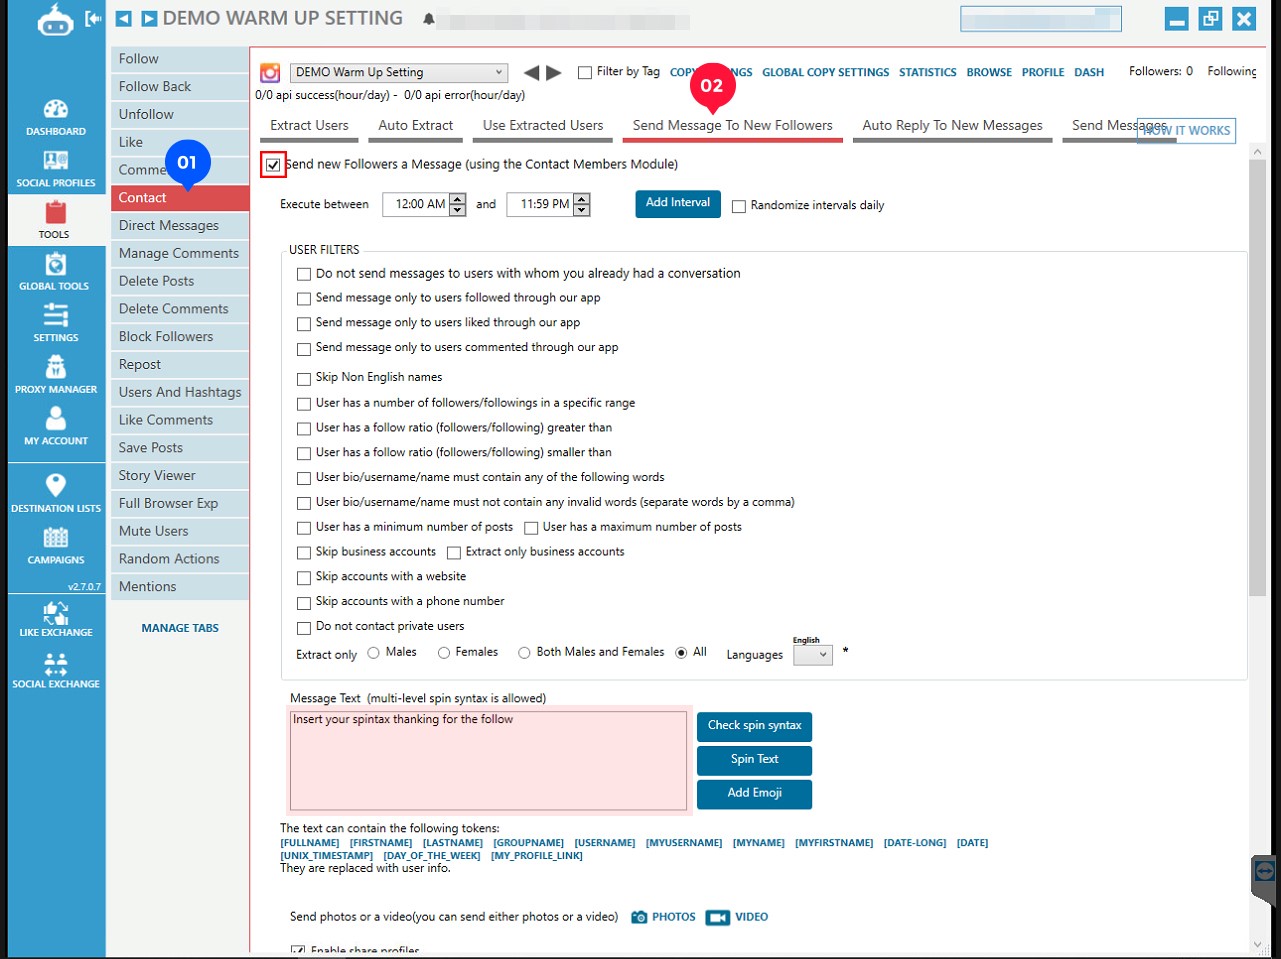
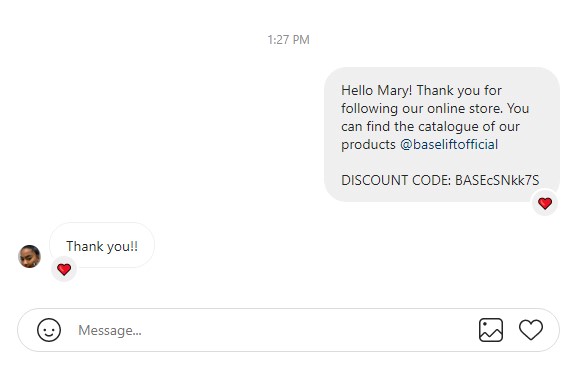
Send Message to New Followers Settings

After the initial direct message, users are likely to respond back. A secondary messaged after a period of 24-48hrs reminds the user of the mother account again and increases the chance of them following back. A secondary message can be kept simple, we have seen using affectionate emojis to be the most effective.
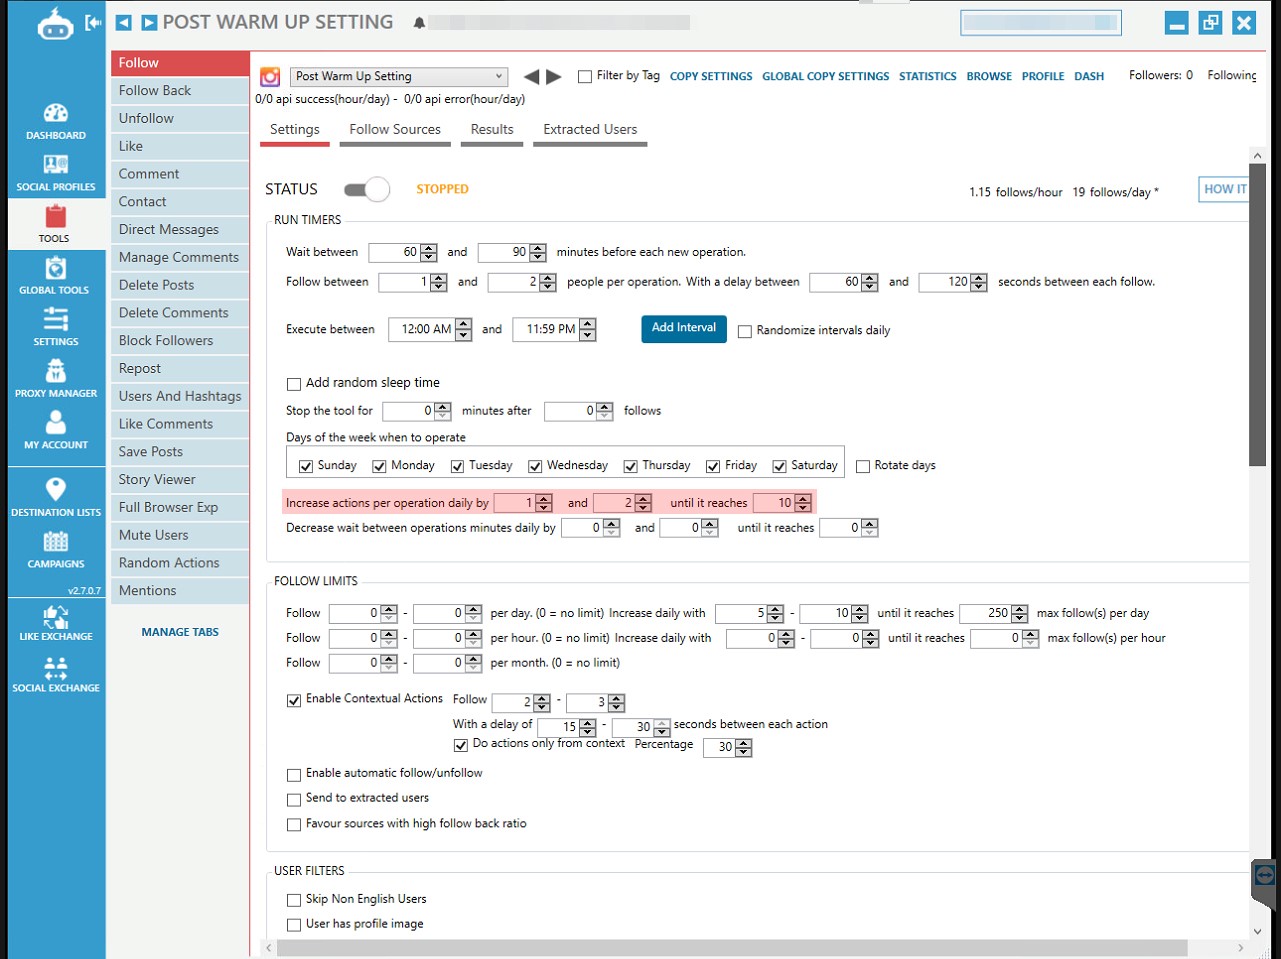
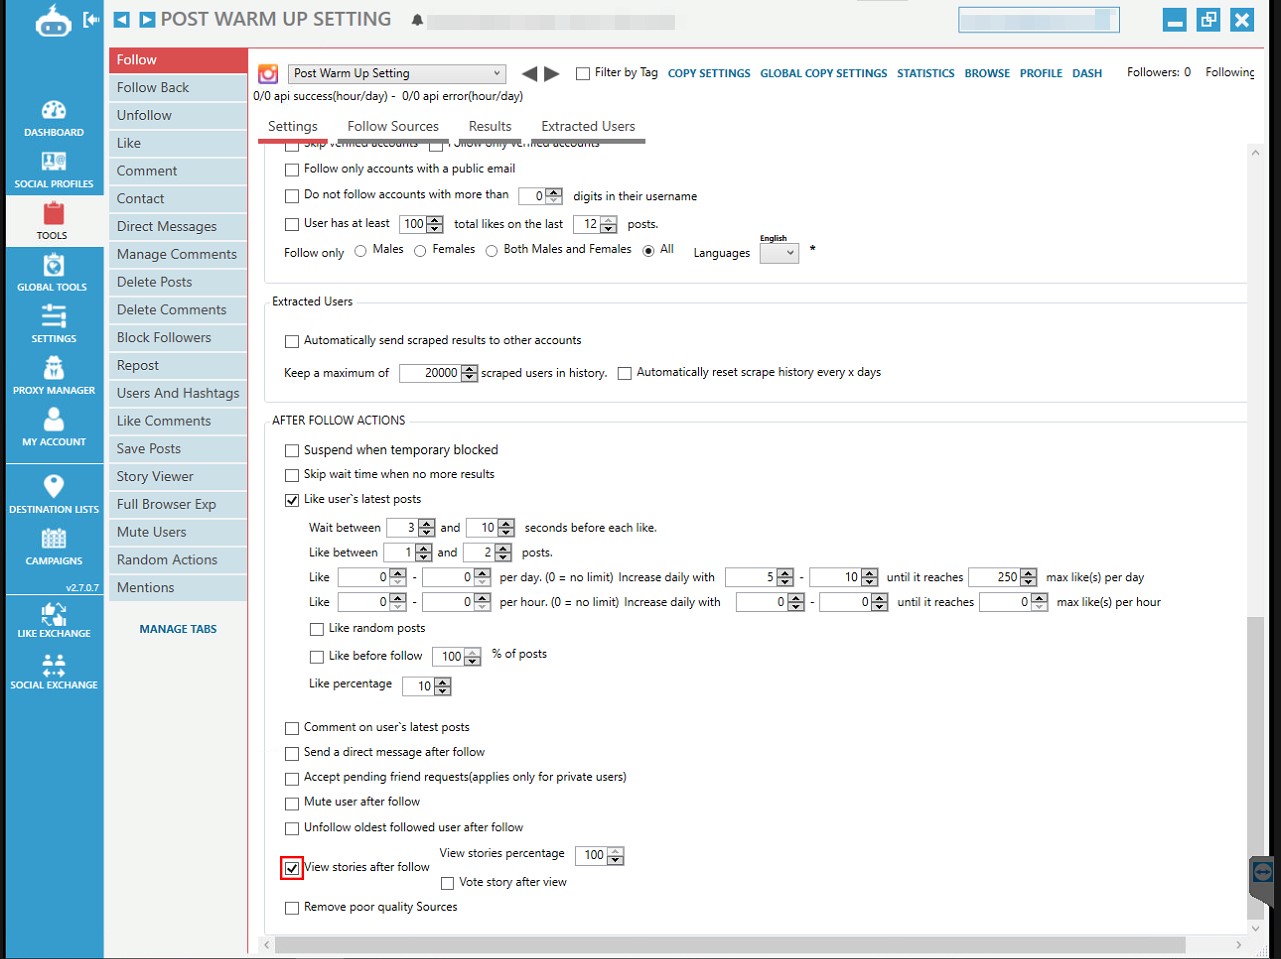
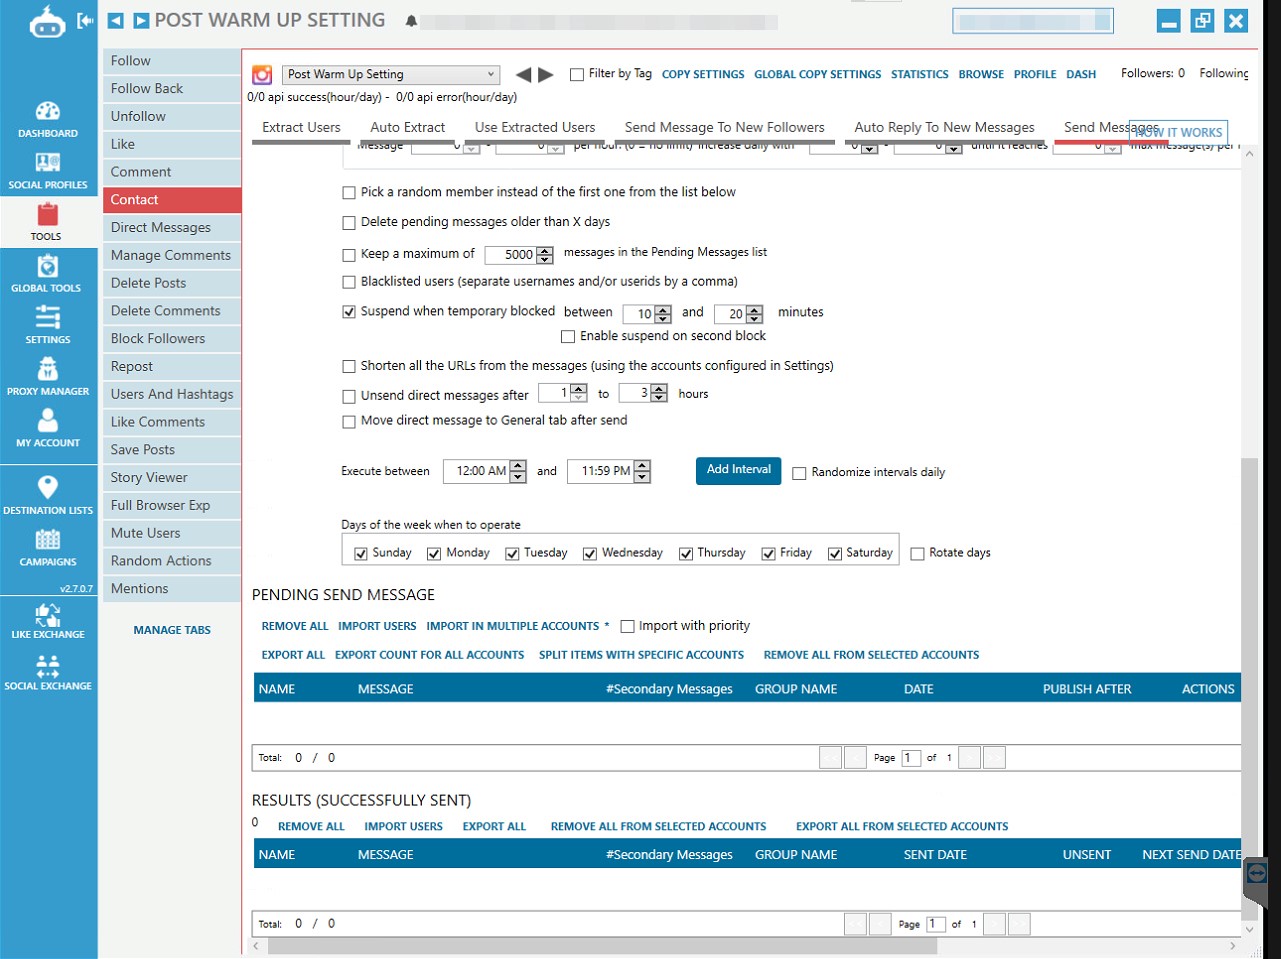
Day 21: Enable Post Warm Up Settings
Similar to the “Demo Warm Up” account, we advise you to create another account labelled “Post Warm Up Settings” which will have the settings provided below ready to be copied to all valid child accounts in a single click.
At this stage disable the Story view tool. We will use the “View Story after follow” in the follow tool section instead.
Post Warmup Follow Settings:

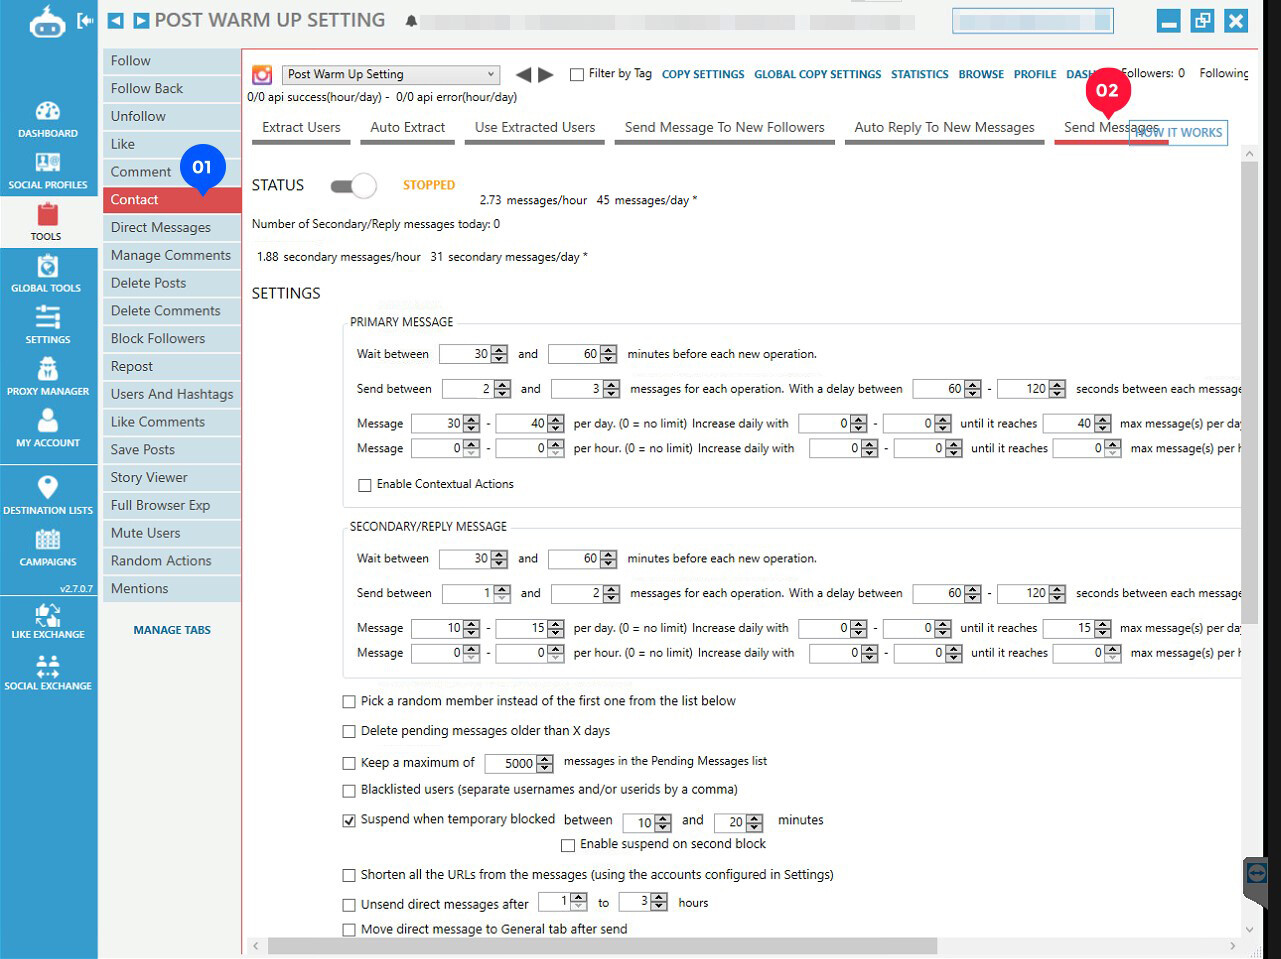
Post Warm Up Contact Settings
Scraper Accounts:
What is a scrapper account? A scrapper account is used purely to obtain data for your child account. Each Instagram account has a number of API actions it can do each month before facing blocks. The scrapper account uses all those API allocations to obtain data and that data is passed onto your child account to action a procedure such as follow, DM, story view and etc.Good scraper accounts can last for several months of continuous use. A good scraper account is one that has been fully profiled, aged and run-in intervals.
A scrapper account as the name suggest should be used to scrape data and then thrown away once the account has been flagged.
Sources:
Obtaining Sources:
In order to obtain a source list we recommend that you find seed keywords in your niche. These keywords will be used to locate larger Instagram pages. There are various online tools that can help you find/display a list of Instagram profiles based on a keyword/s however we saw many inconsistencies with real engagement/relevance to the niche. Often, we would be displayed with profiles which upon inspection would not convert to a goal.
The method we recommend as suggested throughout this guide is search on the Instagram app manually. An in-depth source analysis usually takes a full week to complete, which includes the finding of sources, inspection, engagement, relevancy, popularity and future growth.
A quick search on Google for your niche keyword will display the top-ranking competitors and this can be used as a good starting point to your source list. It is still important to analyse the quality of a source. We use a custom-made bot that analyses a list of sources for various metrics. These metrics include and are not limited to engagement, comment profile checks, frequency of posts, scanning of prohibited words in the comments and our own quality scores for popularity and growth. These checks can be executed manually and can take some time but they are a highly necessary process as it saves time and money (the use of scrapers/Jarvee/data cost) in the long run.
Another method of obtaining your seed keywords is to use Google Keyword Planner. This is a tool provided by Google which allows you to enter a keyword in order to view/evaluate search metrics e.g search volumes. The tool also provides associated keywords, long tail keywords and external but niche related keywords which you may have never considered. This collection of data can be used to find further sources by manually searching on the Instagram app. Other similar free tools include https://keywordtool.io/ or https://kwfinder.com/
Our testing has shown targeting smaller accounts in the initial phase of the mother/child method has resulted in much higher quality follow backs as a result of these smaller accounts being highly engaging, having fewer bots or accounts which follow/unfollow.
A smaller account (<20k followers) is usually more receptive to engaging with its followers resulting in a better source for Jarvee compared to a larger account. We have noticed that smaller accounts are more likely to provide exposure to your mother account by shout outs/mentions on their story without prompt.
Another advantage of manually scanning for smaller accounts is that it helps in identifying large sources in your niche. Smaller accounts tend to follow reputable larger accounts. These larger accounts should be added to your collection of source list.
Instagram profiles can display a message stating this account is “Followed By: [source]”, this is a form of endorsement by an account displaying to its followers that they are following the mother account. Followers of a source are more likely to follow back a mother account if Instagram displays the “Followed By: [source] message”. The mother account can also be displayed on the follow suggestion box to followers of a smaller account as a result of the follow back. This can lead to a natural growth which will complement the mother/child method.
If you are working with clients, another advantage to using smaller accounts during the initial stage is that the results will be quicker as the quality of the followers are higher and more receptive compared to a larger account follower list (1 million+) which often contains ghost profiles, bots and inactive users over the years. The process of starting the mother/child method using smaller hyper active accounts will give you additional time to locate and collect larger sources whilst the client is still able to see results on a daily basis.
We consider a source to be a larger account if it has a following of over 1 million. Although this source may seem large, if you have a 1,000 child accounts running, it can take less than 3 weeks for this source to be depleted. It is essential to gather multiple larger sources to avoid any periods of inactivity from the child accounts. The need to continuously search for sources is decreased when finding a high-quality larger source. This source is easier to maintain and does not require updating often which involves removing existing followers from the source list to avoid duplicate DM’s / followings from multiple child accounts.
When analysing a larger source, if it becomes apparent that many of the smaller sources do follow this bigger account, it is a good indication of the quality of this larger account. When evaluating a larger account, an important note to consider is that a higher number of comments per post does not necessarily mean that it is a good source. We have seen an increased use of engagement pools / pods which results in the same group of people commenting on every post. To an average user, this can display an active account however, this is a false screen of engagement. We advise to avoid adding these accounts to your source list as the followers are less likely to be authentic or may even be purchased. This is another affirmation to manually check each source and the posts individually.
Source Option:
Jarvee has 14 different source options;
• Follow users by hashtag search
• Follow by username/fullname/bio
• Followers of target account
• Followers of own followers
• Followings of own followers
• Follow specific users
• Follow using Geo Location
• Follow users that interacted with posts on target accounts
• Follow users that interacted with post on target posts
• Follow users that tagged specific users
• Follow suggested users
• Follow own story viewers
• Follow from Explore page
• Follow from Explore shopping page
From the list above Jarvee has many options when targeting users. Each has its own merits and different techniques can be used to maximise the full capacity of a source list. A detailed guide can be written for each targeted option however in this guide we will focus on the “Follow specific users” option only.
The follow specific user option allows you to input a list of usernames for Jarvee to interact with its action tools.
Using the specific users option allows you to remove duplicate actions amongst child accounts e.g. follows and direct messages. If multiple child accounts are targeting the same user obtained by using different targeting options e.g. follow by hashtag, it is a waste of resources and duplicate scraper API calls resulting in a waste of actions/time. A user can be deterred to follow a mother account if they have been messaged by several child accounts.
Jarvee does provide a blacklist user option where you are able to provide a list of usernames to block from all child accounts. This is a method of stopping duplicate actions targeting a specific user however this block lists will require to be continually updated daily. This can be intensive on the Jarvee software as each action e.g. each follow will need to be cross checked with the blacklist. If you have 1000+ child accounts this means 1,000 black list checks before an action. This is not the most efficient method to remove or stop duplicate actions.
We find it more manageable to simply export both followers list (mother account & source account) and compare and delete the duplicate followers on a CSV file. This eradicates the use of Jarvee resources. We recommend to review this list on a weekly basis and when inputting new sources.
4G Proxies:
Instagram automation has evolved from using data centre IP addresses to mobile 4G proxies. It has become near impossible to use data centre IP addresses for the mother/child method. Majority of providers are selling abused IP addresses and those who are selling private data centre proxies come at a high cost which is not feasible for the mother/child method compared to having 4G proxies.Data centre proxies are limited to 2-3 Instagram child accounts being connected. These IP addresses are static and do not rotate which is essential for this method.
Having rotating IP addresses allows you to connect a larger amount of Instagram accounts per proxy without leaving a notable footprint. The safest setting that we have found to work with great success in the long term is to connect a maximum of 15 child accounts per 4G proxy. We can say in the past 3 years that we have not come across any issues relating to our proxy settings.
We have tested connecting 30 child accounts per 4G proxy with a shortened IP rotating interval of 15 – 30mins however we have logged errors whilst IPs were being changed. As the IP is being changed more often per hour due to the higher number of child accounts per proxy, that split second of disconnect while the 4G proxy reconnects to the network to provide a new IP has resulted in a higher number of action failures on Jarvee such as sending a DM. If running 1,000 accounts, the number of failures every 15mins can add up and have an effect on your campaign goal e.g. increasing followers.
We have in the past used great providers e.g. Airproxy. As our client base increased, it made more financial sense to create and run our own 4G proxies. A reputable 4G proxy provider will typically charge between £60-£100 ($80 - $135) per month. By creating our own 4G proxies we have been able to decrease the monthly cost per 4G proxy to £5 ($6.73) (after the initial cost of custom software development and equipment expenses). This equates to £0.33 ($0.44) per child account per month. The cost of managing your own collection of private 4G proxies outweighs renting from providers.
New accounts made from one geographical location and then connected to a rented 4G proxy that resides in another location (different country) will often have verification issues. It is easy for Instagram to detect IP hopping on new child accounts. We have always practised and recommend that you create child accounts in the same location as your proxy setup. This allows you to connect a newly created child account to Jarvee in a matter of minutes without facing any verification issues.
Set up cost:
This is the cost involved in running 500 child accounts using in house private 4G proxies. Prices are originally based in GBP £ and have been converted to USD $. Actual product price in USD may vary depending on retailer.Retail Price (Amazon UK):
The calculations below display retail prices on Amazon. When bulk purchasing, costs can be dramatically reduced by 60%+.
Dongle: £40.00 each ($55.00)
Orico Dongle Hubs: £33.00 each ($45.00)
Jarvee - 500 account subscription: £170.00 ($230.00)
Mobile Phones: £150.00 ($205.00) Amazon Price
4G Data Plan: £15.00 ($21.00) each per month
PV Sim Cards: 100 sims for £100.00 ($135.00)
Desktop (minimum ram 16GB i5): £400.00 ($540.00)
Air Conditioner: £300.00 ($400.00)
Power Supply Unit: £25.00 ($35.00)
Initial breakdown of start-up costs to run 500 accounts, you will need the following:
Dongle: Each dongle can run 15 accounts safely.
500 accounts / 15 accounts per dongle = 33 dongles required
33 dongles required x £40 ($54.00) each = £1,320.00 ($1,780.00)
Orico Dongle Hubs: Each dongle hub has 10 dongle ports.
500 / 10 = 50 dongle hubs required
50 dongle hubs required x £33.00 ($45.00) each = £1,650.00 ($2,250.00)
Jarvee – 500 account subscription: £170.00 ($230.00) per month
Mobile Phones: £150.00 ($205.00) Samsung A20e (you can create all 500 accounts using 1 phone but that will take hundreds of hours based on our guide procedures. We recommend purchasing a minimum of 10 phones if you want to scale up whilst saving time / costs).
£150.00 ($205.00) per phone x 10 = £1,500.00 ($2,050.00)
4G Data Plan: £15.00 ($21.00) each per month unlimited data
500 accounts / 15 per dongle = 33 Data Plans
33 Data Plans x £15.00 ($21.00) per month = £495.00 ($695) per month
PV Sim Cards: 100 sims for £100.00 ($135.00)
500 sim cards = £500.00 ($675.00)
Desktop: £400.00 ($540.00)
Air Conditioner: £300.00 ($400.00) one-off cost
Power Supply Unit: £25.00 ($35.00)
Total Setup Cost to run 500 accounts: £6,360.00 ($8,655.00)
(Internet connection + electricity has not been accounted)
Monthly Running Cost after Setup:
Jarvee: £170.00 ($230.00) per month – 500 account subscription
4G Data Plan: £15.00 ($21.00) each per month unlimited data
500 accounts / 15 accounts per dongle = 33 Data Plans
33 Data Plans x £15.00 ($21.00) per month = £495.00 ($670) per month
3 scrapers are required per child account:
500 child accounts x 3 = 1500 Scraper Accounts x £0.75 ($1.00) = £1,125 ($1,515.00)
Scraper IP’s: £200.00 ($270.00) for 166 proxies.
Each proxy can be used with 3 scraper accounts on timed intervals. Whilst some scraper accounts are valid and active, others should be in night mode to avoid blocks / verification.
Total monthly running cost: £1,990.00 ($2,685.00)
We recommend creating your own scraper accounts to decrease the monthly cost by 56% to £865.00 ($1,170.00).
Location:
A highly overlooked aspect and one that we view to be the most important factor when implementing the mother/child setup is the geographic area. Location plays a major factor in the success of your campaign, from the initial child account creation process to rotation of IPs.
Having multiple locations when creating child accounts decreases the risk of using the same IP address. This may become more likely when creating 1,000+ accounts. We recommend using multiple locations when creating mass accounts to ensure 4G IP addresses are not used repeatedly.
A more advanced method involves additional research into reputation, network speeds, cell mast data e.g. using mastdata.com and other paid tools.
Dongle
Dongle Comparison:
If you search on eBay, Amazon or AliExpress, you will find many brands/models claiming to be 4G high speed dongles. We have tested some of the more available and sold brands/versions to see how well they perform in terms of:
- connectivity (important for IP rotation)
- 4G speed / bands
- heat output over time
- antennas
- software features (DHCP option)
- price

Connectivity:
Network reconnection time plays an important factor when it comes to using 4G proxies. In order to change the IP of a 4G proxy, the dongle needs to be rebooted in order to imitate switching airplane mode on/off. The dongle must reconnect to the sim card network in order to gain a new public IP. If the dongle has a slow reconnection time, it has a negative impact on the mother/child campaign as the child accounts will have a longer waiting time to reconnect to the 4G proxy.
Bands:
The LTE standard covers many frequency bands, each with an official designated number. These numbers refer to an actual frequency range in MHz and the territories which support them. If purchasing dongles from AliExpress or Alibaba, you will need to confirm the model being sold has a band within your country. A full list is available at Wikipedia link below: LTE frequency bands - Wikipedia
Heat Output:
It is easy to underestimate the amount of heat produced by a dongle that is running 24/7. When you have a larger number of dongles running consecutively, this can greatly increase the temperature in a room. If you are using a USB hub such as a Orico, you may have 10 dongles inserted per hub. We have noted the temperature of the dongles does indeed have an impact on performance. The hotter the dongle becomes, the more errors we faced with reconnection.
If the dongle is cheaply produced, this can also become a fire hazard. We have over 3,000+ dongles over various office locations in London, each office has its own thermostat AC unit to maintain a constant temperature for peak dongle performance.
Dongle Antennas:
Many brands sell dongles with small attachable antennas supposedly to increase the Wi-Fi range. Our tests results displayed no additional range or speed advantage that would benefit the mother/child method. The antennas did not provide any additional advantages which negates the need to pay extra.
Software:
Different brands provide their own dongle software. It is important that the dongle software is continually updated as it displays the brand’s credibility. Alarmingly, we have come across China brands which were infected with malware and proceed to use the dongle connection for illegal activities such as DDoS attacks. There are a number of dongle software that does not provide you with features such as DHCP which is required when managing your own 4G proxies on a local network.
The following dongles have failed to pass our checks and did not perform well in the long term.

Over the past 3 years these 2 brands/models have performed without fault.

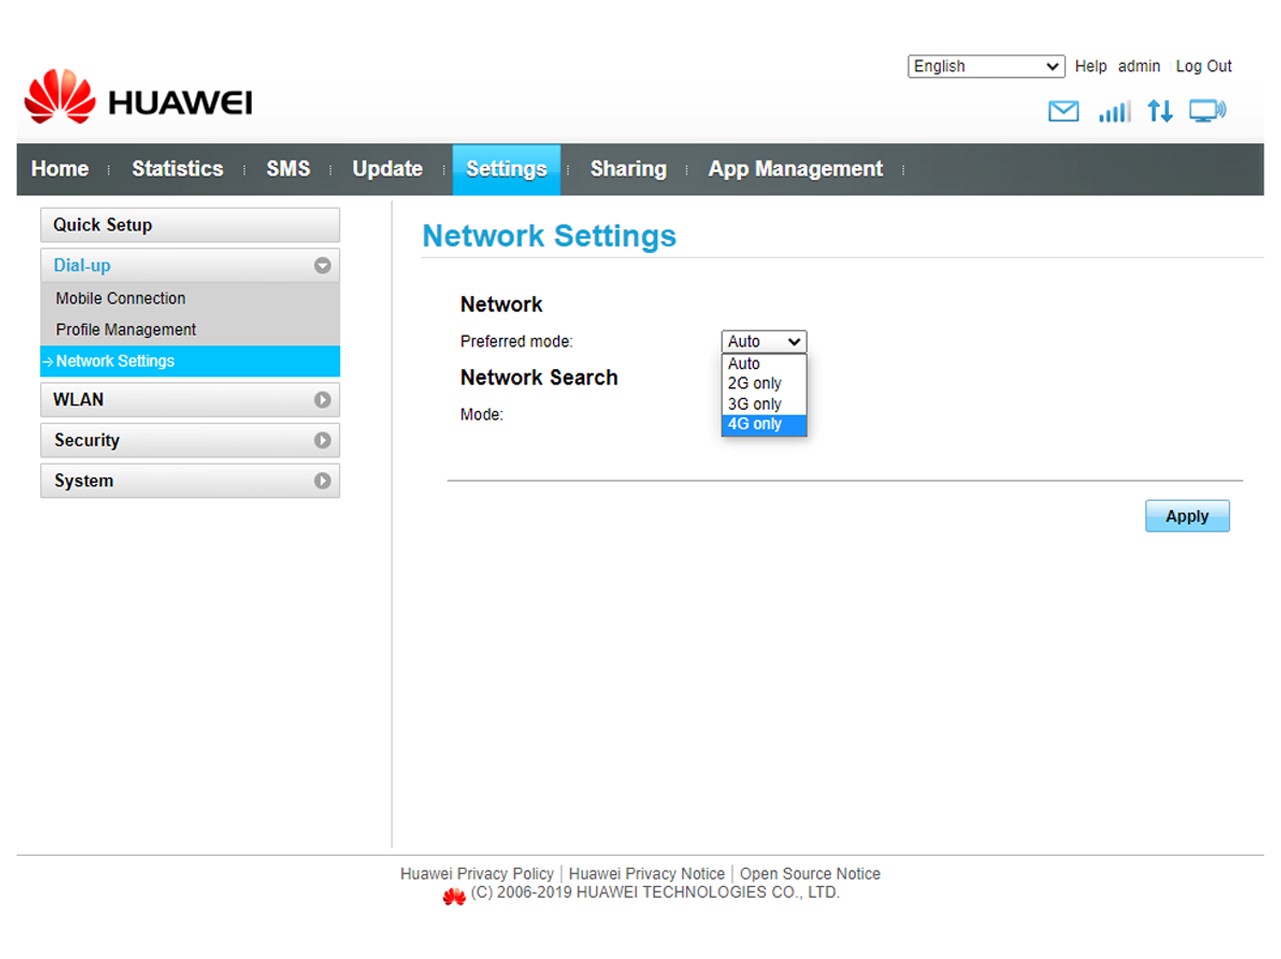
4G Settings:
Pro tip: The network configuration on some dongles are set to AUTO detect, this can result in the network being connected to 3G mode. We recommend changing each dongle setting to 4G only. The number of errors resulting from reconnecting to the network (due to IP rotation) was reduced dramatically with a simple settings change.
Raspberry Pi:
We highly discourage the use of Raspberry Pi (all versions). We have conducted multiple tests and it is simply not a valid option for the mother/child method for the following reasons:
- Performance: It is unable to maintain a higher number of dongles connected. We saw errors from connecting only 7 dongles to each Raspberry Pi. This can be fine if you are running a very small mother/child strategy, however the nature of the mother/child method is to perform bulk actions therefore running a small number of dongles on multiple Raspberry Pi’s is not viable compared to alternatives.
You must remember, each dongle & dongle hub requires a specific power input and after a certain number of dongles / hubs have been connected to the Raspberry Pi, it is unable to provide enough power to support the connections.
- Price: It is too expensive. As of this guide (November 2020) the latest version of 8GB Ram Raspberry Pi can be purchased between £65.00 - £100.00 ($80.00 -$150.00) each. This is nearly triple the price of alternatives that we use from AliExpress. We will not disclose any external sources to protect our business but if you search and look around, you will find 100’s of different brands each selling the same item / hardware specifications with different logos and branding.
The mother/child method can easily become very costly and saving 30% on the initial setup whilst also having a better performance is ideal.
Jarvee Hosting:
The mother/child method requires a lot of actions being completed simultaneously between all accounts. Jarvee is able to complete these actions but the success rate is based on the PC it is installed on.
Jarvee support recommends a maximum of 250 accounts per installation. You are able to purchase a license to run more accounts e.g. 500 accounts however this will need to be split into 2 installation of Jarvee for optimum performance. This means you are able to purchase 1 license but have the ability to run 2 instances of Jarvee each having a maximum of 250 accounts. Jarvee does state a minimum PC requirement to run maximum accounts.
When it comes to running Jarvee you can either purchase a VPS/Dedicated server or have your own private PC which will be running the software 24/7.
For normal Jarvee users (100 accounts or less) who are not using the mother/child method, they are able to use a lower specification VPS/Dedicated server and it will run without any issues. However, to run the mother/child method in bulk (1,000 accounts +) you will be required to upgrade your VPS/Dedicated server to a higher specification which can be costly and adds to your monthly expense.
32GB Hetzner dedicated server costs = £40.00 ($55.00) per month.
12 months = £600.00 ($810.00) including setup fee.
A private PC with the same specifications can cost the same however you own the physical machine whereas a rented VPS/Dedicated server becomes a monthly expense.
How much power does Jarvee require?
Determining the technical specifications of the computer or VPS where you will be installing JARVEE would greatly depend on how many social accounts and the activities you wish to automate on each of the said accounts.
For instance, on normal usage, which means using 2-3 social accounts and posting up to 10 posts per day with each of them, a computer with 2GB of RAM and 2 Cores CPU should work fine.
Therefore, if you are looking into adding and automating more social accounts, you will need a more powerful computer. 10 or more social accounts require at least 4GB of RAM.
We recommend a minimum of 32GB ram, i5 and Windows 10. Any specifications below these recommendations greatly reduce the number of activities on Jarvee. We highly recommend you own a physical machine as this will outweigh the cost of renting a VPS/Dedicated server in the long run.
Website Hosting:
If your conversion goal is to make sales on your website, you must ensure that your hosting plan is adequate to handle the number of visitors per day. We do not recommend cheap $1 hosting companies as we have seen websites crashing and being timed out.
You should increase your hosting plan based on the number of active child accounts. We recommend having a dedicated server for your website and strongly suggest avoiding shared hosting. Before moving our hosting in-house (to save additional cost) we used Hetzner and OVH dedicated servers without any faults.
Measuring Results:
There are 2 means of measuring how successful a specific source is performing, the follow back ratio and sales. Understanding the performance of a source allows you to make quick and decisive changes such as removing/replacing a source.
It is easy to measure the number of Instagram users visiting your website using Google analytics (All Traffic > Source/Medium) however this doesn’t identify which Jarvee source has the highest conversion rate.
A method that we use to differentiate which source has the highest conversion rate is by implementing a discount/coupon code strategy.
If you are using the mother/child method and your campaign goal is to increase sales, it is difficult to monitor where that specific conversion came from as you will be using multiple source lists.
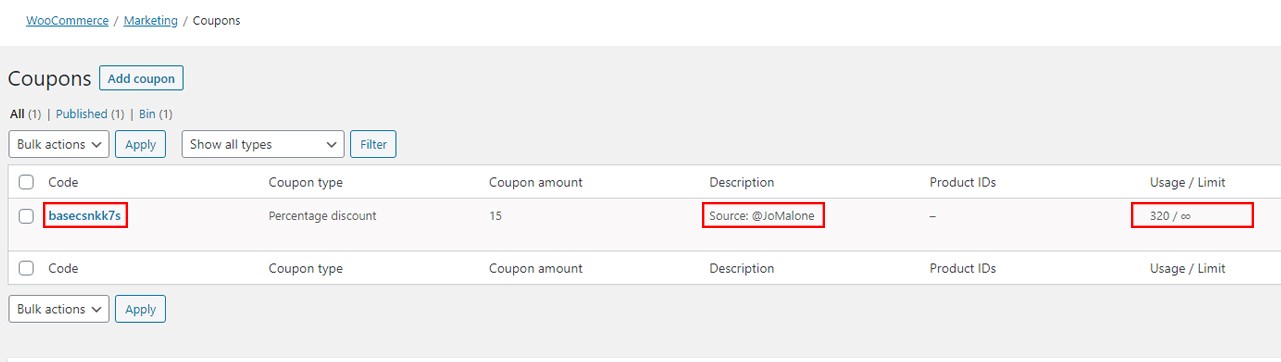
By assigning a unique discount/coupon code for each particular source, it will enable you to differentiate where the conversion has come from. This method requires you to send a direct message to the followers of a source with a unique promotion code. When a sale is generated using this method, we found that 97% of the purchasers from Instagram applied the code sent by DM onto the website’s checkout. This helps us to establish where the conversion has come from as you’ll be able to match the unique promotion code to the source list.
If you are using WooCommerce you are able monitor the number of times a DM code has been used (WooCommerce > Coupons).
Pro tip: When sending a direct message using the child accounts, we recommend you spintax the main body of the message. Having multiple variation of direct messages will decrease your child accounts from being action blocked/delayed on Jarvee as the accounts will be less likely to be flagged for spamming.
Analysing Follow Back Results Per Source
In the example below, the mother account has a follower count of 100,000 before the campaign has started.
Mother account: 100,000 followers
Source (e.g. Manchesterunited): 50,000 followers
Mother account (after 3 days of mother/child campaign): 135,000 followers
A source of 50,000 followers was used in the campaign and after 3 days the mother account had a follower count of 135,000 (an increase of 35,000 followers).
In order to see if the increase of followers is a direct result of the source, you will need to compare the extracted followers list of the mother account (after the campaign) with the source list.
Pro Tip: For a better comparison, you should extract both followers list before the campaign starts and remove any current users from the mother account which are also present in the source list. This will provide a true final result without duplication or past followings being registered.
Result:
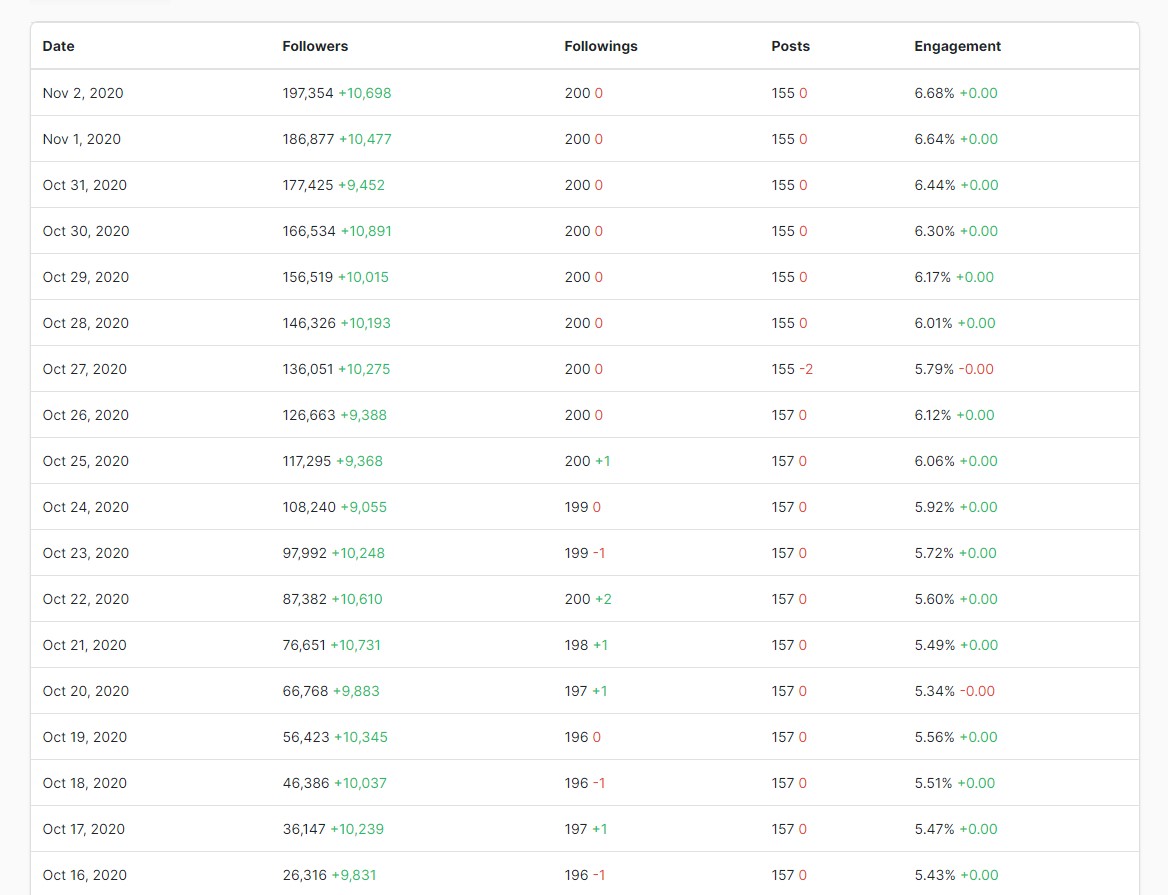
Here are the results from a recent client who had 1,000 child accounts set up.
Duration: From October 16th – November 2nd (after the 1 month warm up period)
Growth: 171,038
Average comments per post: 1,500 – 2,000
Average likes: 17,500 – 20,000
Website Analytics & Website Conversation Results:
Gaining followers doesn’t mean anything unless they convert into the clients end goal e.g. in the example above it was to increase online sales. This particular client had an on-trend product selling a gaming plush toy (Among Us toy) for £9.99 ($13.50) excluding shipping.
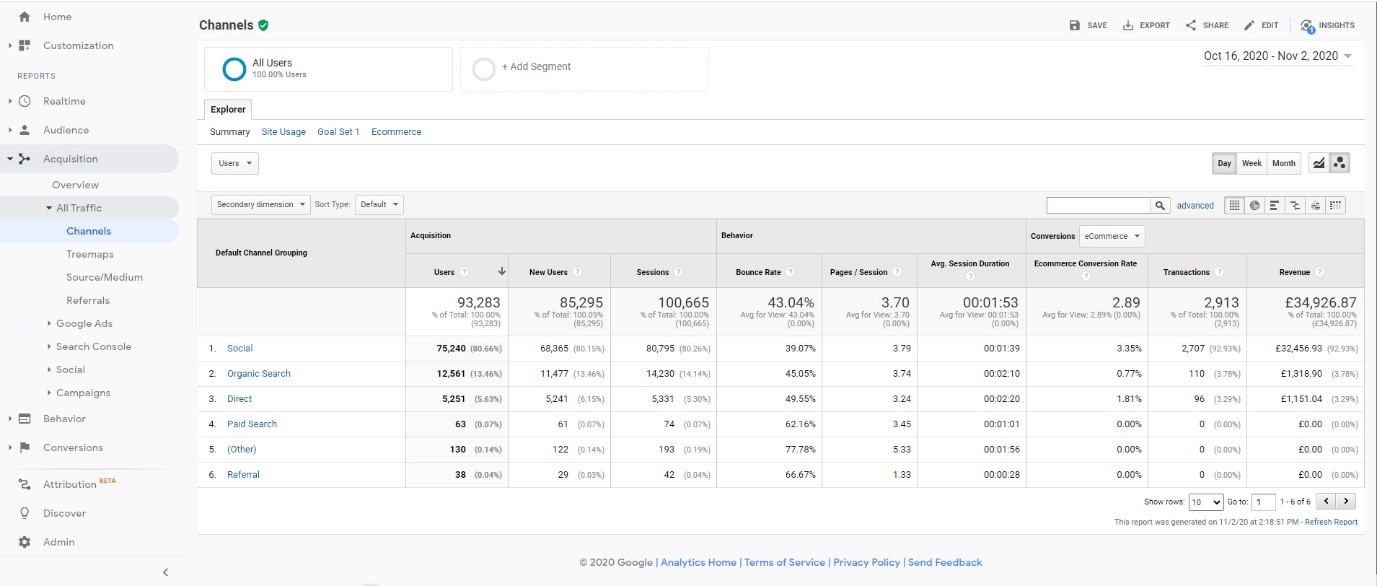
As you can see from the Google analytics data above within a span of 3 weeks, they had obtained sales of above £30,000 ($40,360.28) from social media (exclusively from Instagram) directly benefiting from the mother/child method.
171,038 Instagram followers were gained from October 16th – November 2nd
44% continued to visit the website.
From that 44% (75,240 visitors) the client gained a 3.35% in conversions. The research, selection of the sources and filtering had resulted in exactly £32,456.93 ($43,665.70) of product sales. This can be fine-tuned to increase sales further.
For this particular niche the client is spending a total of £4,000 ($5,381.37) per month (1,000 accounts). After 2 months the client had benefited from this method greatly and has made a return/profit on their investment.


 I’d love to hear about the issues you’re encountering running this many slaves IG wise ever since the updates

